
If you’ve ever tried to remove a background from an image, you know how tedious it can be. Tools like Photoshop or Figma work great, but they don’t scale when we need to process hundreds or thousands of images. That’s where automation (and a little bit of JavaScript) comes in.
Cloudinary makes it incredibly simple to remove backgrounds with JavaScript. Instead of writing a custom algorithm or relying on bulky desktop apps, we can send our image to Cloudinary and get back a transparent version in seconds. Best of all, it plugs right into our existing front-end code.
Here’s what we’ll cover:
- Setting up a JavaScript project with the Cloudinary SDK.
- Uploading images and applying the background removal effect.
- Delivering transparent PNG/WebP outputs.
- Combining background removal with other effects like overlays.
- Embedding everything into a modern web workflow.
Setting Up Your JavaScript Project
Before we start to remove backgrounds with JavaScript, we need a place to work. This means setting up a small JavaScript project and pulling in Cloudinary’s SDK.
Installing Cloudinary JavaScript SDK
If you’re running Node or bundling with tools like Vite or Webpack, just install via npm:
npm install cloudinary
Now, we will create a new directory, e.g., background-removal-demo, which would contain index.html, app.js (optional if you keep scripts separate), and a sample image for testing purposes.
Uploading Images to Cloudinary
Next, let’s upload an image we want to test with. This can be a product photo, a headshot, or even a meme. For this, you can first create an account on Cloudinary and copy your credentials from the dashboard.
We will use the following code in upload.js to upload with Node:
import { v2 as cloudinary } from 'cloudinary';

cloudinary.config({
  cloud_name: "cloud-name",
  api_key: "api-key",
  api_secret: "api-secret"
});

cloudinary.uploader.upload("sample.jpg", {
  folder: "background-demo"
})
.then(result => console.log("Uploaded:", result.secure_url))
.catch(err => console.error(err));
Here, we will replace cloud-name, api-key, and api-secret with our copied credentials.
We can run the following command to execute the script:
node upload.js
This prints a secure URL, which is our image in Cloudinary. The URL contains our image’s public ID too, which we can copy for later. At this point, our image is safely stored in Cloudinary. Now the fun part begins!
Using Cloudinary’s Background Removal with JavaScript
Here’s where the magic happens. Instead of wrestling with masks and layers, all we do is apply a single transformation.
Applying the Background Removal Effect
With one line, Cloudinary can strip the background for us:
const url = cloudinary.url("sample.jpg", {
  effect: "background_removal"
});
Notice how we didn’t need to install an AI library, set up TensorFlow, or spin up a GPU cluster. Cloudinary handles the AI model in the cloud and simply returns a URL pointing to the transformed image, letting you focus on your app instead of infrastructure.
Running the Transformation with JavaScript
We can see it in action by setting the transformed URL as an image source:
document.getElementById("preview").src = url;
So, in our app.js (or inline <script> in index.html) will contain the following:
// Initialize Cloudinary with your cloud name
const cl = cloudinary.Cloudinary.new({ cloud_name: "cloud-name" });

// Basic background removal
const url = cl.url("background-demo/p-id", {
  effect: "background_removal"
});

// Display result in page
document.addEventListener("DOMContentLoaded", () => {
  document.getElementById("preview").src = url;
});
Note that in the above code, we will replace cloud-name with our account’s cloud name and background-demo/p-id with the public ID of our uploaded image.
The complementary HTML in index.html can have the following code:
<!DOCTYPE html>
<html>
<head>
  <title>Cloudinary Background Removal</title>
  <script src="https://unpkg.com/cloudinary-core/cloudinary-core-shrinkwrap.min.js"></script>
  <script src="app.js" defer></script>
</head>
<body>
  <h1>Background Removal Demo</h1>
  <img id="preview" alt="Preview" />
</body>
</html>
Now to see it all in action, all we have to do is first run the upload.js file to upload the local image to Cloudinary. Here is our sample image:

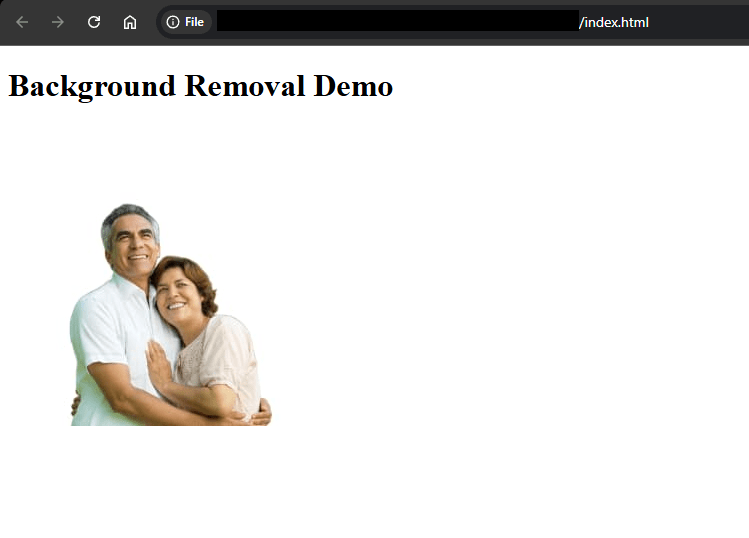
Then we open index.html in our browser to view our image with the background removed:
Working with Transparent Outputs
Removing the background is great, but usually, we want the subject on a transparent canvas so it can sit on any website background. That’s where next gen formats like PNG and WebP come in.
Outputting PNG or WebP with Alpha
We can force transparency by adding this to our app.js and displaying transparentUrl instead of url:
const transparentUrl = cl.url("background-demo/p-id", {
  effect: "background_removal",
  format: "png"
});
Now the image has an alpha channel, meaning it can sit on light, dark, or patterned backgrounds without clashing. WebP works just as well, often at smaller file sizes.
Combining with Other Effects
Background removal is usually just step one. Once the subject is isolated, we can do some pretty fun things with it.
Adding Overlays or New Backgrounds
To put our subject on a colorful background, all we need to do is add the following to our app.js and display newBGUrl instead of url:
const newBgUrl = cl.url("background-demo/p-id", {
  effect: "background_removal",
  background: "lightblue"
});
Chaining Transformations in JavaScript
We can even chain multiple transformations, like adding shadows, resizing, or overlays:
const chainedUrl = cl.url("background-demo/p-id", {
  transformation: [
    { effect: "background_removal" },
    { effect: "shadow" }
  ]
});
Now the background is gone and the subject has a soft drop shadow, making it pop off the page. You could chain resizing, cropping, or even overlays to create production-ready assets without leaving your code.
Embedding in a Front-End Workflow
Adding this process to our existing front-end setup requires just a few steps.
Using with React, Vue, or Vanilla JS
For React, we can just drop the transformed URL in an <img>:
<img src={cl.url("background-demo/p-id", { effect: "background_removal" })} alt="Removed background" />
For Vue or plain JavaScript, the same logic applies. We just bind or set the src attribute.
Triggering on Upload or Button Click
If we want to let users remove backgrounds themselves, we can add a button handler:
document.getElementById("uploadBtn").addEventListener("click", () => {
  // Upload image and apply background_removal
});
This way, users can upload their own photos and instantly see the cutout.
Optimizing Performance and Output
Images are only useful if they load fast. Luckily, Cloudinary handles a lot of optimization automatically, but here are a few tricks:
Using Lazy Loading and Responsive Delivery
We can lazy load our images so they don’t block the page. Lazy loading allows the web browser to pause loading images until they’re needed.
<img
  src="<%= url %>"
  loading="lazy"
  sizes="(max-width: 600px) 100vw, 600px"
/>
Reducing File Size Without Losing Quality
To shrink the file even further, we can also let Cloudinary auto-select quality in JS. That lets you cut down on bandwidth without sacrificing sharpness:
const optimizedUrl = cl.url("background-demo/p-id", {
  effect: "background_removal",
  format: "webp",
  quality: "auto"
});
Wrapping Up
Removing image backgrounds from images doesn’t have to be a headache. With Cloudinary, it’s literally one line of code, and from there, we can deliver transparent outputs, swap in new backgrounds, or optimize for performance.
If you’re working on an e-commerce site, a design tool, or even a social media app, learning to remove backgrounds with JavaScript can save hours of manual editing and instantly make your app feel smarter. Sign up for a free Cloudinary account and try it out today.
FAQs
How accurate is Cloudinary’s background removal?
It uses AI to detect the subject and separate it from the background. For product photos and portraits, the accuracy is excellent.
Do I need a paid plan for background removal?
You can use it on the free plan, though usage limits apply. Paid tiers give you more transformations and bandwidth.
Can I replace the background with another image?
Yes! You can set a solid color, gradient, or even another Cloudinary asset as the new background.

