The HTML image tag <img>, present on almost every website on the web, empowers developers to seamlessly integrate images, enriching the user experience and crafting visually captivating layouts. Because of this, understanding the various attributes associated with this tag is crucial for effective image implementation.
So, in this post, we will explore the capabilities of the <img> tag and how you can leverage its attributes to optimize image display on your web pages. Whether you’re a seasoned developer or a beginner, this article will equip you with the knowledge and techniques to unlock the full potential of this essential tool.
In this article:
What Are HTML Img Tag Attributes?
The HTML <img> tag comes with a set of attributes that provide additional information and functionality. These attributes play a significant role in controlling the appearance and behavior of images on a webpage. Let’s discuss some key attributes and their uses.
Using the Width And Height Attributes With the Image Tag HTML
The width and height attributes in the <img> tag allow developers to specify the dimensions of the displayed image. By defining these attributes, you can maintain the image’s aspect ratio and control its size, ensuring a visually appealing layout.
Here is an example:
<img src="example.jpg" alt="Example Image" width="300" height="200">
Here, the <img> tag displays an image (example.jpg) with a specified width of 300 pixels and a height of 200 pixels. The alt attribute provides alternative text for accessibility and SEO purposes.
Using the Alt Attribute
The alt attribute is crucial for accessibility and SEO. It provides alternative text that is displayed if the image cannot be loaded, helping users with visual impairments understand the content via screen readers. Additionally, search engines use this text for indexing, improving the webpage’s overall search engine optimization.
Here is an example:
<img src="example.jpg" alt="Example Image" width="300" height="200">
So, if this image does not load successfully, the alternate text “Example Image” would appear, which is better for accessibility.
Using <img> Tag as a Link
One powerful capability of the <img> tag is its ability to serve as a link. By wrapping the <img> tag within an <a> (anchor) tag, you can turn an image into a clickable link. This is useful for creating interactive elements and navigating users to other pages or resources.
Let’s look at an example:
<a href="https://www.example.com">
  <img src="example-image.jpg" alt="Example Image" width="300" height="200">
</a>
Above, the <img> tag is wrapped inside an <a> (anchor) tag. The href attribute in the anchor tag specifies the destination URL when the image is clicked.
Handling Images With Cloudinary
Cloudinary is a cloud-based image and video management service that simplifies image handling on websites. It offers a comprehensive cloud-based image and video management solution, making it an invaluable tool for developers seeking efficient website image handling. With Cloudinary, you can streamline image storage, optimization, and manipulation processes, enhancing your site’s performance and user experience.
Integrating Cloudinary into your HTML workflow provides several benefits:
- Effortless Image Storage and Management – Cloudinary acts as a centralized repository for your images, eliminating the need to manage them directly on your web server. This simplifies storage, organization, and access to your visual assets.
- Automatic Image Optimization – It automatically optimizes uploaded images for various devices and screen sizes. This reduces file size, leading to faster loading times and improved website performance.
- Powerful Image Transformation – It offers a wide range of image transformation capabilities, allowing you to resize, crop, apply filters, and manipulate images directly through URLs. This eliminates the need for manual editing and ensures consistent image presentation across your website.
- Enhanced Image Delivery – Cloudinary utilizes a global Content Delivery Network (CDN) to deliver your images efficiently from geographically distributed servers. This ensures fast and reliable image loading for users worldwide.
- Advanced Features – Their platform offers additional features like image tagging, automatic backups, and security measures, providing a robust and secure solution for managing visual content.
How to Use Cloudinary to Optimize Images
Before we begin, you’ll need to have a Cloudinary account. If you don’t have one, visit their website and sign up for a free account.
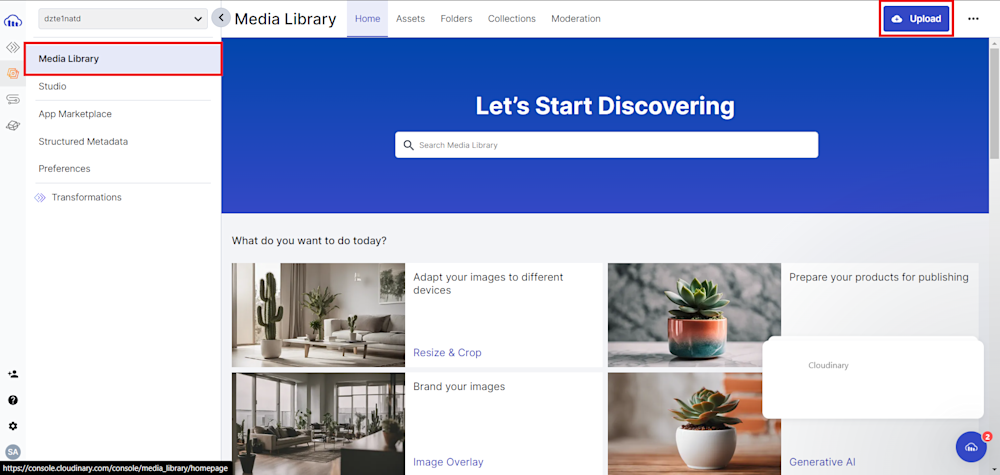
In order to optimize your images, you will first need to upload them to your Cloudinary cloud. To do this, head to Cloudinary and log in to your account. Here, navigate to the Media Library tab in the left menu bar. Next, click on the Upload button on the top-right corner to upload your image:
Once your images have been uploaded, you can retrieve their URL by heading to the Assets tab and clicking on the <> button in the top-right corner of your image. For now, we’ll use cld-sample2.jpg, which is available in the Cloudinary demo cloud.
To use our images, we will create a sample HTML page where we can load them by searching them in a search bar. So, let’s begin by creating a new HTML file and pasting the following code:
<!DOCTYPE html>
<html>
<head>
    <meta name="viewport" content="width=device-width, initial-scale=1">
    <title>Responsive Image Example</title>
</head>
<body>
    <label for="publicIdInput">Enter Cloudinary Public ID:</label>
    <input type="text" id="publicIdInput" placeholder="Enter public ID">
    <button onclick="loadImage()">Load Image</button>

    <div id="imageContainer"></div>

    <script>
        function loadImage() {
            // JavaScript code to handle image loading
        }
    </script>
</body>
</html>
This code creates a basic structure with elements for the input field to search for an image in the Cloudinary cloud, a button to load the picture, a div container to display the loaded image, and finally, JavaScript code to handle the image loading logic.
Now, let’s integrate our images into our project. Start by creating a function called loadImage() inside the script tag. Here, we will use the getElementById() method to retrieve the imageContainer element as well as the publicID from the input tag:
      function loadImage() {
        var publicId = document.getElementById('publicIdInput').value;
        var imageContainer = document.getElementById('imageContainer');
Next, we check if the publicID is empty. If it isn’t, we will create a new Cloudinary URL that retrieves our image from the cloud:
      if (publicId.trim() !== '') {
        var cloudinaryURL = 'https://res.cloudinary.com/<cloud_name>/image/<delivery_type>/<transformations>/<version>/<public_id>.<extension>'
Replace the URL tags with your desired parameters. You can learn more about the Cloudinary URL structure by visiting the official documentation.
After the URL has been created, we will finally create a new image element and set the imageContainer div as follows:
      if (publicId.trim() !== '') {
        var cloudinaryURL = `http://res.cloudinary.com/demo/image/upload/v1/${publicId}`;
        var responsiveHTML = `
            <picture>
              <img
                src="${cloudinaryURL}"
                alt="Image"
                sizes="100vw">
            </picture>
          `;

        imageContainer.innerHTML = responsiveHTML;
      }
Here is what our HTML file looks like:
<!DOCTYPE html>
<html>

<head>
  <meta name="viewport" content="width=device-width, initial-scale=1">
  <title>Responsive Image Example</title>
</head>

<body>
  <label for="publicIdInput">Enter Cloudinary Public ID:</label>
  <input type="text" id="publicIdInput" placeholder="Enter public ID">
  <button onclick="loadImage()">Load Image</button>

  <div id="imageContainer">
    <!-- The image will be dynamically loaded here -->
  </div>

  <script>
    function loadImage() {
      var publicId = document.getElementById('publicIdInput').value;
      var imageContainer = document.getElementById('imageContainer');

      if (publicId.trim() !== '') {
        var cloudinaryURL = `http://res.cloudinary.com/demo/image/upload/v1/${publicId}`;
        var responsiveHTML = `
            <picture>
              <img
                src="${cloudinaryURL}"
                alt="Image"
                sizes="100vw">
            </picture>
          `;

        imageContainer.innerHTML = responsiveHTML;
      } else {
        alert('Please enter a valid public ID.');
      }
    }
  </script>
</body>

</html>
Now, all we need to do is to open our webpage and search for our image in the cloud:
And that is it! By integrating Cloudinary, you gain a platform for content management and a powerful and flexible solution for managing and optimizing your website’s images, ultimately helping you enhance user experience and website performance.
Final Thoughts
Mastering the Image tag HTML and its attributes is essential for creating visually appealing and accessible web pages. Whether you are adjusting image dimensions, optimizing for SEO, or exploring advanced solutions like Cloudinary, a solid understanding of these concepts will empower you to enhance the overall user experience on your website.
Experience the future of digital asset management with Cloudinary’s innovative cloud platform. Sign up for free today!
Learn more:
- CDN for Images: Optimize and Deliver Images Faster
- Handle Text Wrap Around Images Using HTML and CSS
- Working with Video? Check Video API


