
A JavaScript overlay is a visual element, often a div or similar HTML element, that appears above other content on a web page, typically with a semi-transparent background. Overlays are widely used for modals, popups, lightboxes, navigation menus, and loading indicators, allowing you to display information, gather user input, or highlight specific content without navigating away from the current page. In web development, overlays are positioned using CSS properties like position: fixed or absolute and a high z-index to ensure they appear above other elements.
JavaScript is essential for toggling overlay visibility, handling user interactions, and managing dynamic content within overlays. Proper implementation also requires accessibility considerations, such as keyboard navigation and ARIA attributes.
In this guide, we’ll explore different methods of adding overlays to visual elements using JavaScript, CSS, and Cloudinary, and discuss best practices for creating effective, accessible overlays in your web applications.
In this article:
Adding Overlays with CSS
Suppose we have the following product image:
Image attribution: Photo by Marcus Loke on Unsplash

And we want to layer the image tag below on top of it as a label:

Here’s how we would do that with HTML and CSS.
<!DOCTYPE html>
<html lang="en">
<head>
  <meta charset="UTF-8">
  <meta name="viewport" content="width=device-width, initial-scale=1.0">
  <title>Overlay Example With HTML and CSS</title>
  <style>
    .photo {
      position: relative;
      width: 40%;
      max-height: 10%;
    }

    .overlay-content {
    position: absolute;
    top: 0;
    width: 100%;
    height: 100%;
    }

    .tag{
    position: absolute;
    right: 10px;
    }
  </style>
</head>
<body>

<div class="photo">
  <img src="clothes.jpg" width="100%" height="100%">
  <div class="overlay-content">
    <img class="tag" src="50-off.png" width="30%" height="20%">
  </div>
</div>

</body>
</html>
The above code gives us the following result:

Although the example above works as intended, most of the time, you want a more effective solution that offers you advanced configuration options and control over the labeling process.

Implementing JavaScript Overlays With HTML
To create a basic JavaScript overlay, you typically define a hidden overlay element in your HTML and use JavaScript to toggle its visibility. Here’s a simple example:
<!-- HTML -->
<button id="showOverlay">Show Overlay</button>
<div id="overlay" style="display:none; position:fixed; top:0; left:0; width:100vw; height:100vh; background:rgba(0,0,0,0.5); z-index:1000;">
  <div style="background:white; margin:10% auto; padding:20px; width:300px;">
    <p>This is an overlay!</p>
    <button id="closeOverlay">Close</button>
  </div>
</div>

<!-- JavaScript -->
<script>
document.getElementById('showOverlay').onclick = function() {
  document.getElementById('overlay').style.display = 'block';
};
document.getElementById('closeOverlay').onclick = function() {
  document.getElementById('overlay').style.display = 'none';
};
</script>
This approach uses JavaScript to control the overlay’s visibility and ensures the overlay appears above all other content using position: fixed and a high z-index. You can further enhance the overlay by adding keyboard accessibility and ARIA attributes for screen readers.
Adding Overlays with Cloudinary
There are many possibilities to explore when it comes to applying overlays to visual elements in Cloudinary. With Cloudinary, you can layer any type of resource, such as images, icons, or text, on top of another visual element.
A layer is a type of transformation that allows us to add overlays to visual elements in Cloudinary. For example, applying an image layer directly to the URL of an image uploaded to Cloudinary has the following syntax:
https://res.cloudinary.com/your-cloudinary-name/image/upload/l_public_id_of_image_to_use_as_overlay/fl_layer_apply/base_image_to_add_overlay.jpg
Additionally, we can customize the layered asset by applying transformations and adjusting its placement (using placement qualifiers such as gravity, offset, and others) on the base image.
Using the same image from the previous example, let’s see how, in the following steps, we can use Cloudinary to add image overlays using the NodeJS SDK.
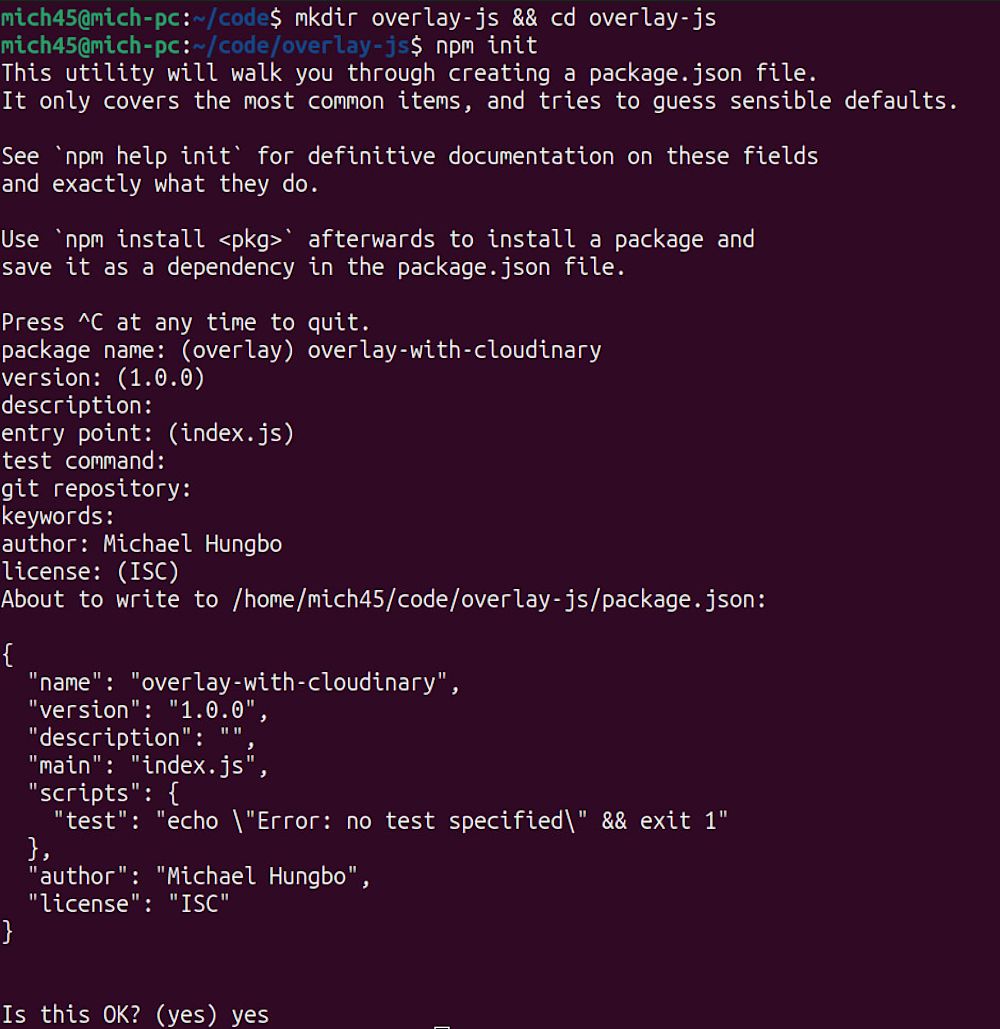
Step 1 – Setting up the Application
To get started, create a new directory for the application and run npm init in the folder to initialize a Node application. You’ll be taken through a few prompts to configure the application. The end result will look like something below:
Step 2 – Install Necessary Packages and Dependencies
Run the command below in the terminal to install the required dependencies for the project:
npm install express multer cloudinary
- Express: A web application framework for Node.js designed for building web applications and APIs.
- Multer: A middleware for handling multipart/form-data and uploading files in NodeJS applications.
- Cloudinary: The Cloudinary NodeJS SDK provides an API for uploading, storing, transforming, and delivering media files.
Next, in the package.json file in the root directory, modify the scripts field to the following:
..."scripts": { "dev": "node --watch --env-file=.env index.js" },
This tells Node to automatically restart the express server whenever we make changes to the index.js file and specify the file’s location that holds the environment variables.
Step 3 – Add Environment Variables
We need to use our Cloudinary API credentials to access Cloudinary programmatically with the Node.js SDK. Log in to your Cloudinary account and copy the values from the dashboard panel as shown below:

Cloudinary dashboard
Now, create a .env file in the root directory and add the corresponding values as follows:
CLOUDINARY_API_KEY =
CLOUDINARY_CLOUD_NAME =
CLOUDINARY_API_SECRET =
Step 4 – Writing the Code
First, we need to set up the express server and ensure it’s working. Create a file named index.js in the root directory and add the code below to it:
const express = require("express");
const app = express();

app.get("/", (req, res) => {
  res.send("Welcome to the homepage.");
});

app.listen(3000, () => {
  console.log("App is running!");
Next, start the server by running npm run dev. If everything goes well, you should see App is running logged to the console.
Next, modify the content of index.js to the following:
const express = require("express");
const multer = require("multer");
const path = require("node:path");
const fs = require("fs");
const cloudinary = require("cloudinary").v2;

cloudinary.config({
  cloud_name: process.env.CLOUDINARY_CLOUD_NAME,
  api_key: process.env.CLOUDINARY_API_KEY,
  api_secret: process.env.CLOUDINARY_API_SECRET,
  secure: true,
});

const app = express();

app.get("/", (req, res) => {
  res.send("Welcome to the homepage!");
});

// Function to check if the uploaded file is an image file
const fileFilter = (req, file, cb) => {
  const extname = path.extname(file.originalname).toLowerCase();
  if (extname === "jpg" || "jpeg" || "png" || "webpm" || "tiff" || "bmp") {
    return cb(null, true);
  }
  const error = new Error("Only image files are allowed!");
  error.status = 400;
  cb(error, false);
};

// Create a directory to upload the images on disk
var dir = "./uploads/";

if (!fs.existsSync(dir)) {
  fs.mkdirSync(dir);
}
const upload = multer({ dest: "uploads/", fileFilter });

// The overlay Cloudinary URL that will be updated later in the code
let overlayURL;

// Function to upload the image file to Cloudinary
const cloudinaryImageUpload = (file) => {
  return new Promise((resolve, reject) => {
    cloudinary.uploader
      .upload(file)
      .then((result) => {
        resolve(result.secure_url);
      })
      .catch((error) => {
        reject(error);
      });
  });
};

// Function to add the overlay to the base image
const addOverlayToImage = (img) => {
  return new Promise((resolve, reject) => {
    cloudinary.uploader
      .upload(img, {
        eager: [
          {
            overlay: { url: overlayURL },
            gravity: "north_east",
            x: "10",
            y: "10"
          },
        ],
      })
      .then((result) => {
        resolve(result.eager[0].secure_url);
      })
      .catch((error) => {
        reject(error);
      });
  });
};

// Endpoint to upload the image to use as overlay
app.post("/overlay", upload.single("image"), async function (req, res, next) {
  if (req.file !== undefined) {
    try {
      const overlay = await cloudinaryImageUpload(req.file.path);
      overlayURL = overlay;
      res.status(200).json({
        success: true,
        overlay: overlayURL
      });
    } catch (error) {
      res.status(400).json({
        success: false,
        error,
      });
    }
  } else {
    res.status(400).json({
      success: false,
      error: "No image file was uploaded",
    });
  }
});

// Endpoint to upload the base image file
app.post("/base", upload.single("image"), async function (req, res, next) {
  if (req.file !== undefined) {
    try {
      const baseImageWithOverlay = await addOverlayToImage(req.file.path);

      res.status(200).json({
        success: true,
        file: baseImageWithOverlay,
      });
    } catch (error) {
      res.status(400).json({
        success: false,
        error,
      });
    }
  } else {
    res.status(400).json({
      success: false,
      error: "No image file was uploaded",
    });
  }
});

app.listen(8080, () => {
  console.log("App is running!");
});
Here’s what is going on in the code above:
- The
/overlayendpoint is used to upload the image file to be used as an overlay. - The
/baseendpoint is used for uploading the base image file to which the overlay will be applied. - Next, the
addOverlayToImagefunction uploads and applies the overlay to the image using thecloudinary.uploader.upload()method. - This example uses the eager transformation mode to apply the overlay transformation to the base image before it’s uploaded to Cloudinary.
- The
overlayparameter in theeagerarray specifies the URL of the overlay – which has already been uploaded to Cloudinary. - The
gravityparameter sets the position in which the layer is placed within the base image. It is set to ‘center’ by default. You can use the interactive demo here to experiment with gravity and coordinate parameters. - The
xandyparameters set the coordinates (or padding) of the overlay relative to the top-right corner as specified by thegravityparameter.
Step 5 – Trying it Out
For this step, we’ll make use of the Postman VS Code extension.
First, upload the overlay image to the /overlay endpoint. The result will be used to update the overlayURL variable that we defined in the code.

Next, we’ll upload the base image to the /base endpoint and obtain the URL of the image with the overlay applied to it, as shown in the Postman request below:
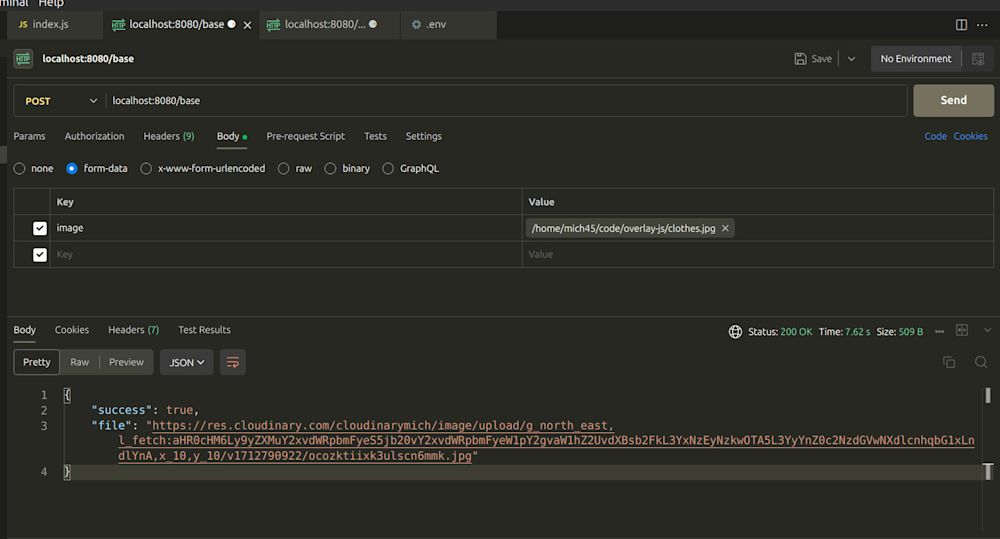
Here’s the output of the image link:

This example shows Cloudinary offers more powerful image processing capabilities than plain HTML and CSS. It allows you to dynamically manipulate images on the fly. Also, Cloudinary handles image storage and delivery for you, saving you the trouble of managing image assets manually.
Final Thoughts
Image overlays offer the opportunity to enhance the presentation of digital content by creating visual effects, adding branding elements, and emphasizing specific information.
In this article, we explored two methods of adding image overlays in JavaScript. We also explored how to use plain HTML, CSS, and Cloudinary. Feel free to sign up for a Cloudinary account today and experiment with the different options available for adding overlays to visual content.
Take your digital experience to the next level with Cloudinary’s powerful media optimization tools. Sign up for free today!

