Image Effects How to Make a Low-Quality Image Look Better Understanding Lossless Image Compression How to Set Up Image Registration in Python 8 Different Image Processing Techniques You Can Use 4 Ways to Make an Image Larger without Losing Quality 3 Easy Ways to Eliminate Duplicate Images The Basics of Face Detection in Python How to Implement Multiple File Upload in PHP Like a Pro Creating Custom Image Cropping Interfaces in Android How to Create Simple Yet Effective PHP Overlay Understanding Real-Time Image Recognition How to add a shadow effect to an image with CSS How to crop an image in Flutter with Cloudinary How To Rotate an Image with Java Image Processing with Python Rotating an image with CSS Enhancing User Experience with a Responsive Image Slider Building a Python Image Recognition System Building an Interactive JavaScript Image Manipulation Tool Image Align Centering with HTML and CSS Efficient Image Cropping Techniques with Angular and Cloudinary Ultimate Guide to Photo Gallery on Android A Comprehensive Guide to Adding Text to Images on Android Mastering Background Changes in React Applications Comprehensive Guide on Changing Background on Android Devices Mastering Image Rotation in Java A Guide to Adding Text to Images with Python A Guide to Converting Images to Grayscale with Python Introduction Creating an Image Overlay with JavaScript Rotating an Image in Python Creating a Dynamic Photo Gallery with jQuery Creating An Interactive Photo Gallery Using JavaScript Mastering Overlay in Android Mastering Angular Overlay: A Comprehensive Guide Comprehensive Guide to Overlay in Flutter Mastering Overlay React for Responsive Design Solutions Create a Blurred Image with PHP: A Comprehensive Guide Guide to Using Blur Image in Flutter Mastering Blur Image in React Native Mastering Image Blurring in Python Mastering the Art of Image Blurring Mastering the Art of Image Blurring in Java The Ultimate Guide to Blurring Images on Android Understanding and Implementing Blur Image in JQuery An Extensive Walkthrough of Blurring Images with JavaScript How to Use HTML, CSS, and JavaScript to Make an Image Slider HTML Image Tag How to Crop GIFs? How to Align Images with CSS Ken Burns Effect – Complete Guide and How to Apply It Cartoonify – Complete Guide on Cartoonify Image Effect Mastering Web Aesthetics: A Comprehensive Guide to Gradient Fades Sepia Effect: The Ultimate Guide to the Sepia Photo Effect What is Vignette? Guide to Vignette Image Editing Pixelate – The Ultimate Guide to the Pixelation Effect How to Outline an Image: Enhancing Visual Appeal and Depth Make Your Photos Pop with Image Effects Upscale Image – Developers guide to AI-driven image upscaling Image Manipulation: History, Concepts and a Complete Guide A Full Guide to Object-aware Cropping Simplify Your Life with Automatic Image Tagging How To Resize Images In WordPress How To Create a Progress Bar For Asset Uploads Animated GIFs – What They Are And How To Create Them How To Automatically Improve Image Resolution AI Drop Shadow Get Image Dimensions From URLs Automatically Add Sepia Effect To Images Automatically Make an Image a Cartoon Automatically Add Blur Faces Effect To Images Automatically Add Background Removal Effect to an Image How to Resize an Image with React How to Easily Resize an Image with React Native

How to Easily Resize an Image with React Native

resize image react native

Images can be applied in different formats and sizes when creating mobile and web applications. If you think about how many application settings that can be, you start to understand how tedious and time-consuming the task of resizing images can be.

In this article, you will learn how to easily resize an image with React Native.

In this article:

Prerequisites

To understand the concepts in this tutorial, a good knowledge of JavaScript and React is required.

You will also need:

The complete source code can be found here.

“Image

Getting started

First, you need to create a React Native starter project by navigating to the desired directory and running the below command in a terminal:

    npm install -g expo-cli
    expo init react_native_img && cd react_native_img

The command installs the Expo CLI on your machine, creates a React Native project called ‘react_native_img,’ and navigates into the project directory.

PS: The command will also ask to choose a template. Choose blank by pressing the Enter key.

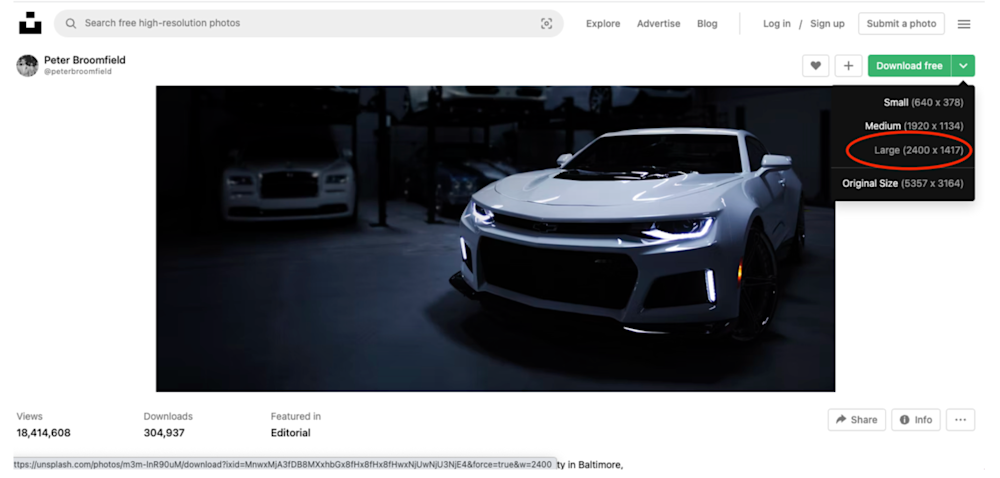
Next, you must download sample images for your gallery by navigating to the URLs below:

Car inside a page

Next navigate to the assets folder, create an images folder, and copy and paste the downloaded images into this folder.

Now you’ll need to modify the App.js file to:

https://gist.github.com/Mr-Malomz/fff5926746b4565ecfb13a510bddeefa target=”_blank”

The snippet above:

  • Imports required dependencies.
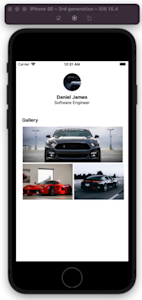
  • Creates a markup to display a profile section and a gallery section.
  • Uses StyleSheet – a React Native CSS-like support – to resize an image with React Native accordingly and add properties.

With that done, you can now start a development server using the following command:

     ‘Expo start.’

Next, you must open the generated URL on a web browser and scan the barcode using the installed Expo app:

Challenges with this approach

  • Application Performance: To get non-pixelated images, you must download the best option, which is usually a large file. The size affects the loading time and application performance.
  • Scalability: If the business requirement changes at any time – for instance, a web and an API version of the application – you will be required to follow the same approach by manually downloading and copying to the project folder.

Upload once, use everywhere

Cloudinary is a visual media platform used to upload, store, manage, transform, and deliver images and videos for websites and applications. The platform also offers a vast collection of software development kits (SDKs) for front-end frameworks and libraries.

Use Cloudinary to organize your media assets and automatically generate optimized assets with unique links. You can also resize an image with React Native.

To use Cloudinary in your application, you need to create an account. Signup is completely free.

Image sourcing and uploading to Cloudinary

Next, you will use the same set of images used above.

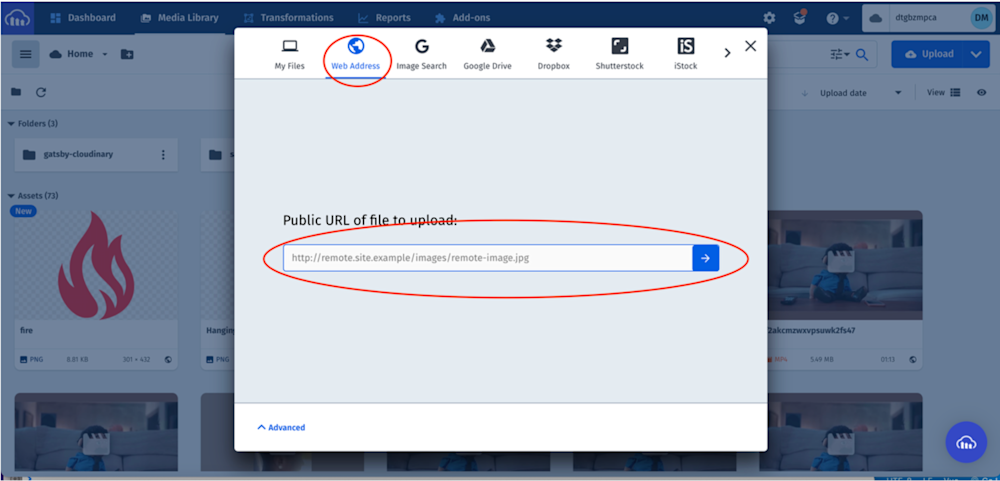
In your Cloudinary dashboard, you upload the images by clicking on the Media Library tab, clicking on Upload, selecting the Web Address option, inputting the url, and clicking on the Arrow Button to upload.

Button

PS: Cloudinary provides multiple sources of uploading media assets. 

After uploading the image, we will see it displayed on the console with its unique link. We can copy the link by clicking on the link icon highlighted below:

Add media


To use the optimized images from Cloudinary/ the resize image with React Native, you can modify App.js, as shown below:

https://gist.github.com/Mr-Malomz/877029954d581ba2af36baf47caa8775

Conclusion

Now that you’ve seen how easy it is for Cloudinary to resize an image with React Native and automatically generate optimized images, it’s time to put it into use on your own website and/or application. Cloudinary also offers advanced media functionality like filtering, cropping, resizing, retouching, and more. Try it out (it’s free forever!) and unleash the full potential of your digital media.

More from Cloudinary
 

QUICK TIPS
Colby Fayock
Cloudinary Logo Colby Fayock

In my experience, here are tips that can help you better resize images in React Native using Cloudinary for a smoother development experience and optimal performance:

  1. Use Cloudinary’s auto responsive breakpoints for device-specific delivery
    React Native runs on various screen sizes and resolutions, making responsive image handling crucial. Use Cloudinary’s auto breakpoints in your transformation URL (w_auto) to dynamically adapt image widths based on device screens. This will ensure that your images load faster and appear correctly on all devices without compromising visual quality.
  2. Leverage q_auto and f_auto for format and quality optimization
    When resizing images, combine f_auto (format auto) and q_auto (quality auto) to deliver images in the best file format (e.g., WebP or AVIF) and quality level based on the user’s device and network conditions. This significantly reduces file size, optimizing loading times while preserving visual fidelity.
  3. Preprocess large images before delivery
    If working with high-resolution images, use Cloudinary’s upload transformations (eager transformations) to pre-process and store resized versions of the images during the upload process. This avoids server-side resizing overhead at runtime and ensures that your app quickly serves cached, optimized images.
  4. Use cloudinary-react-native SDK for seamless integration
    The cloudinary-react-native SDK is tailored specifically for React Native, providing optimized components and image management tailored to mobile use cases. Use this SDK for better integration with React Native’s ecosystem, and avoid performance issues that may arise from using web-based SDKs.
  5. Minimize re-renders by caching images locally
    Utilize libraries like react-native-fast-image in conjunction with Cloudinary to cache resized images locally on the device. This minimizes unnecessary network requests and speeds up image display, especially when scrolling through large galleries or image-heavy views.
  6. Use transformation chaining for complex use cases
    If you need to apply multiple transformations—such as resizing, cropping, and adding watermarks—leverage Cloudinary’s transformation chaining feature. This allows you to combine multiple image effects in a single URL request, reducing server load and minimizing the number of transformations needed.
  7. Handle conditional transformations for theme and layout changes
    Create condition-based image transformations using Cloudinary’s powerful transformation syntax. For instance, dynamically adjust image dimensions or aspect ratios based on the theme, screen orientation, or view mode (portrait/landscape). This makes your app’s images more adaptive to real-world scenarios without manual intervention.
  8. Use gravity and crop qualifiers to focus on key areas
    When resizing, use Cloudinary’s gravity and crop qualifiers (e.g., gravity:face or gravity:auto) to maintain the focus on key content areas, such as faces or centered elements. This ensures that the most important parts of the image are not cropped out, preserving the visual narrative even after resizing.
  9. Enable lazy loading and placeholders for a smooth UX
    Use Cloudinary’s low-quality image placeholders (q_auto:low) or blur effects for placeholders when resizing images in React Native. Implement lazy loading techniques using components like react-native-lazy-load-image to delay loading of off-screen images, ensuring a smoother and faster user experience.
  10. Optimize image upload strategy for mobile networks
    When uploading images from a React Native app, ensure they are resized, compressed, and optimized client-side before sending to Cloudinary, especially on slower mobile networks. Tools like react-native-image-resizer can be used to resize and compress images locally before sending them to Cloudinary for final transformation and storage.

By applying these tips, you can efficiently use Cloudinary for resizing images in React Native, providing optimal image delivery for mobile devices while enhancing your app’s performance and user experience.

Last updated: Oct 6, 2024