MP4, also known as MPEG-4 Part 14, is a popular video file format for storing video and audio data. It can also be used to store other multimedia data such as still images and subtitles. Graphics Interchange Format (GIF), on the other hand, is a bitmap image format used for storing image data. It uses a lossless compression algorithm to store pixel data, making it useful for saving large images to minimize storage use.
Unlike MP4s, GIFs are not videos. Animated GIFs are a sequence of static images played in a loop, which gives them key advantages over other image file formats. There are several reasons why you might want to convert a MP4 file to GIF. For example, you can convert MP4 to GIF to create short, animated clips that are easy to share and play automatically on most platforms.
Key Takeaways:
- MP4 is a video format that can store video, audio, images, and subtitles, while GIF is an image format that plays a loop of static images. Converting MP4s to GIFs is useful for making short, shareable animations that play automatically on most platforms.
- Since GIFs aren’t designed for video, reducing the frame rate with FFmpeg helps shrink file size while keeping quality reasonable. Using fewer frames per second means fewer images in the GIF, which makes the file smaller.
- FFmpeg works well for converting a few MP4 files, but it’s not ideal for handling large batches. Cloudinary, a cloud-based media platform, can automate MP4 to GIF conversions at scale through its UI or programming tools.
In this article:
- Using FFmpeg for Video Conversion and Making GIFs
- Making a GIF from an MP4 Video Using FFmpeg
- Improving GIF Quality and Reducing File Size with FFmpeg
- Converting MP4 to GIF with Cloudinary
Using FFmpeg for Video Conversion and Making GIFs
FFmpeg is a free and open-source, command-line tool containing a suite of libraries for handling video, audio, and image processing. It’s widely used for transcoding, editing, and converting media files, including turning MP4 videos into GIFs. FFmpeg is fast, customizable, and works locally across multiple OSes, making it ideal for developers building cross-platform apps.
Before you can start using FFmpeg, you need to install it on your computer.
Go to the official FFmpeg website and download the appropriate version for your operating system (Windows, macOS, or Linux), and follow the installation instructions.
To check if FFmpeg is installed correctly, open your terminal or command prompt and type the following command:
ffmpeg -version
If you see information about FFmpeg, you’re all set!
Next, create a folder where you’d like to run the demos in this article and download the video file used in the demos from here. We saved the file as demo-video.mp4.
Making a GIF from an MP4 Video Using FFmpeg
Converting an MP4 to a GIF with FFmpeg involves running a command to process the video and output a GIF file. Change directory into your project folder and run the following command in the terminal:
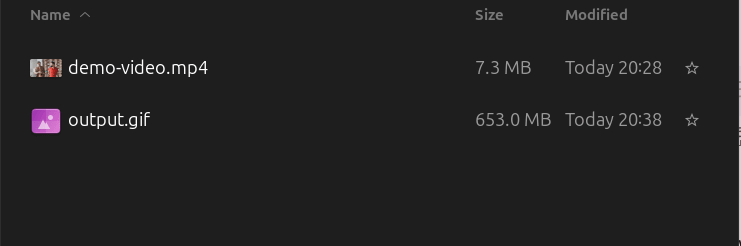
ffmpeg -i demo-video.mp4 output.gif
After a few seconds you should see the output.gif file created in the directory.
But there’s a problem. The generated GIF file is 653 MB in size, which is about 8823% the original size!
This excessively large file size stems from how the GIF format handles compression and color information. Video codecs like MP4 use highly efficient inter-frame compression, meaning they only store the changes between consecutive frames, leading to much smaller file sizes.
GIFs, on the other hand, essentially store each frame as a separate image, similar to a series of uncompressed still images, resulting in less efficient compression for video-like content. This means we need a way to compress and optimize GIF files if we want to make this efficient..
Improving GIF Quality and Reducing File Size with FFmpeg
Since the GIF format is not optimized for video content by default, we need to apply some optimizations to our FFmpeg command to reduce the output size while still maintaining reasonable quality. Let’s take a look at some of the most common ways:
Method 1: Frame Rate Reduction
Reducing the frame rate (FPS) is a simple and effective way to cut down on file size. By lowering the frames per second (such as from 25 to 10), we can directly decrease the number of frames in the GIF, which significantly reduces the output file size. The fps video filter in FFmpeg enables us to achieve this.
For example, to convert demo-video.mp4 to output.gif with a frame rate of 10 FPS:
ffmpeg -i demo-video.mp4 -vf "fps=10" output.gif
The above command produces a GIF file as shown in the following screenshot:
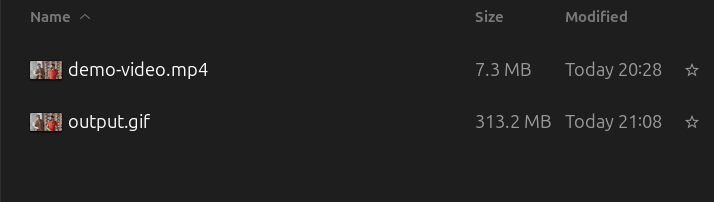
As shown in the screenshot, the file is reduced to 313 MB, which is more than half the original size. But this is still considerably large when compared to the original video file. Also, a low FPS results in a choppy GIF animation, which can ruin the effect. You can also experiment with different FPS values to find a balance between smoothness and file size: the higher the FPS value, the larger the file size.
Method 2: Scaling Down Resolution
Scaling down a video means reducing its dimensions, which leads to a reduction of the video data or pixels per frame. In our case, the original dimension of our input video is 3840×2160, and FFmpeg uses the same dimensions in the output file. This dimension is excessively large when compared to commonly used dimensions for GIF files, which ranges between 500-800px, although this may vary depending on the platform where the GIF is being used.
FFmpeg provides a scale filter for resizing or changing the resolution of a video or image, using the -vf flag. It has the following syntax:
ffmpeg -i input.mp4 -vf scale=WIDTH:HEIGHT output.mp4
To achieve an even smaller file size without sacrificing quality, we can combine scaling down and reducing the FPS value of the output GIF as follows:
ffmpeg -i demo-video.mp4 -vf "fps=10,scale=800:-1" output.gif
In the above snippet, scale=800:-1 tells FFmpeg to scale the output GIF animation to a width of 800px, while maintaining its aspect ratio (-1).
The above command results in a GIF file with a size of 16 MB as shown in the following image:
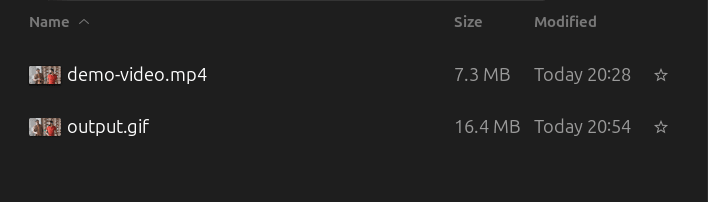
While 16 MB is considerably smaller compared to the 312 MB generated in the previous example, it’s still a big file size for a GIF. However, it’s important to note that the length of the GIF animation will also influence the file size. Typical and recommended lengths are just a few seconds, often under 6 seconds. In our case, the GIF animation is 15 seconds long, which explains the large file size.
Method 3: Color Palette Optimization (palettegen and paletteuse filters)
Color palette optimization is an advanced method for modifying the color palette from the video’s dominant colors to improve quality and potentially reduce file size. GIFs are limited to a 256-color palette, and without optimization, FFmpeg uses a generic palette, which can lead to color banding and dithering artifacts.
This method follows a two-step process. The first step involves using the FFmpeg palettegen filter to generate a custom, optimized color palette from the video’s dominant colors. The next step then uses the paletteuse filter to apply the custom palette to the final GIF.
Step 1: Generate the Palette
This command creates a palette file (palette.png) tailored to its specific colors:
ffmpeg -i demo-video.mp4 -vf "palettegen" -y palette.png
Step 2: Create the GIF Using the Custom Palette
This command uses both the original video and the generated palette to create the final GIF.
ffmpeg -i demo-video.mp4 -i palette.png -filter_complex "paletteuse" output.gif
If you run those commands as they are, it’ll take ages and create a massive file. In fact, the generated GIF file will be so big that it may crash your image viewer software!
We can get the best results by adding color palette tweaks to what we’ve already done. Keep in mind, this doesn’t make the file smaller, it just tweaks the colors in the video.
Here’s the code to fine-tune the generated GIF file:
ffmpeg -i demo-video.mp4 \
-vf "fps=10,scale=800:-1:flags=lanczos,split[s0][s1];[s0]palettegen=max_colors=32:stats_mode=single:[p];[s1][p]paletteuse=dither=floyd_steinberg" \
output.gif
The command looks a bit complex, so let’s break it down:
flag=lanczos: This tells FFmpeg to use the Lanczos scaling algorithm to keep the image sharp.split[s0][s1]: This filter creates two identical copies of the video stream, which are labeled[s0]and[s1]and used for the two-pass process.[s0]palettegen=max_colors=32:stats_mode=single:[p]: This is the first pass where the GIF’s color palette is generated. The[s0]stream is used for this purpose.max_colors=32: Limits the palette to a maximum of 32 colors, keeping the file size small.stats_mode=single: This tells the filter to analyze the entire video as a single block to determine the most common colors, creating a general-purpose palette.[p]: The generated palette is given the label[p], which is then used in the next step.[s1][p]paletteuse=dither=floyd_steinberg:bayer_scale=4: This is the second pass where the generated palette is applied to the video.dither=floyd_steinberg: Applies Floyd-Steinberg dithering, a popular method that disperses color quantization errors to create smoother gradients.
Color palette optimization results in a much-better looking GIF, especially for pictures with many colors or gradients.
Converting MP4 to GIF with Cloudinary
FFmpeg makes a good choice for converting one to few MP4 files manually. However, things can get problematic quickly when you need to process hundreds or thousands of video files at scale. Cloudinary is a cloud-based media management platform that offers file conversion. Including converting MP4 to GIF.
To use Cloudinary, you’ll typically upload your video to your product environment first. You can do so using the Cloudinary Media Library UI in your product environment or programmatically using any of Cloudinary’s programming SDKs.
You can find the uploaded demo video here.
Applying a Transformation via URL
Once the video has been uploaded, converting the MP4 video to GIF with Cloudinary is as simple as changing its file extension.
Here’s the converted GIF URL:
https://res.cloudinary.com/cloudinarymich/video/upload/c_scale,w_800/v1757595887/demo-video_aqoipi.gif
In the snippet above, in addition to changing the file extension to .gif, we added a scale transformation parameter to scale down the video’s resolution, which reduces the size of the output GIF drastically.
The key advantages of using Cloudinary over FFmpeg for converting an MP4 to a GIF are simplicity and scalability. As we’ve demonstrated, Cloudinary simplifies the conversion process dramatically. Instead of writing complex commands with multiple flags, you just add transformation parameters to a simple URL. This is especially useful as a developer if you need to use ffmpeg for converting multiple MP4 to GIF at once, without writing complex scripts.
Wrapping Up
Converting MP4 videos to GIFs has a lot of practical applications today. In this article, we explored how both FFmpeg and Cloudinary offer powerful ways to convert MP4 videos to GIFs. FFmpeg is a perfect choice if you want hands-on control and local processing, while Cloudinary is ideal for cloud-based, scalable solutions, requiring little setup and no complex configurations.
Unlock the full potential of your digital content with Cloudinary’s advanced editing and optimization tools. Sign up for free today!
Frequently Asked Questions
Can I add audio to a GIF?
No, you can’t. GIFs are image files that only play visual frames. If you want both video and sound, you should use a format like MP4 instead.
What is the right dimension to use for GIF files?
As we mentioned earlier in the article, there’s no one-size-fits-all dimension for GIF files. The “right” dimension will often depend on where you’ll be using the GIF. But generally, you should aim for the smallest dimensions to keep the file size as smallest as possible.

