Converting images into NumPy arrays is a foundational step in Python-based image processing, computer vision, and machine learning workflows. Once an image is represented as numerical data, we can inspect pixel values, apply mathematical transformations, batch images for model training, and integrate image data into scientific or AI pipelines. NumPy provides the structure that allows images to move from static files into fully programmable data objects.
In this guide, we walk through the most common and reliable methods for converting images to NumPy arrays using popular Python libraries such as Pillow, OpenCV, Matplotlib, and scikit-image. We explain how each library handles color channels, transparency, and data types, and why images with identical shapes may still behave differently across libraries.
Key takeaways:
- Converting an image to a NumPy array allows direct access to pixel-level data for analysis and transformation.
- Different libraries load images using different color channel orders, even when array shapes look identical.
- Data types and pixel value ranges affect numerical operations, visualization, and machine-learning pipelines.
In this article:
- What It Means to Convert an Image to a NumPy Array
- Installing NumPy and Image Libraries: What You Need First
- Method 1: Converting an Image to a NumPy Array with Pillow
- Method 2: Using OpenCV (cv2) to Convert an Image to a NumPy Array
- Method 3: Converting an Image with Matplotlib or scikit-image
- Handling Color Modes (RGB, BGR, RGBA, Grayscale) and Data Types
- Batch Processing: Loading Multiple Images into a Single NumPy Array
- Common Mistakes, Performance Tips
What It Means to Convert an Image to a NumPy Array
Converting images to a NumPy array gives developers flexibility to work with them in unique ways instead of just static files. These arrays represent the image as a matrix of pixel values, where each number corresponds to a specific brightness or color level. The array structure depends on the image format: grayscale images use two dimensions (height × width), while color images use three (height × width × channels).
Once an image is represented as a NumPy array, it can be inspected, transformed, or analyzed using standard numerical operations. It serves as the groundwork for a variety of applications in computer vision, machine learning, and scientific imaging.
Installing NumPy and Image Libraries: What You Need First
Converting images into NumPy arrays requires a few core libraries. NumPy handles the array operations, while image libraries such as Pillow, OpenCV, Matplotlib, or scikit-image handle reading the image file into memory. Each library loads images slightly differently, but all of them return data that can be represented as a NumPy array.
Before running the examples in this guide, we’ll install NumPy and the imaging libraries we plan to use. The following command installs NumPy, Pillow, OpenCV, Matplotlib, and scikit-image in one step. The script also installs the requests library we will use to download remote images.
pip install numpy pillow opencv-python matplotlib scikit-image requests
Once installed, each library can load an image into Python, and NumPy will represent that image as an array of pixel values. This provides a consistent foundation for image analysis, manipulation, and machine learning workflows.
Next, we will see how to convert an image to a NumPy array.
Note: All the code in this article is available in this Google Colab notebook.
Method 1: Converting an Image to a NumPy Array with Pillow
Pillow (PIL) is one of the most common libraries for loading images in Python. It reads the image file, handles color modes, and provides access to the raw pixel data. When a Pillow image is passed to the NumPy np.array() function, it converts the image into an array, where each element represents a pixel value.
Below is the basic workflow for loading an image with Pillow and converting it into a NumPy array.
from PIL import Image
import numpy as np
# Load the image using Pillow
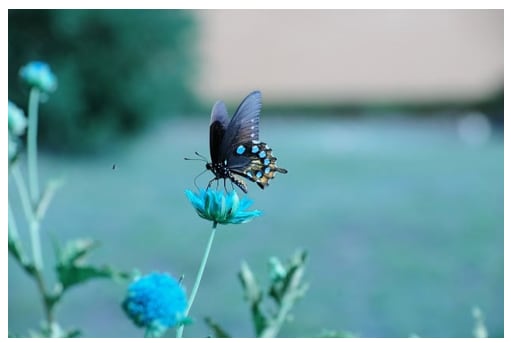
img = Image.open("../images/butterfly-9986828_640.jpg")
# Convert the image to a NumPy array
arr = np.array(img)
print(arr.shape)
The code above converts an image to a NumPy array and stores it in the arr variable. Since the input is a 640 x 480 RGB image, the output array has the shape (425, 640, 3). This new array can now be used for pixel-level operations, statistical analysis, machine learning pre–processing, or any workflow that relies on numerical processing.
Pillow cannot directly open images from URLs. To do so, we can download the image, then pass the bytes to Pillow using BytesIO.
import numpy as np
import requests
from io import BytesIO

url = "https://cdn.pixabay.com/photo/2022/10/22/17/00/gull-7539615_1280.jpg"
# Fetch the image as bytes
response = requests.get(url)
img = Image.open(BytesIO(response.content))

arr = np.array(img)
print(arr.shape)
# Output
(853, 1280, 3)
Method 2: Using OpenCV (cv2) to Convert an Image to a NumPy Array
OpenCV is another popular library for image processing and computer vision. Because OpenCV loads images directly as NumPy arrays, unlike Pillow, it is well-suited for high-performance pipelines and large-scale image processing.
The cv2.imread() function reads the file and returns a NumPy array automatically:
import cv2

# Load the image using OpenCV
img = cv2.imread("../images/butterfly-9986828_640.jpg")
print(type(img))       # <class 'numpy.ndarray'>
print(img.shape)       # (height, width, channels)

# Output
<class 'numpy.ndarray'>
(425, 640, 3)
OpenCV cannot open URLs directly, but we can retrieve the raw bytes and decode them using cv2.imdecode():
import cv2
import numpy as np
import requests

url = "https://cdn.pixabay.com/photo/2022/10/22/17/00/gull-7539615_1280.jpg"

# Download the image as bytes
resp = requests.get(url)
img_bytes = np.frombuffer(resp.content, np.uint8)

# Decode into an OpenCV image (NumPy array)
img = cv2.imdecode(img_bytes, cv2.IMREAD_COLOR)
print(img.shape)

# Output
(853, 1280, 3)
Method 3: Converting an Image with Matplotlib or scikit-image
By default, Matplotlib and scikit-image load images as NumPy arrays. Both are widely used in scientific computing, visualization, and machine-learning pipelines. While Pillow and OpenCV are common choices for general-purpose image handling, Matplotlib and scikit-image provide convenient high-level functions and consistent array outputs.
Using Matplotlib (matplotlib.image.imread)
Matplotlib’s image module reads an image and immediately returns a NumPy array. Here’s an example:
import matplotlib.image as mpimg

# Load the image with Matplotlib
img = mpimg.imread("../images/butterfly-9986828_640.jpg")
print(type(img))     # <class 'numpy.ndarray'>
print(img.shape)     # (height, width, channels)
# Output
<class 'numpy.ndarray'>
(425, 640, 3)
Similar to Pillow and OpenCV, Matplotlib cannot load URLs directly. We follow the same pattern where we download the bytes and convert them using BytesIO:
import matplotlib.image as mpimg
import requests
from io import BytesIO

url = "https://cdn.pixabay.com/photo/2022/10/22/17/00/gull-7539615_1280.jpg"
response = requests.get(url)
img = mpimg.imread(BytesIO(response.content), format='jpg')
print(img.shape)

# Output
(853, 1280, 3)
Using scikit-image (skimage.io.imread)
The scikit-image library provides a more specialized image-loading interface. It reads many formats and returns images as NumPy arrays in a consistent float64 format, with pixel values normalized to the 0.0–1.0 range.
Here’s a basic workflow:
from skimage import io

# Load the image using scikit-image
img = io.imread("../images/butterfly-9986828_640.jpg")

print(type(img))     # <class 'numpy.ndarray'>
print(img.shape)     # (height, width, channels)

# Output
<class 'numpy.ndarray'>
(425, 640, 3)
Like Matplotlib and Pillow, we can download a remote image from a URL and load it using scikit-image as follows:
from skimage import io
import requests
from io import BytesIO

url = "https://cdn.pixabay.com/photo/2022/10/22/17/00/gull-7539615_1280.jpg"

# Fetch the image bytes
response = requests.get(url)
response.raise_for_status()

# Read the image using scikit-image
img = io.imread(BytesIO(response.content))

print(img.shape)

# Output
(853, 1280, 3)
Handling Color Modes (RGB, BGR, RGBA, Grayscale) and Data Types
Once an image has been converted into a NumPy array, the next important detail is understanding how its color channels and data types are represented.
Although Pillow, OpenCV, Matplotlib, and scikit-image all return NumPy arrays, they don’t follow the same conventions. These differences matter when displaying images, converting between libraries, or preparing preprocessing pipelines for machine learning.
RGB vs. BGR: Why Shapes Match but Colors Look Different
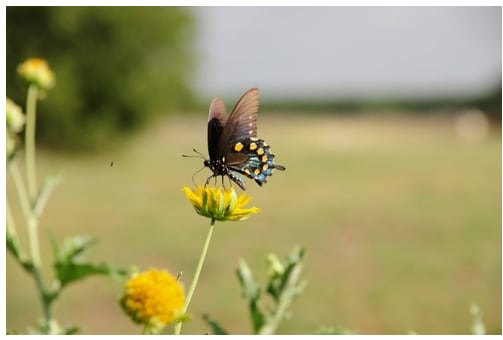
The Pillow, Matplotlib, and Scikit-Image libraries load images in RGB format. OpenCV, however, loads an image in BGR format. This is why OpenCV images appear blue-tinted when displayed using Matplotlib.
import matplotlib.pyplot as plt

img = cv2.imread("../images/butterfly-9986828_640.jpg")
print(img.shape)

plt.imshow(img)
plt.axis("off")
plt.show()
To load an OpenCV image in the RGB format, we need to convert it to RGB format using the cv2.COLOR_BGR2RGB attribute.
img_rgb = cv2.cvtColor(img, cv2.COLOR_BGR2RGB)

plt.imshow(img_rgb)
plt.axis("off")
plt.show()
Output:
Transparency and Alpha Channels (RGBA and BGRA)
Some image formats, such as PNG, include an alpha channel for transparency. In these cases, the NumPy array contains four channels: (height, width, 4).
Pillow and Matplotlib load them as RGBA images, while OpenCV loads them as BGRA when transparency is preserved.
Grayscale Images
Grayscale images contain only a single intensity channel. As a result, the NumPy array has two dimensions instead of three.
OpenCV allows explicit grayscale loading:
gray = cv2.imread("../images/butterfly-9986828_640.jpg", cv2.IMREAD_GRAYSCALE)
print(gray.shape)
Other libraries automatically infer the grayscale mode if the image file contains no color channels. Grayscale arrays are standard in edge detection, thresholding, and classical computer vision workflows.
Data Types and Pixel Value Ranges
In addition to color modes, image libraries also differ in how pixel values are stored numerically. Although the examples in this guide load the same image file, the underlying NumPy array can represent pixel data using different data types and value ranges depending on the library and the processing stage.
Understanding these differences is important when combining libraries, performing numerical operations, or preparing image data for machine learning models.
uint8 Images (0–255)
By default, Pillow, OpenCV, and scikit-image preserve the original data type of most standard image files. When loading a typical JPEG or PNG image, all three libraries return a NumPy array of type uint8:
import numpy as np
import cv2
from PIL import Image
from skimage import io

image_path = "../images/butterfly-9986828_640.jpg"

# Pillow
img_pil = np.array(Image.open(image_path))

# OpenCV
img_cv = cv2.imread(image_path)

# scikit-image
img_ski = io.imread(image_path)

print("Pillow:", img_pil.dtype, img_pil.min(), img_pil.max())
print("OpenCV:", img_cv.dtype, img_cv.min(), img_cv.max())
print("scikit-image:", img_ski.dtype, img_ski.min(), img_ski.max())

# Output
Pillow: uint8 0 255
OpenCV: uint8 0 255
scikit-image: uint8 0 255
Floating-Point Images (0.0–1.0)
Although scikit-image preserves uint8 values on load, many of its processing functions operate internally on floating-point data. For this reason, scikit-image provides explicit utilities for converting images to normalized floating-point arrays.
from skimage import img_as_float

img_float = img_as_float(img)

print(img_float.dtype)
print(img_float.min(), img_float.max())

# Output
float64
0.0 1.0
Converting Between Data Types
When working across multiple libraries, explicit data type conversions are often required.
# To convert a floating-point image back to uint8:
img_uint8 = (img_float * 255).astype("uint8")
# To convert a uint8 image to a normalized floating-point format:
img_float = img_uint8.astype("float32") / 255.0
Batch Processing: Loading Multiple Images into a Single NumPy Array
In many real-world workflows, images are not processed one at a time. Machine learning training, dataset preprocessing, and bulk analysis all require loading multiple images and stacking them into a single NumPy array. By using batch processing, images can be processed with both consistency and efficiency.
The key requirement for batching is that all images must share the same dimensions and number of channels. If they do, they can be stacked along a new axis, forming a four-dimensional array:
from PIL import Image
import numpy as np

image_paths = [
    "../images/butterfly-9986828_640.jpg",
    "../images/butterfly-9986828_640.jpg",
    "../images/butterfly-9986828_640.jpg"
]

images = []

for path in image_paths:
    img = Image.open(path)
    images.append(np.array(img))

batch = np.stack(images)

print(batch.shape)
print(batch.dtype)

# Output
(3, 425, 640, 3)
uint8
Each image occupies one entry in the batch, while the remaining dimensions represent height, width, and color channels.
Batch arrays are the standard input format for deep learning frameworks such as TensorFlow and PyTorch. They also simplify vectorized operations, allowing transformations, normalization, and augmentation to be applied across all images at once.
Common Mistakes and Performance Tips
Common Mistakes When Working with Image Arrays
- Ignoring color channel order: OpenCV loads images in BGR format, while Pillow, Matplotlib, and scikit-image use RGB. Mixing these libraries without converting channel order often results in incorrect colors when displaying or saving images.
- Assuming identical shapes imply identical formats: Arrays with the same shape, such as
(425, 640, 3), may still differ in channel ordering or data type. Shape alone does not guarantee compatibility across libraries. - Forgetting to normalize pixel values: Some workflows expect pixel values in the range 0.0–1.0, while others expect 0–255. Feeding unnormalized data into models or visualization pipelines can lead to incorrect results.
- Stacking images of different sizes: NumPy cannot batch images with different dimensions. Images must be resized or cropped to a consistent shape before stacking into a single array.
- Losing transparency information: Loading PNG images without preserving alpha channels can silently drop transparency data, which affects compositing and segmentation tasks.
Performance Tips for Large-Scale Image Processing
- Load images lazily when possible: Avoid loading entire datasets into memory at once. Process images in batches to reduce memory usage.
- Use OpenCV for high-throughput pipelines: OpenCV’s native NumPy integration and optimized decoding make it well-suited for large datasets and performance-critical workflows.
- Convert data types only when necessary: Repeated conversions between uint8 and floating-point formats increase overhead. Choose a representation early and stay consistent.
- Reuse buffers and arrays: Pre-allocating arrays for batch processing reduces memory fragmentation and improves execution speed.
Frequently Asked Questions
Why do different libraries return different data types for the same image?
Each library is designed for different use cases. Pillow and OpenCV prioritize compatibility with standard image formats, while scikit-image focuses on numerical analysis and normalization.
Why does an OpenCV image look incorrect when displayed with Matplotlib?
OpenCV uses BGR channel ordering. Converting the image to RGB resolves the color mismatch.
Is it better to use uint8 or floating-point arrays for machine learning?
Both are valid. Floating-point arrays are common for model input, but many pipelines convert from uint8 to float only during preprocessing to reduce memory usage.

