Image processing plays a key role in modern applications, from data analysis and automation to visual content management. Developers use it to inspect, transform, and optimize images before they reach users or downstream systems. Python has become one of the most popular tools for this work because of its clear syntax and rich ecosystem of libraries.
With Python, you can read images, access pixel data, and apply transformations using well supported tools like Pillow and OpenCV. These capabilities make it easy to build scripts and services that handle images at scale. Understanding how to use Python to read an image is the first step toward creating reliable and efficient image processing workflows.
In this article:
- What Reading an Image Means in Python
- Loading Images with OpenCV
- Loading Images with Pillow
- Reading Images Using ImageIO
- Read Images Using Matplotlib
- How to Read Images from URLs and Byte Streams
- Working with Color, Grayscale, and Alpha Channels
- Common Errors When Reading Images and How to Fix Them
What Reading an Image Means in Python
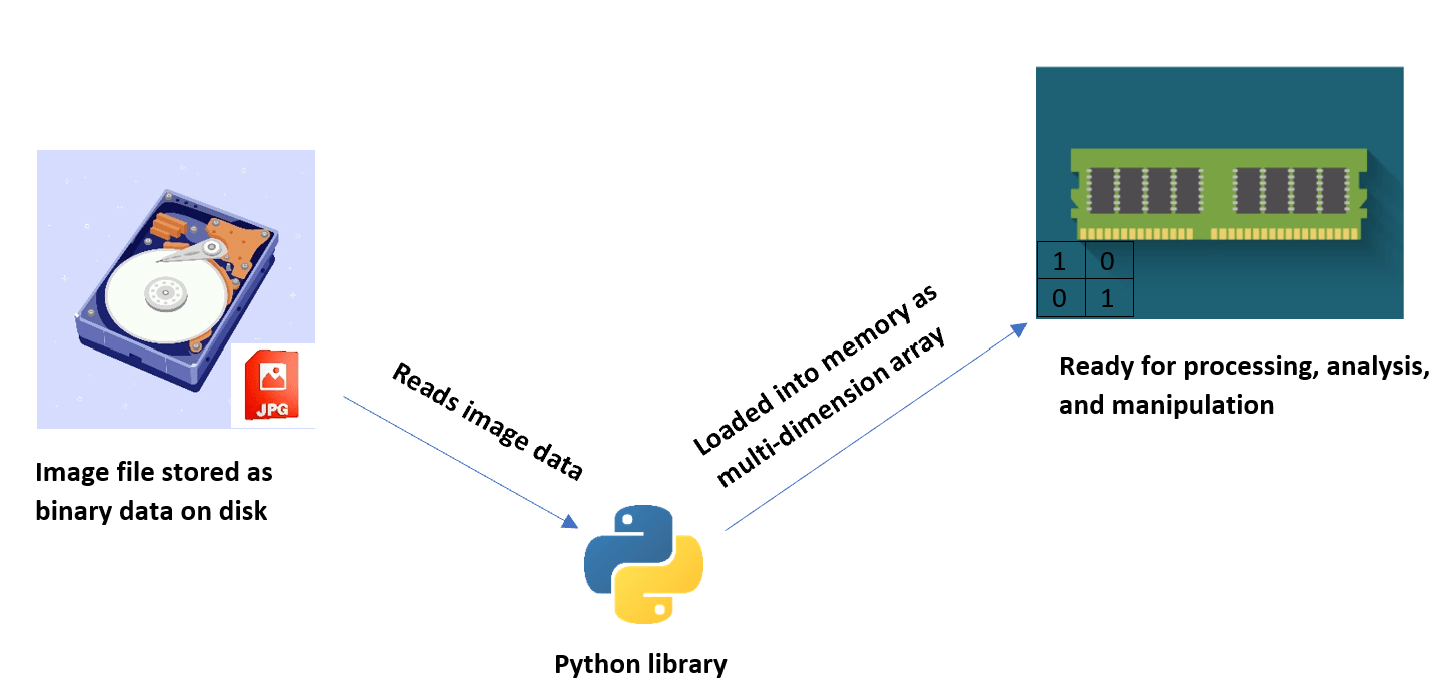
Reading an image in Python is the process of loading an image file from a specific source like a storage location or an external URL into memory. This is typically implemented by using specialized Python libraries that are built specifically for working with images.
When an image is read in Python, its data is usually represented by values stored in a multi-dimensional array. These values correspond to the pixel information included in the image. This operation is very common for applications that need processing, analyzing, manipulating, or displaying images.
Loading Images with OpenCV
OpenCV is an open-source library used in Python image processing, computer vision, and even machine learning and scientific computations. It interprets visual data like in images and videos and loads them as NumPy arrays to facilitate their processing, analysis, and manipulation.
To start working with images using OpenCV, first install the library using the pip package manager with pip install opencv-python
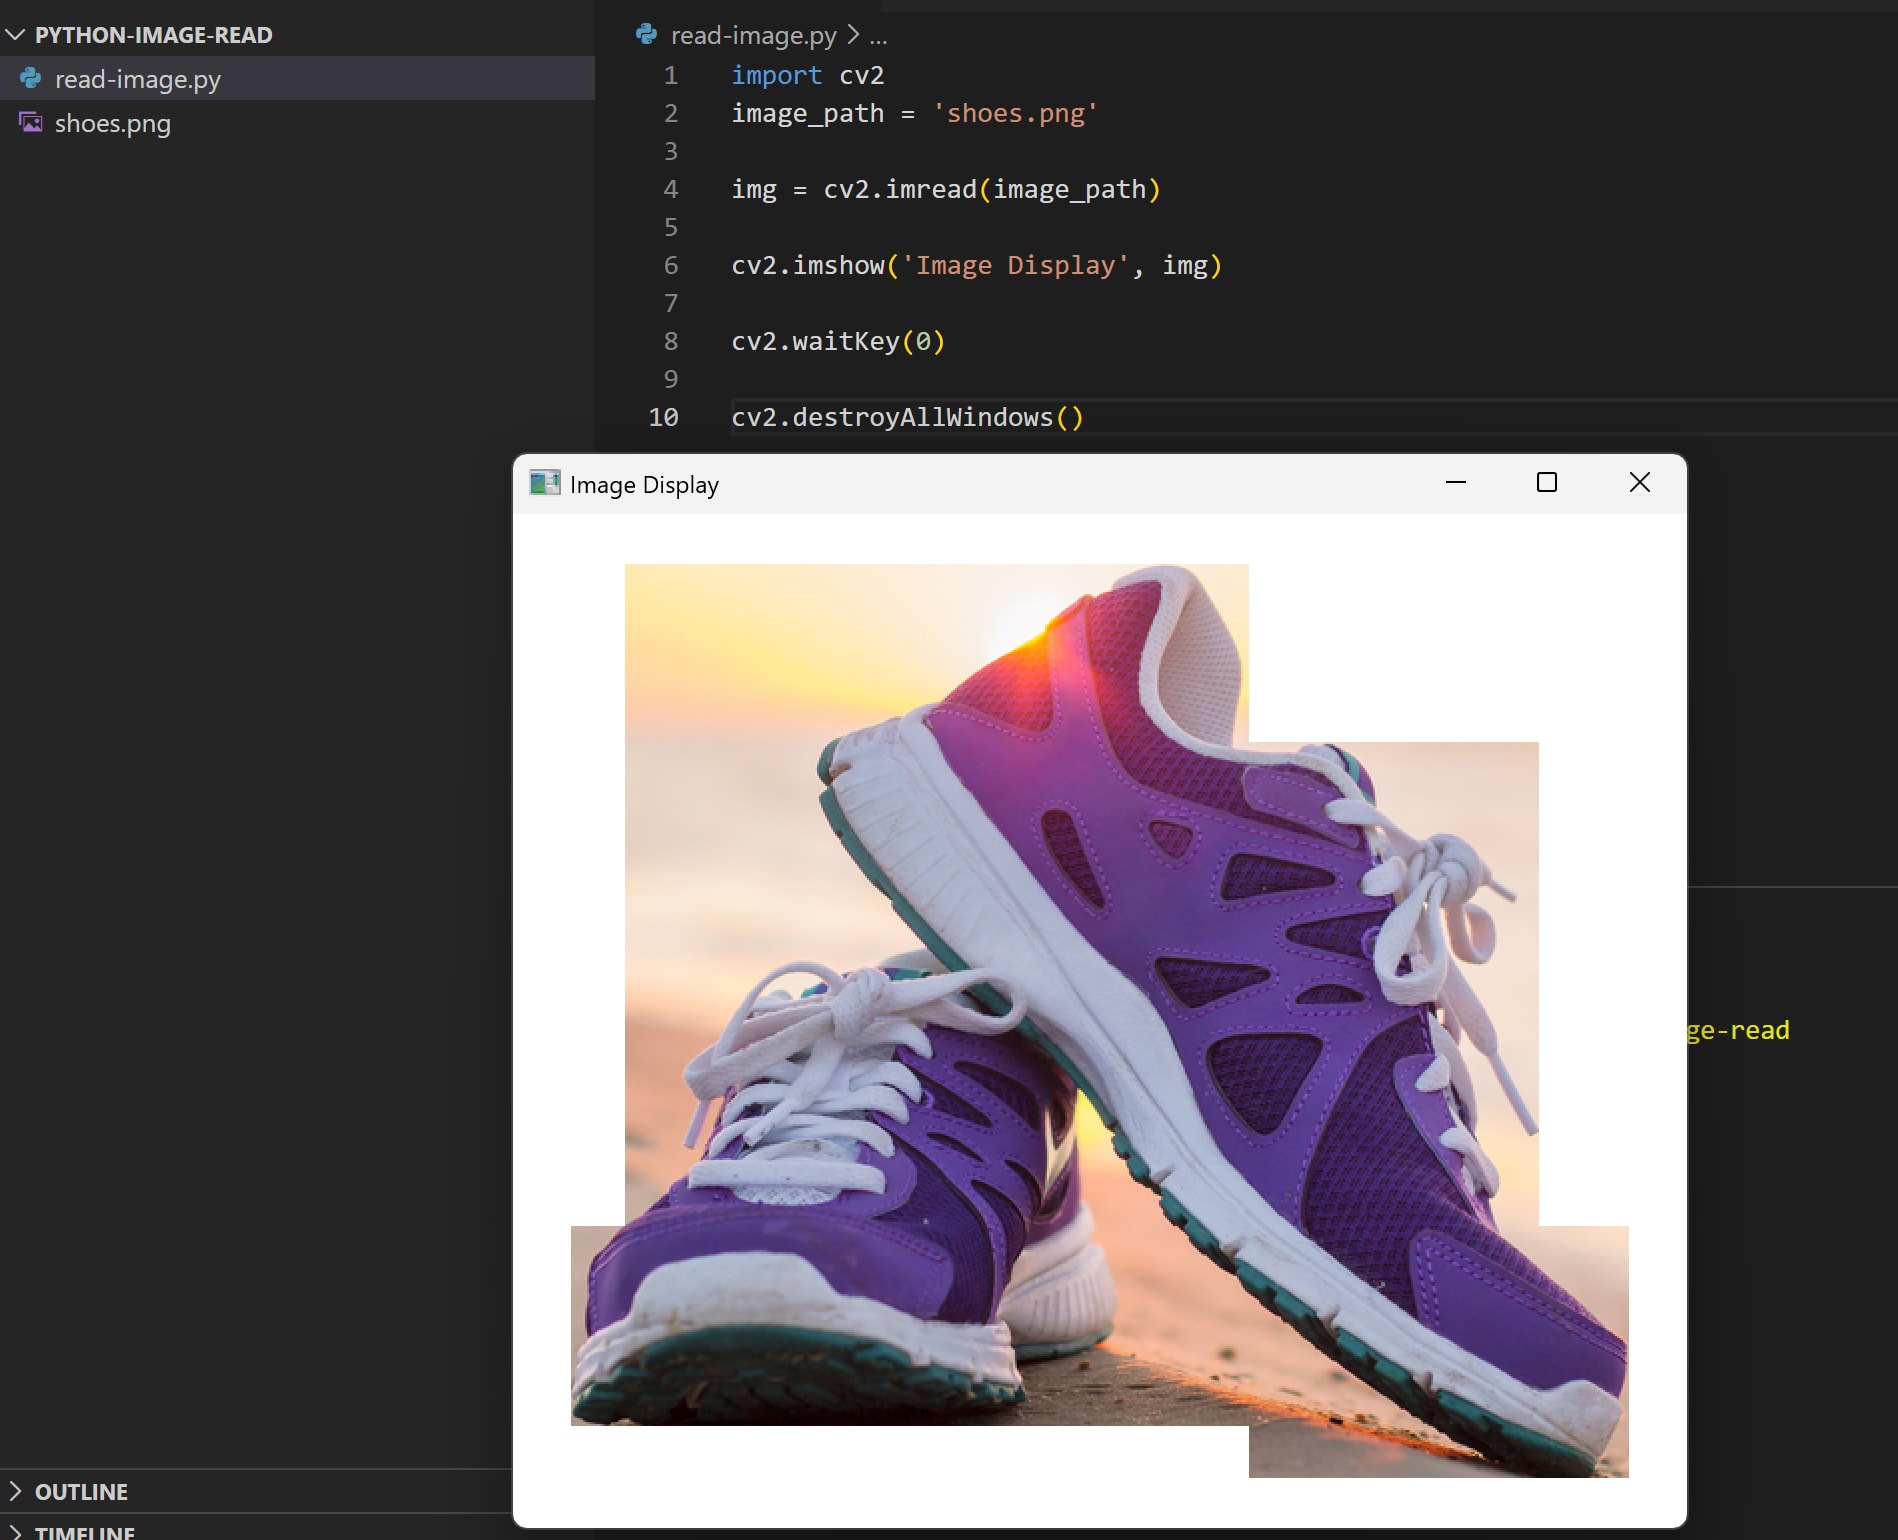
Once the library is installed, you can import it into your project and use the following code to load and display the image:
import cv2
image_path = '/path/to/your/image'

img = cv2.imread(image_path)

cv2.imshow('Image Display', img)

cv2.waitKey(0)

cv2.destroyAllWindows()
The cv2.imread() method loads the image from the specified path provided as a parameter, and the cv2.imshow() displays the image in a window. If we run this code we should get our image displayed:
Loading Images with Pillow
Pillow is another open-source Python library for image processing and manipulation. It supports various image formats and allows for a wide-range of operations to be applied for transforming the images. It is an actively maintained fork of the original Python Image Library(PIL), but the original PIL library is no longer being updated.
Install the Pillow library using pip with pip install pillow
Then import it into your project to load an image with the following code:
from PIL import Image

image_path = "shoes.png"

img = Image.open(image_path)

img.show()
The Image.open() method loads the image file from the specified path, and then the show() method displays the image using the operating system’s default image viewer application:
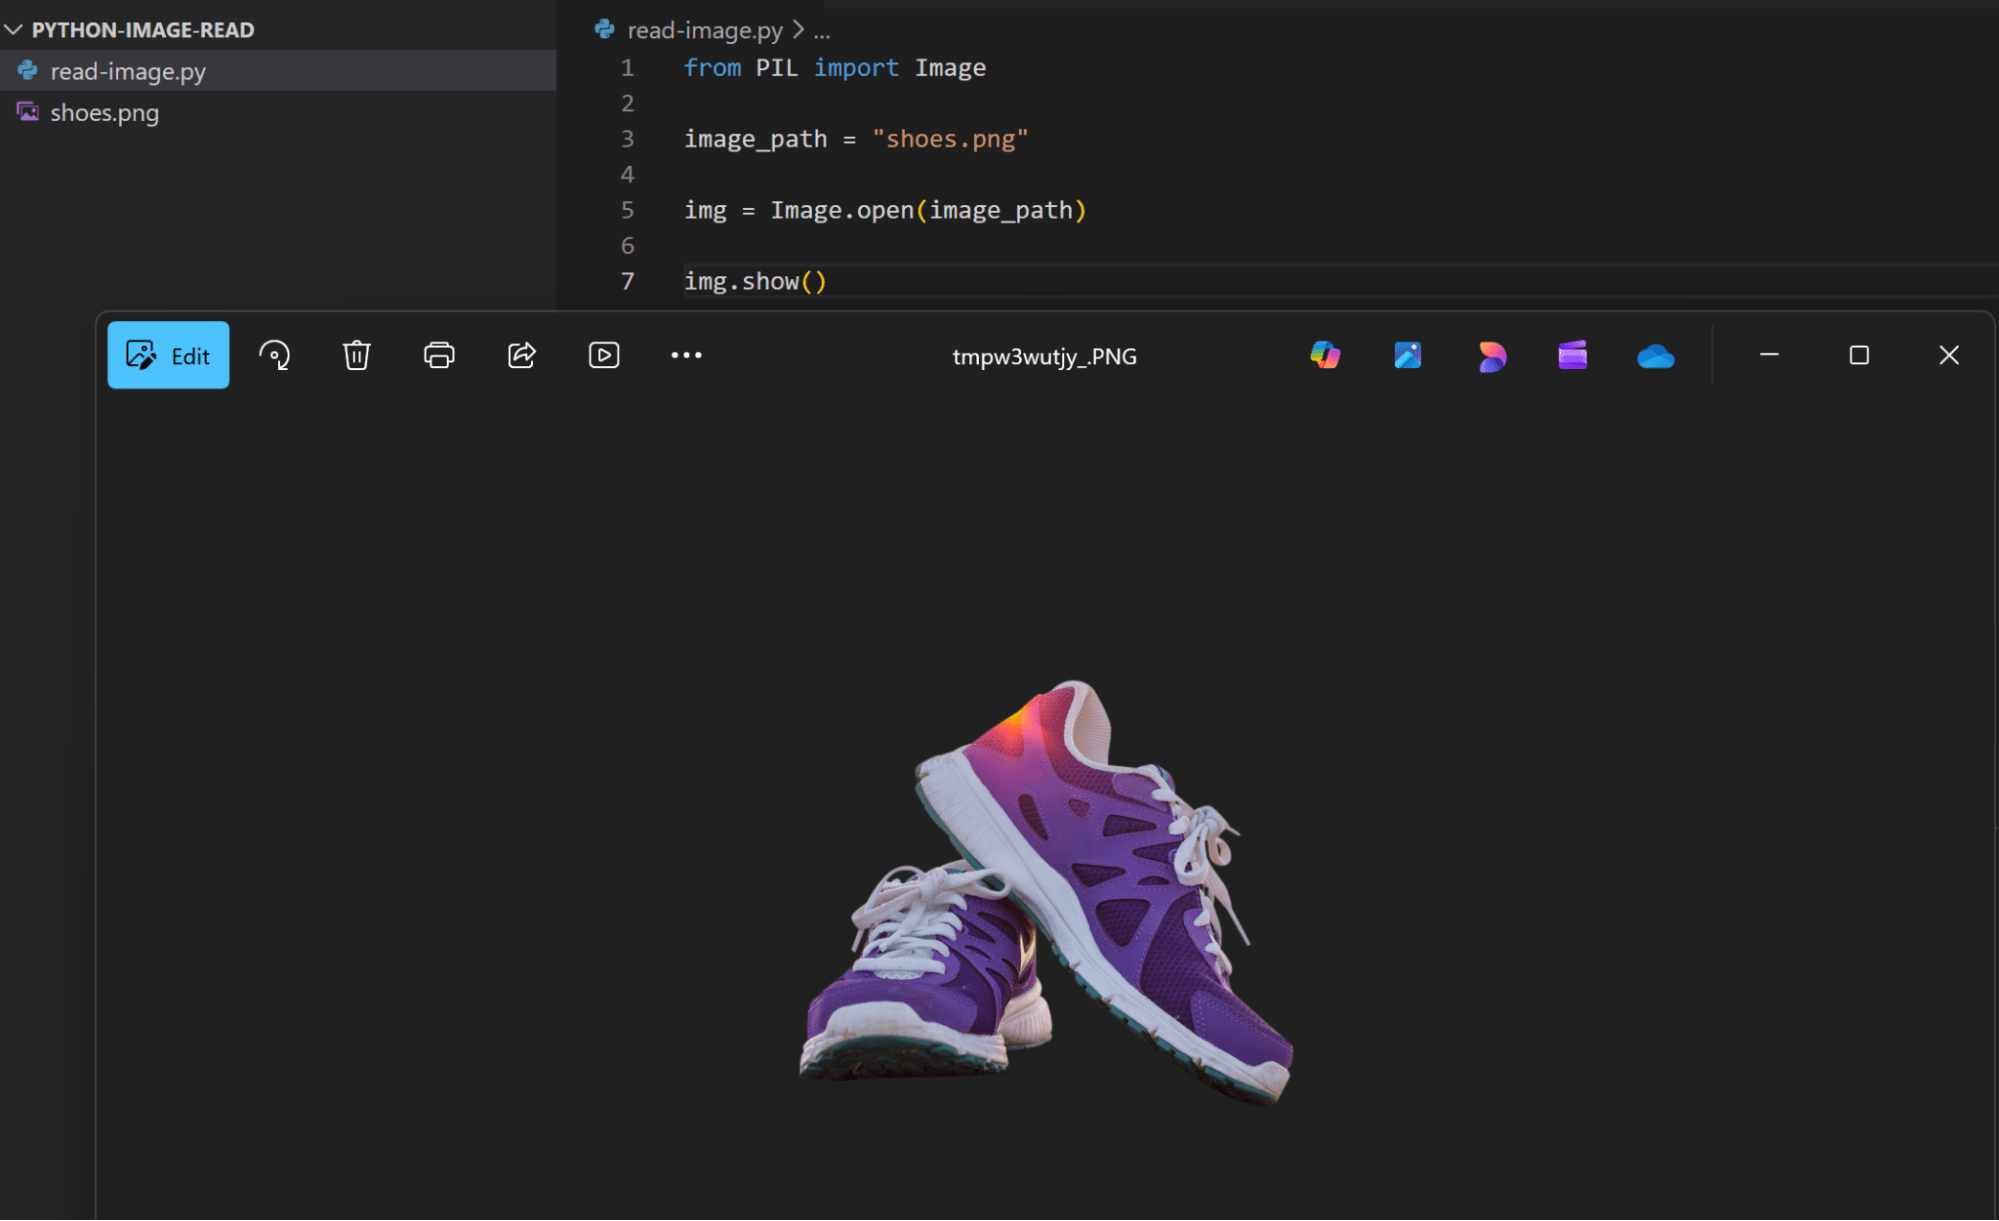
You can notice a different image name for the open file, this is because the show() method saves a temporary copy of the image file and that’s what it displays using the operating system image viewer application.
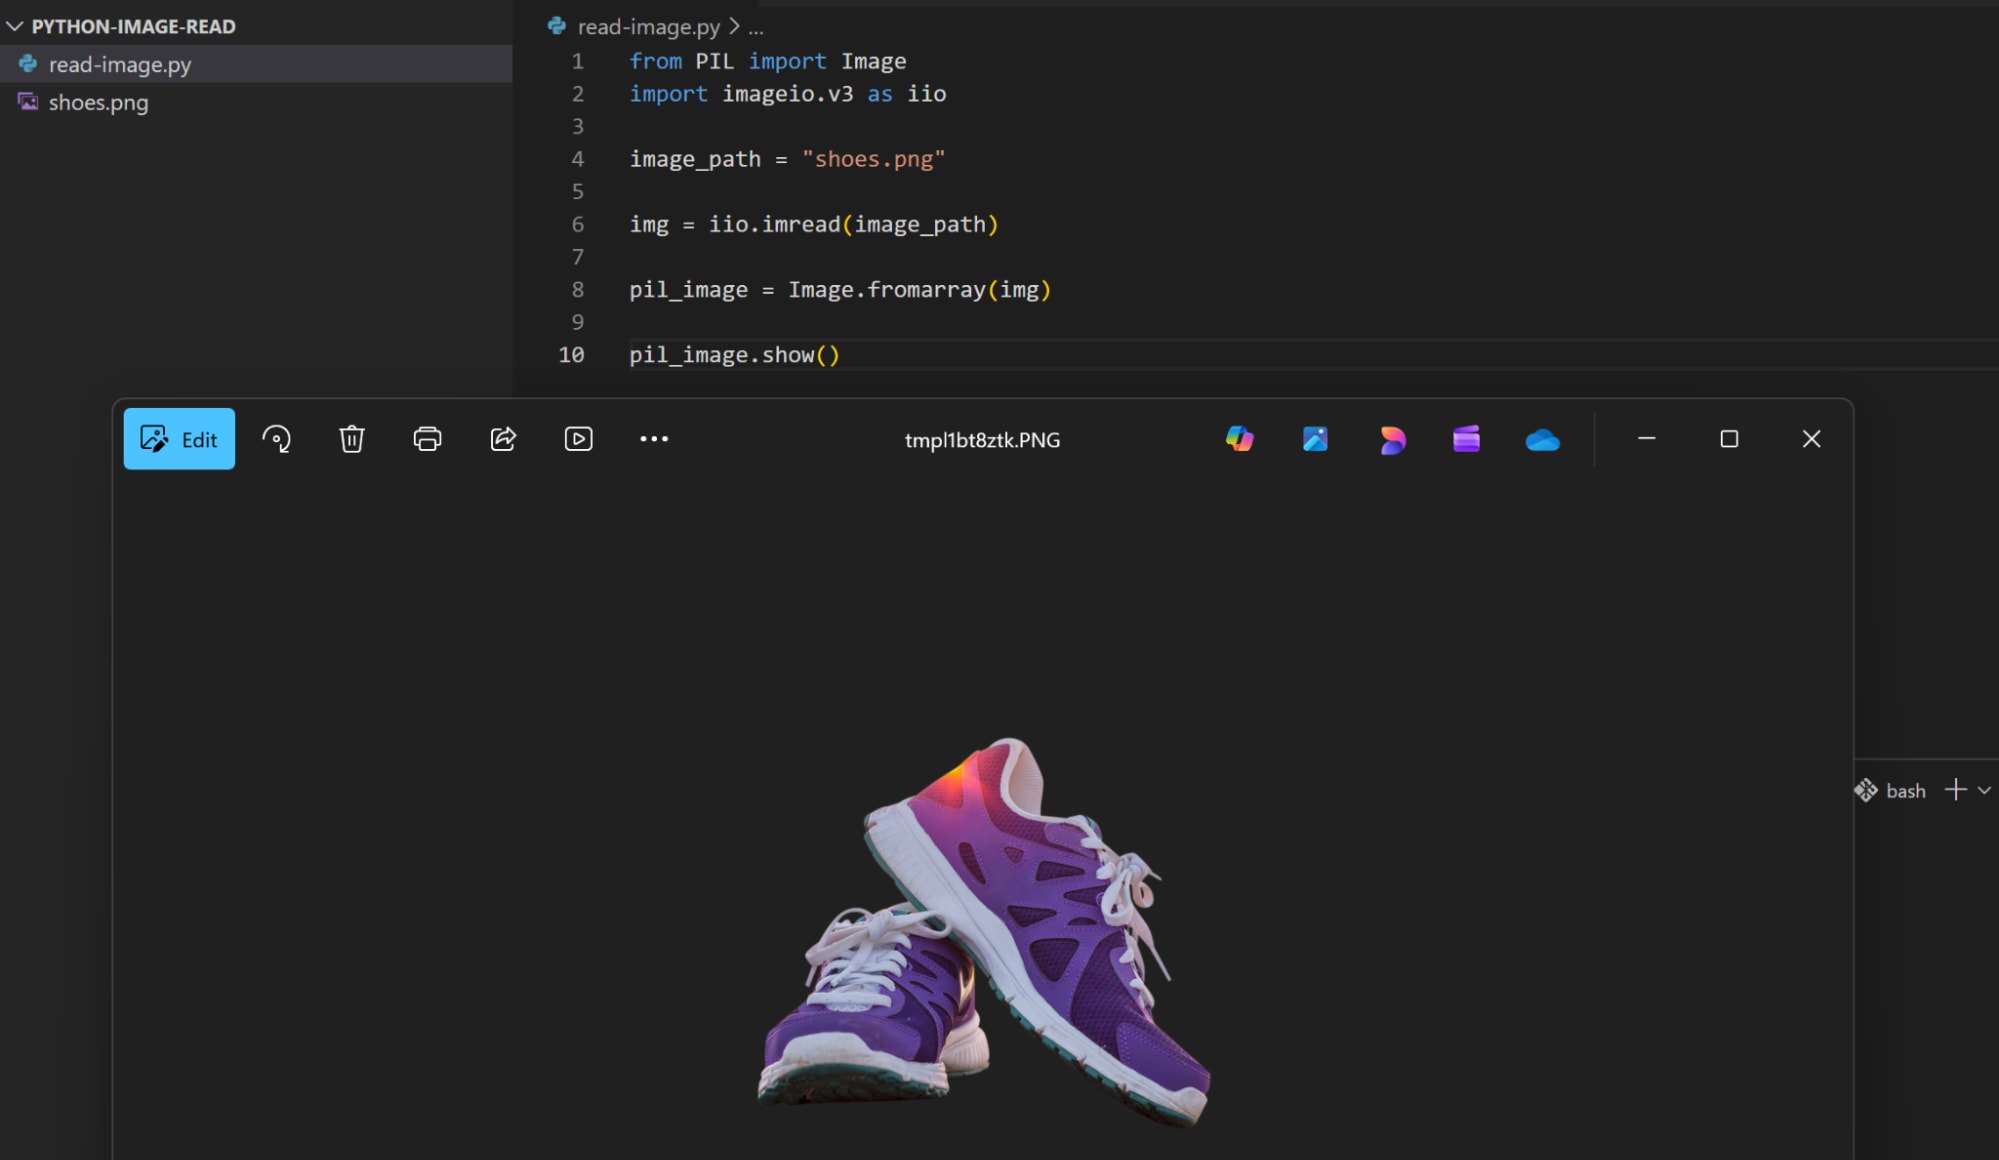
Reading Images Using ImageIO
ImageIO is another open-source Python library that provides easy-to-use interfaces for working with images. While ImageIO can read image files itself, it relies on other libraries like Pillow to display the image.
ImageIO loads the image as a NumPy array, you can then convert this array to a Pillow object and display it using the Pillow show() method as we did in the previous example.
First install the ImageIO library using pip install imageio
Then use the following code for reading and displaying the image:
from PIL import Image
import imageio.v3 as iio

image_path = "shoes.png"

img = iio.imread(image_path)

pil_image = Image.fromarray(img)

pil_image.show()
The imread() method loads the image file as a NumPy array, then the fromarray() method is provided by the Pillow library and it gets the NumPy array as a parameter and converts it into its image representation:
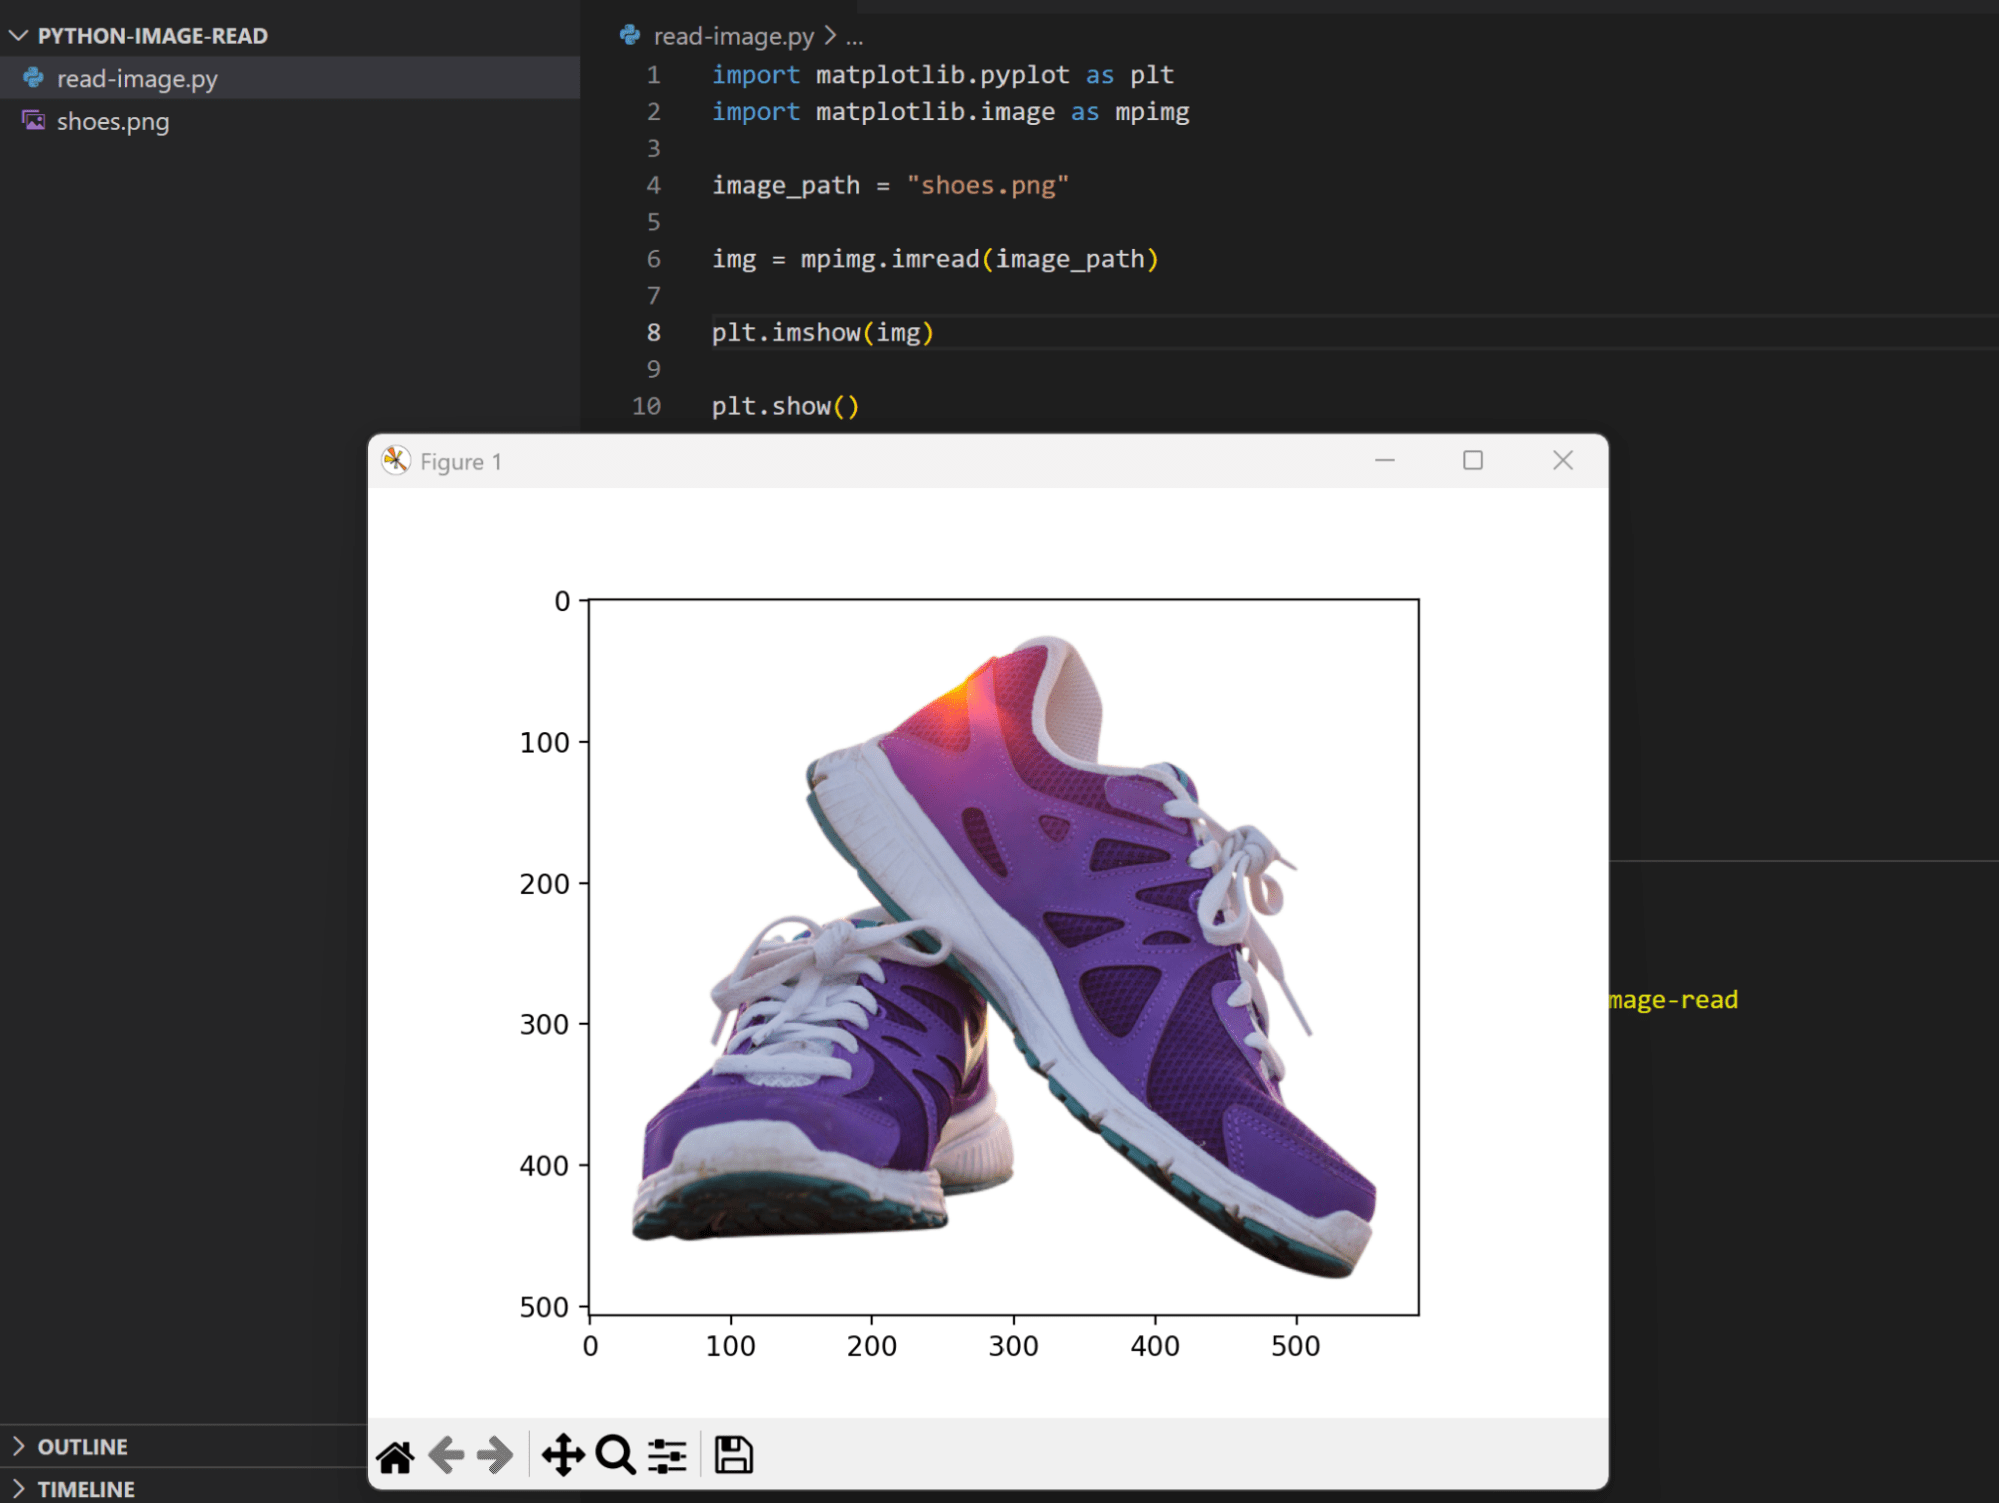
Read Images Using Matplotlib
Matplotlib is a Python library for building data visualizations. It is commonly used in data science and machine learning applications. It provides a comprehensive set of interfaces for different types of graph-plotting.
Again, start with installing the library using pip pip install matplotlib
Then use the following code to read and display the image:
import matplotlib.pyplot as plt
import matplotlib.image as mpimg

image_path = "shoes.png"

img = mpimg.imread(image_path)

plt.imshow(img)

plt.show()
The imread() method loads the provided image file, then the imshow() method draws this image figure, finally, the show() method displays the active figures on the screen:
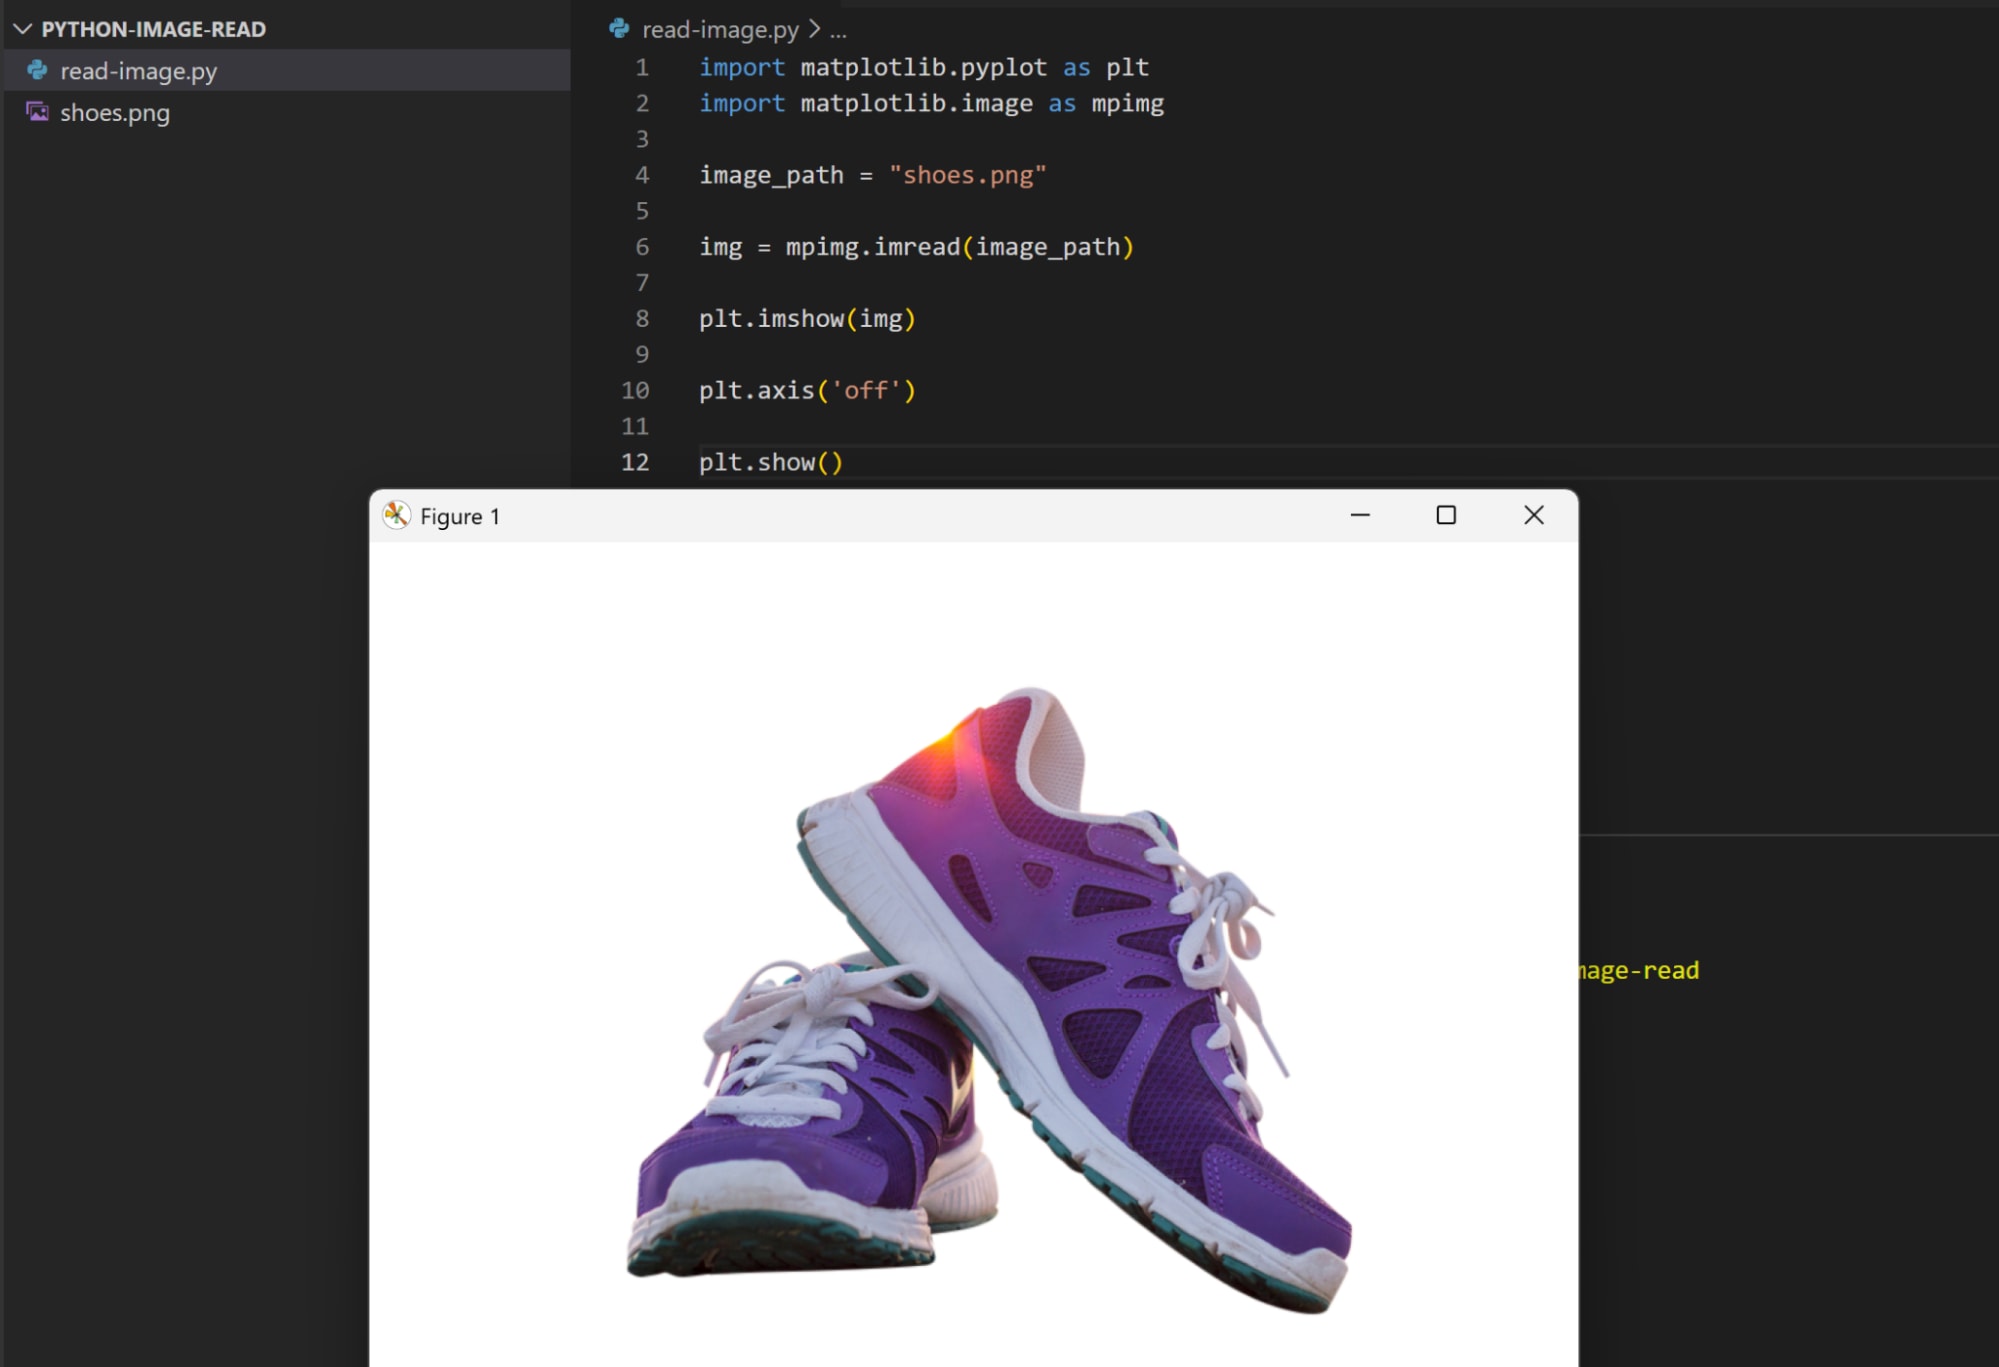
If you want to remove the X and Y axis scale, you can disable them using the axis() method:
import matplotlib.pyplot as plt
import matplotlib.image as mpimg

image_path = "shoes.png"

img = mpimg.imread(image_path)

plt.imshow(img)

plt.axis('off')

plt.show()
How to Read Images from URLs and Byte Streams
In the previous examples, we loaded the image as a file from local storage, but we can also use these libraries to read the image from other sources like an external URL and as a raw stream of bytes.
Let’s check this with an example. We’ll use the Pillow library for reading the image as before, and we’ll use the Python requests library to send the HTTP request for retrieving the image using the URL. Additionally, we’ll use the Python io module to work with the byte stream data.
The Python io module is typically present by default as part of the Python installation, but you’ll need to install the requests library via pip install requests
Then you can use the following code to read the image from the URL and display it:
import requests
from PIL import Image
from io import BytesIO

image_url = "https://link/to/image"

response = requests.get(image_url)

img = Image.open(BytesIO(response.content))

img.show()
Let’s break down what’s happening here:
response.contentattribute returns the body of the HTTP response (which includes the image from the URL) as a raw stream of bytes- Then,
BytesIO()adds the byte stream binary data in memory and provides a file-like object to work with it. Image.open()method gets this file-like object and loads the image from it.- We display the image using the
show()method

Working with Color, Grayscale, and Alpha Channels
Now that we understand how to read images in Python, let’s see how to apply some transformations on the images. We’ll implement some basic transformations by manipulating image colors, creating a grayscale image, and applying transparency using alpha channels.
Let’s start by working with colors using our Pillow library. Each image object in Pillow has a specific mode, the mode determines how each pixel in the image is represented. For example, the RGB mode represents the pixel as a tuple of 3 values for the Red, Green, and Blue channels, the RGBA mode represents a pixel as a tuple of 4 values, with the fourth channel is the alpha channel representing transparency.
We can change the color of an individual pixel by setting its value according to the mode representation:
import requests
from PIL import Image
from io import BytesIO
image_url = "https://link/to/image"
response = requests.get(image_url)
img = Image.open(BytesIO(response.content)).convert('RGB')
width, height = img.size
for pixel_x in range(width):
for pixel_y in range(height):
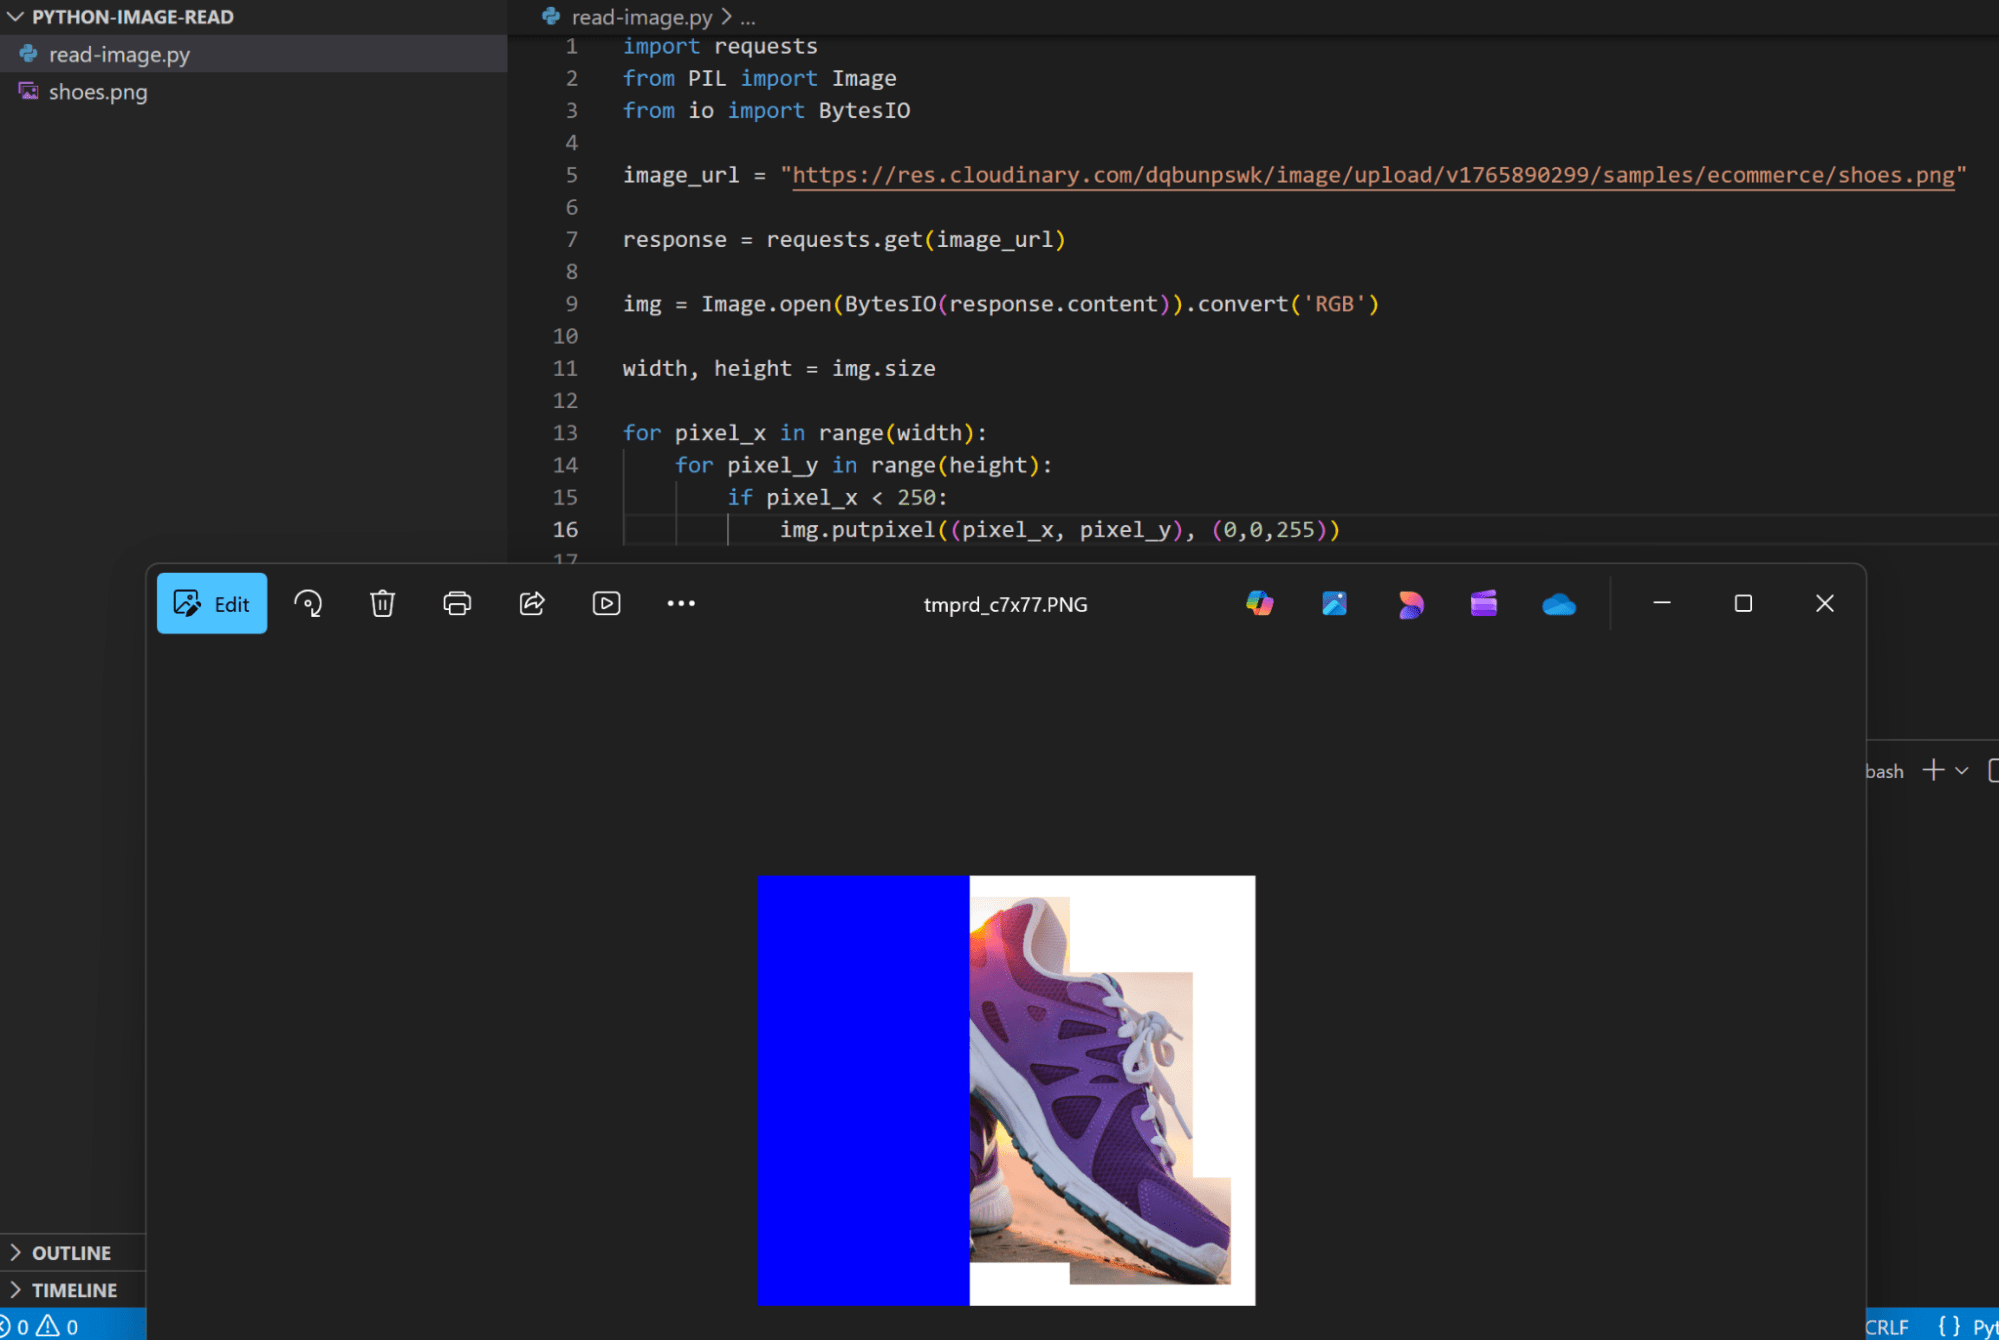
img.putpixel((pixel_x, pixel_y), (255,0,0))
img.show()
In the above code, we:
- Load an image from the URL and set its mode to RGB using the
convert()method. - Get the dimensions of the image using the
sizeattribute, which returns a 2-tuple including the width and height of the image. - Loop through each pixel and set the pixel value using the
putpixel()method. Because the image now is in RGB mode, we provide a 3-tuple for the pixel’s value. The(255, 0, 0)represents a pure red color, so our image now should have all its pixels set to red
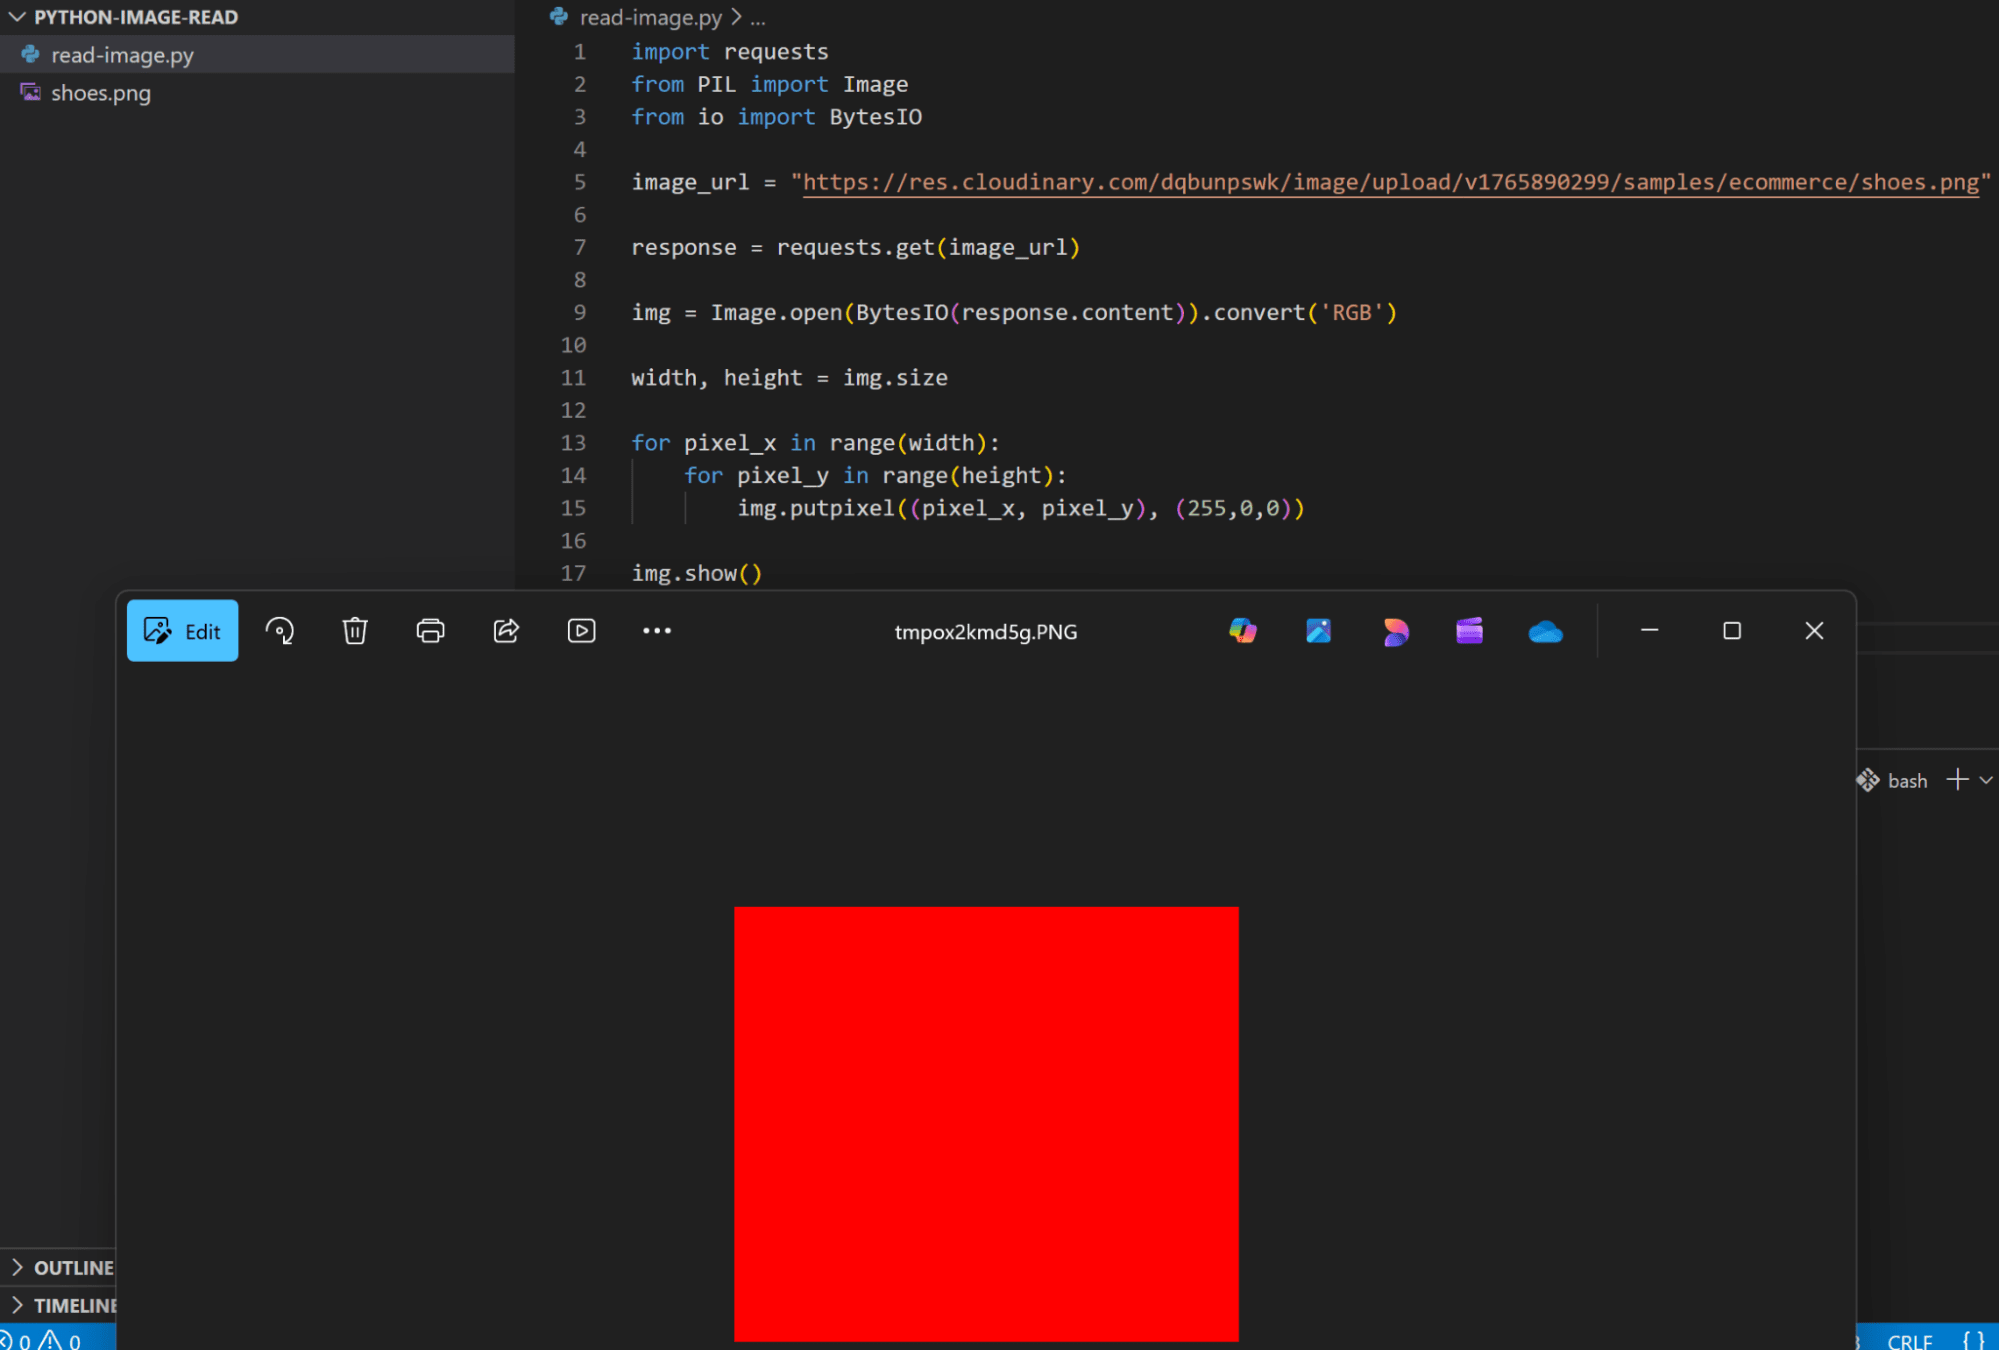
And we can of course set pixel color for only some of the pixels in the image:
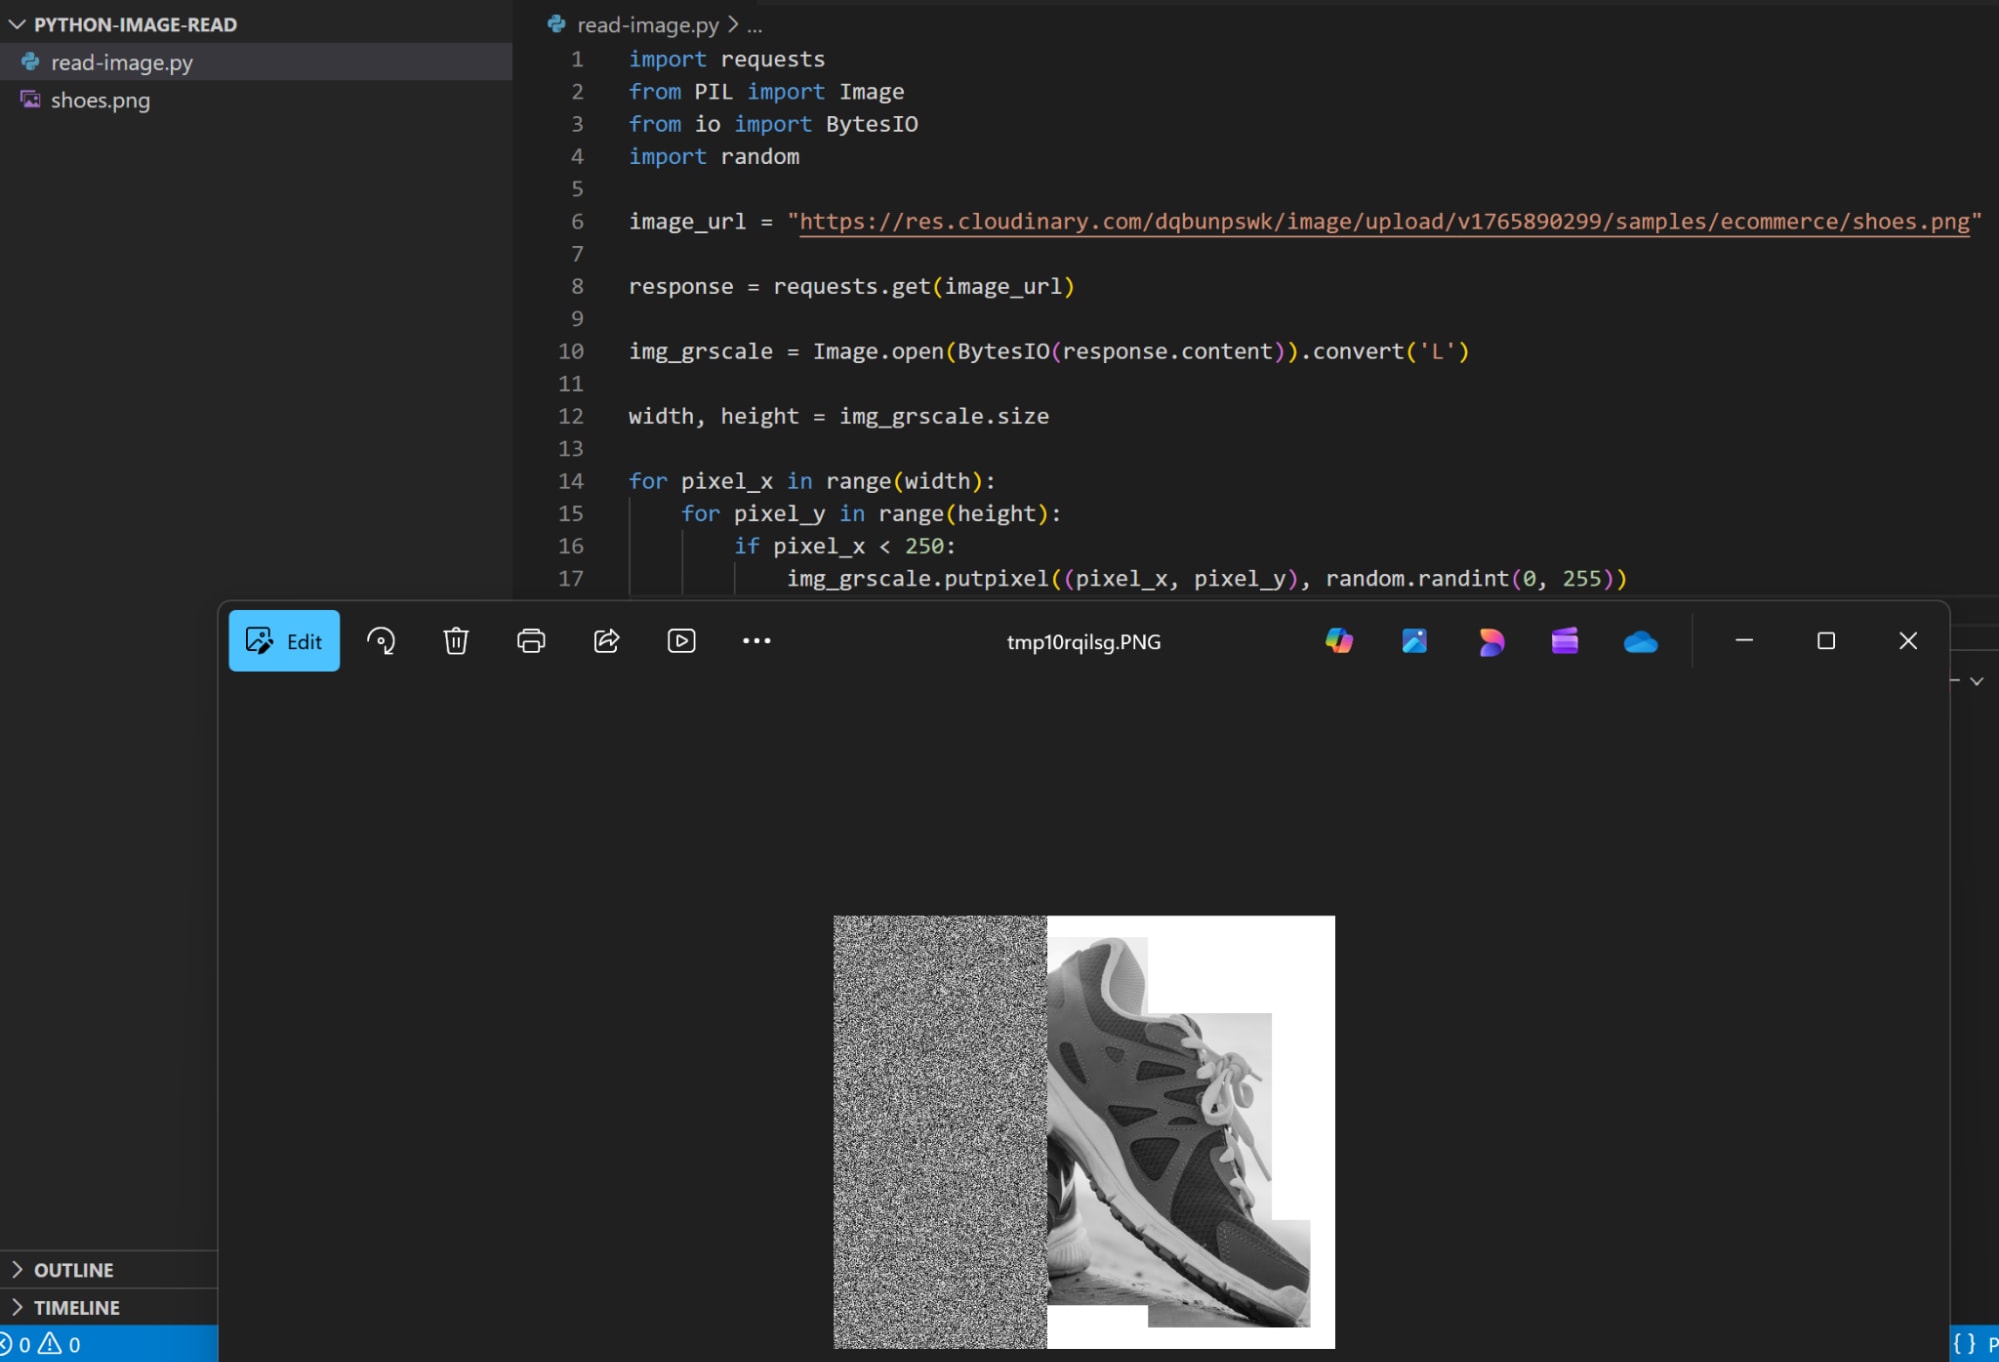
Now let’s move to the grayscale mode. In Pillow, it’s represented by ‘L’ for luminous. In the grayscale mode each pixel is represented by an integer, ranging from 0 to 255 (an 8-bit representation). The value decides the level of gray color, or luminous, with 0 being the lowest (black) and 255 being the highest (white).
To work with grayscale using Pillow, we first need to convert our image into the ‘L’ mode:
import requests
from PIL import Image
from io import BytesIO

image_url = "https://link/to/image"

response = requests.get(image_url)

img_grscale = Image.open(BytesIO(response.content)).convert('L')

img_grscale.show()

Then we can modify pixels gray level by setting a pixel value as we did in the previous color example, the difference is that this time it will be a single integer value instead of a 3-tuple:
import requests
from PIL import Image
from io import BytesIO
import random

image_url = "https://link/to/image"

response = requests.get(image_url)

img_grscale = Image.open(BytesIO(response.content)).convert('L')

width, height = img_grscale.size

for pixel_x in range(width):
    for pixel_y in range(height):
        if pixel_x < 250:
            img_grscale.putpixel((pixel_x, pixel_y), random.randint(0, 255))

img_grscale.show()
Now let’s move to the final mode we’re going to work with in this guide, which is the transparent mode (also called alpha). In Pillow, the transparent mode is called RGBA mode, where it converts an image to an RGBA image instead of RGB.
Each pixel in this mode is represented by a 4-tuple, with the first 3 values in the tuple are the standard RGB channels, while the fourth value is the alpha channel, which represents the degree of transparency of the pixel. The alpha channel can also have a value between 0 and 255, with 0 being fully transparent, and 255 being fully opaque.
Let’s read our image in the RGBA mode and see how it looks:
import requests
from PIL import Image
from io import BytesIO

image_url = "https://link/to/image"

response = requests.get(image_url)

img_alpha = Image.open(BytesIO(response.content)).convert('RGBA')

img_alpha.show()
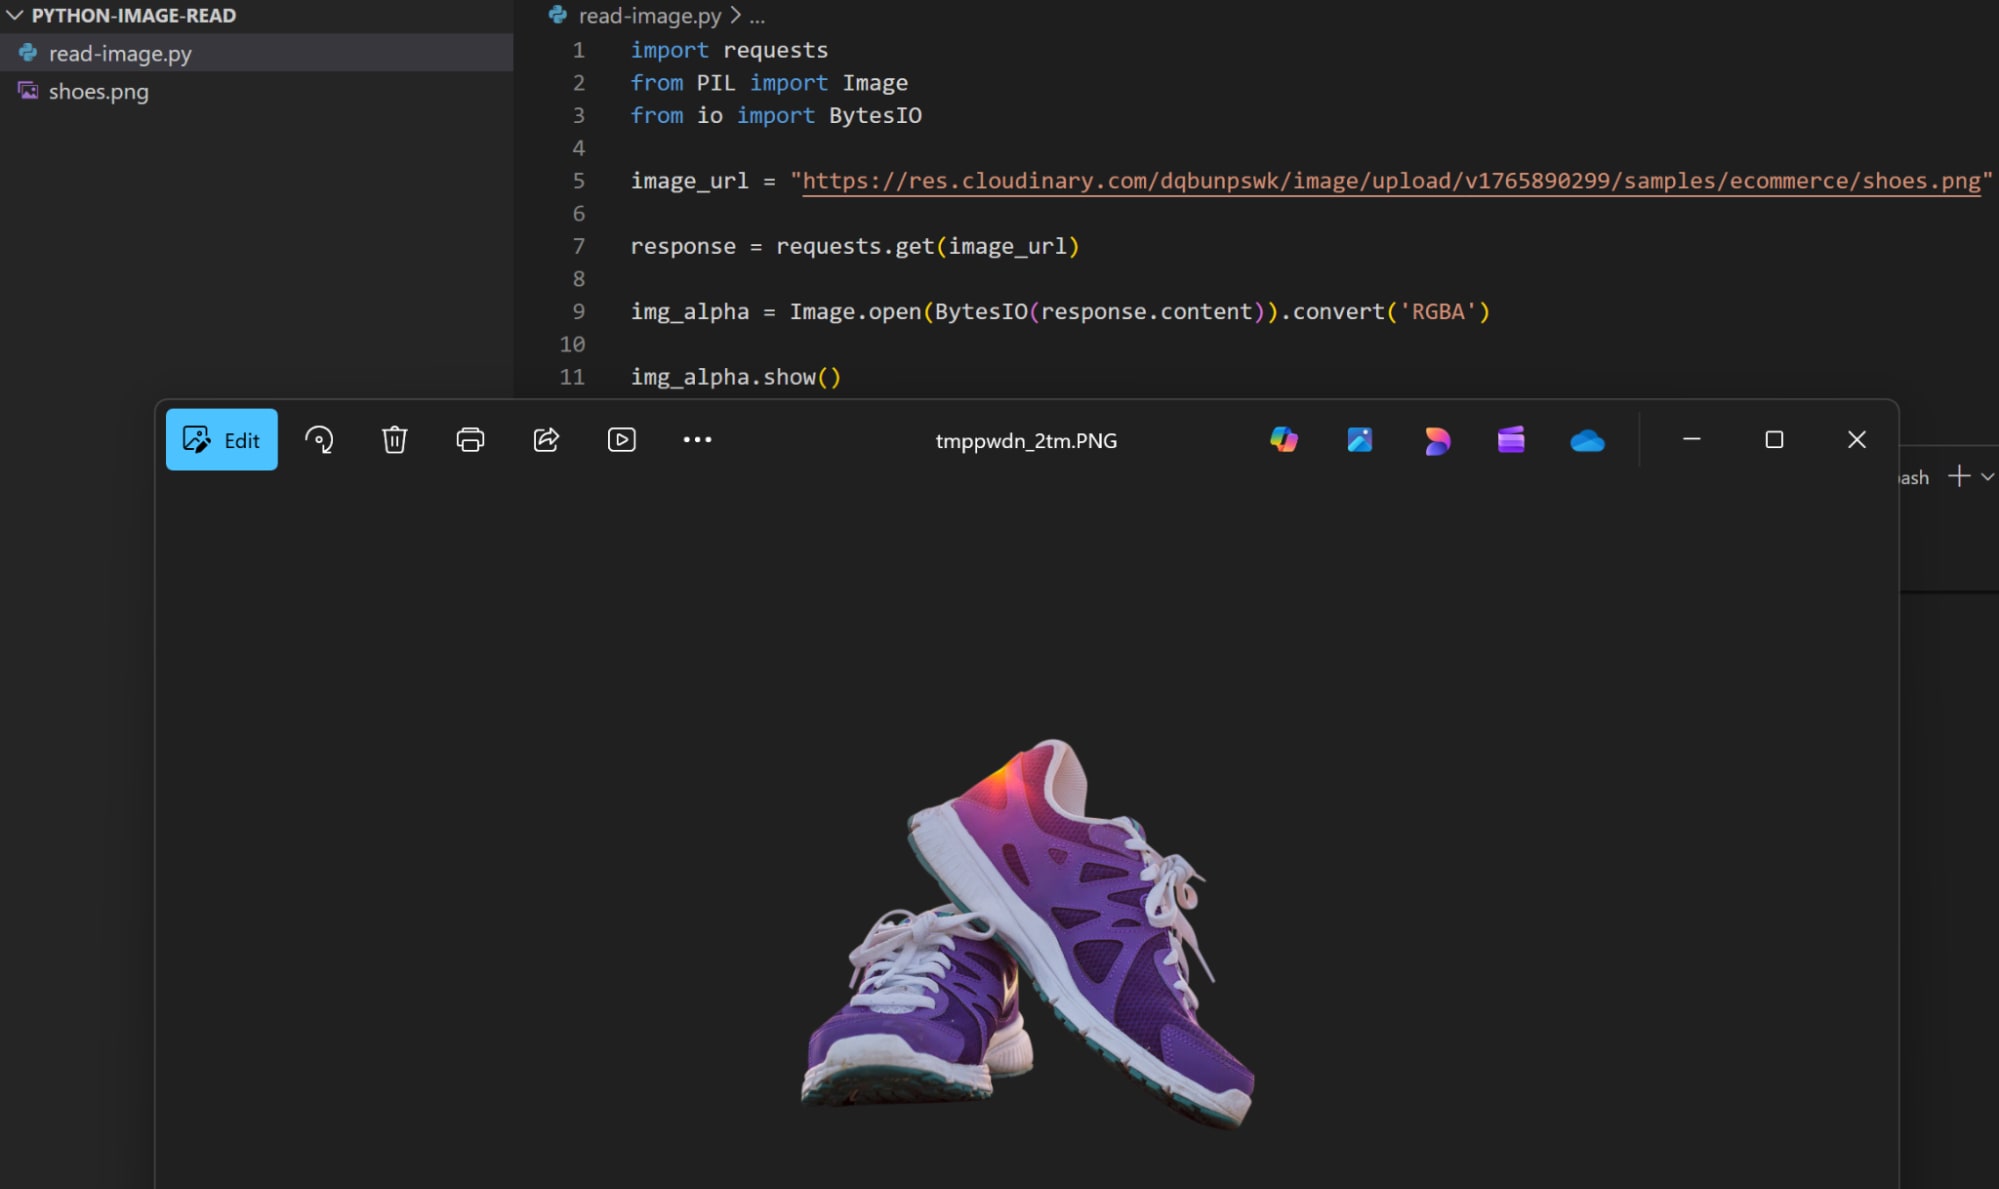
We can see that the shoes object in the image is showing, while the rest of the image is displaying the background color, which means that these pixels are fully transparent.
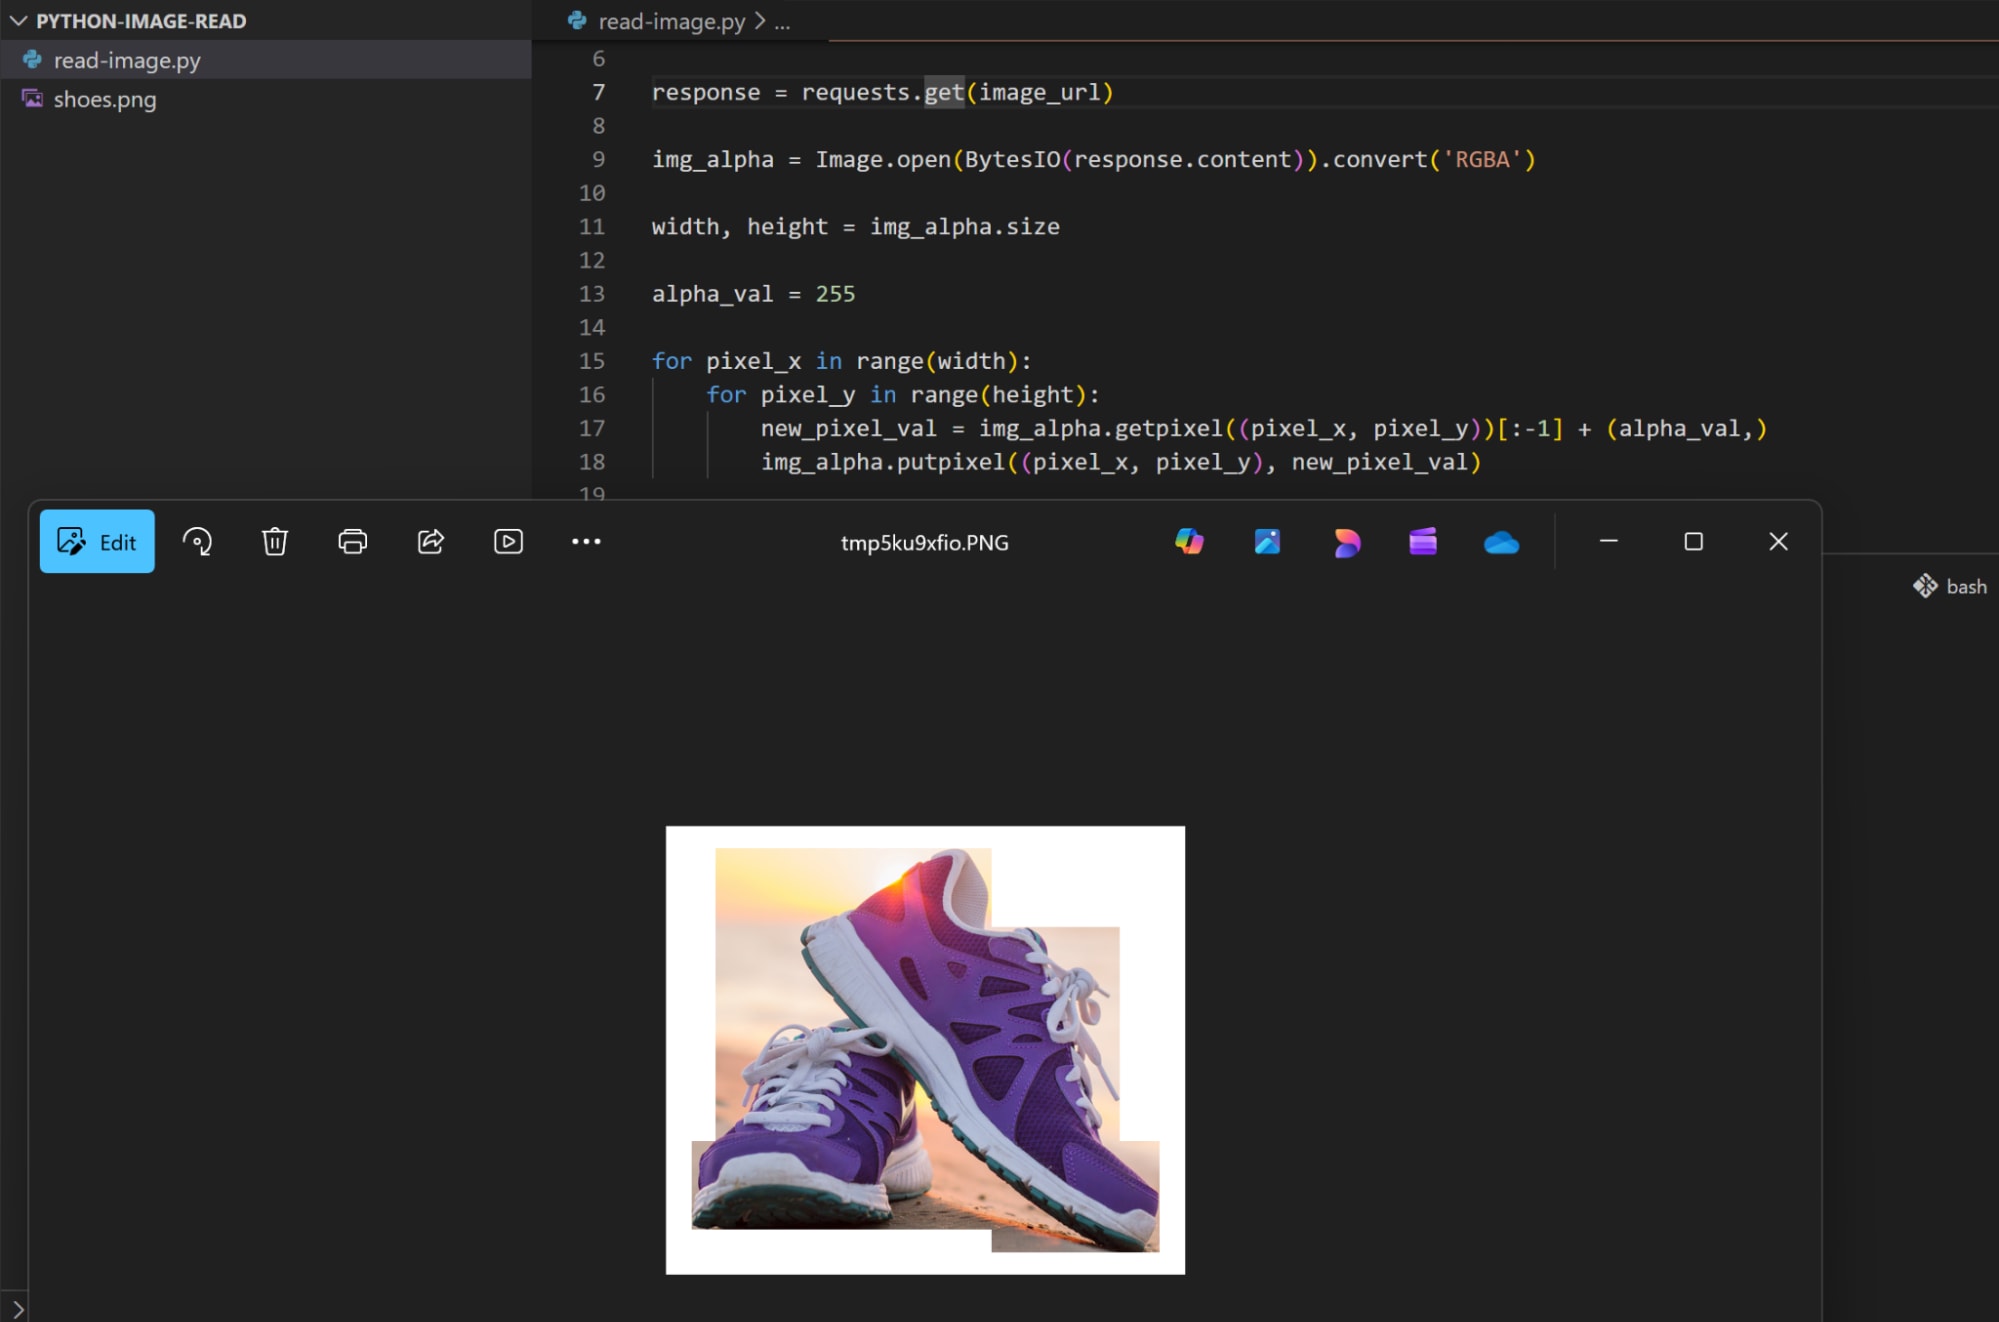
Now if we modify the alpha channel value for the image pixels and set it to fully opaque, we should see all the image pixels’ colors instead of the background color:
import requests
from PIL import Image
from io import BytesIO

image_url = "https://link/to/image"

response = requests.get(image_url)

img_alpha = Image.open(BytesIO(response.content)).convert('RGBA')

width, height = img_alpha.size

alpha_val = 255

for pixel_x in range(width):
    for pixel_y in range(height):
        new_pixel_val = img_alpha.getpixel((pixel_x, pixel_y))[:-1] + (alpha_val,)
        img_alpha.putpixel((pixel_x, pixel_y), new_pixel_val)

img_alpha.show()
Common Errors When Reading Images and How to Fix Them
After we’ve covered different scenarios for working with images in Python, let’s see some of the common errors that can appear when trying to read an image.
- FileNotFoundError: This error indicates that Python cannot find the image file in the specified path. Ensure you provided the correct path, and as a best practice try to use absolute paths instead of relative paths.
- UnidentifiedImageError: The file is either corrupted or has an unknown image format. Check the file integrity for any errors and validate if the image format is supported by the used Python library. You can also try to convert the image format to another one that the library can read.
- ModuleNotFoundError: The library or package you’re trying to use doesn’t exist. Ensure you installed the correct Python library and imported it into your project.
- AttributeError: This error indicates that the method or property you’re trying to access for an object is incorrect. Either you specified a non-existent attribute or method name, or you used an incorrect capitalization. For example, if you used
Image.SIZEinstead ofImage.sizein Pillow, it will display an error.
Wrapping Up
Reading an image in Python is the process of loading the image data from a specific source like a persistent storage or external URL into memory. It is a common process for applications that require processing, analyzing, or manipulating images.
Python provides many libraries that facilitate reading and working with images. These libraries abstract the low-level complexity of handling the image data, and provide higher-level functions and properties that are easy to use.
Frequently Asked Questions
How do you read an image in Python?
In Python, you can read an image using libraries like OpenCV, Pillow, or Matplotlib by calling a function that loads the image file into an array or image object. For example, cv2.imread("image.jpg") with OpenCV returns the image data as a NumPy array.
Which library is best for reading images in Python?
OpenCV is widely used for advanced computer vision tasks and reads images as NumPy arrays, while Pillow is simpler and integrates well with basic image handling. Your choice depends on whether you need extensive processing (OpenCV) or lightweight image loading and saving (Pillow).
What file formats can Python read when loading images?
Python image libraries support common formats like JPEG, PNG, BMP, and TIFF out of the box, and many also handle additional formats via plugins. Format support ultimately depends on the library you use and the codecs installed on your system.

