Image compression is critical for modern web applications. Large, unoptimized images slow down page loads, consume unnecessary bandwidth, and frustrate users on slower connections. With JavaScript, we can compress images directly in the browser before uploading them to a server, or leverage cloud services like Cloudinary for automatic optimization during delivery. This guide covers both approaches with practical, working examples.
Key takeaways:
- Client-side compression reduces upload times and server load by processing images in the browser before transmission.
- Lossy compression (JPEG) provides smaller file sizes at the cost of some quality, while lossless (PNG) preserves every pixel.
- The Canvas API enables browser-based image compression with full control over quality and dimensions.
- Combining client-side and cloud-based compression creates the fastest possible user experience.
In this article:
- Why Compress: Faster Loads, Less Data
- When to Compress Client-Side vs Server-Side
- Lossy vs. Lossless: Pick the Right One
- Compress Images with the Canvas API
- Use Cloudinary for Automatic Compression
- Using the Cloudinary JavaScript SDK
Why Compress: Faster Loads, Less Data
Image compression directly impacts user experience and application performance. Uncompressed images can range from hundreds of kilobytes to several megabytes, causing slow page loads, high bandwidth costs, and poor mobile user experiences. Image compression algorithms reduce file sizes by removing redundant data (lossless) or discarding less noticeable visual information (lossy), making images load faster while using less data.
When to Compress Client-Side vs Server-Side
Images can be compressed primarily in the client browser, on the server, and in cloud-based frameworks.
Client-side Compression
Client-side compression happens in the user’s browser using JavaScript before the image is uploaded to a server. This approach reduces the amount of data sent over the network, speeds up uploads, and decreases server processing load. It’s ideal for user-generated content platforms, profile picture uploads, and mobile applications with limited bandwidth. The browser does the heavy lifting, meaning the server handles smaller files from the start.
Server-side Compression
Server-side compression takes place after the image reaches the backend server, typically during storage or when serving images to users. This method gives centralized control over quality settings, supports batch processing of existing images, and works for images uploaded via non-browser clients (mobile apps, APIs). Server-side compression is best when we need consistent optimization across all images, regardless of how they’re uploaded, or when we’re delivering images through a CDN that can cache the compressed versions.
Cloud-based Compression
Cloud-based services like Cloudinary combine the best of both worlds. Images are uploaded once (optionally pre-compressed client-side), and the cloud service automatically generates optimized versions on-demand based on the requesting device, browser, and screen size. This eliminates the need to store multiple versions of the same image and ensures every user receives the most optimized version for their specific context.
In practice, the best strategy often involves multiple layers: compress images in the browser before upload to reduce transfer time, then rely on cloud-based services for automatic format conversion, responsive sizing, and delivery optimization. This approach minimizes bandwidth at every step while maintaining visual quality.
Lossy vs. Lossless: Pick the Right One
Understanding the difference between lossy and lossless compression helps choose the right strategy for each image type. The fundamental trade-off is between file size and visual fidelity.
Lossy Compression
Lossy compression permanently discards image data that the human eye is less likely to notice. JPEG is the most common lossy format, using techniques like chroma subsampling and discrete cosine transforms to reduce file sizes by 70-90% compared to uncompressed formats. The key advantage is dramatically smaller files, making lossy compression ideal for photographs, hero images, and content where a slight quality reduction is acceptable. Modern lossy formats like WebP and AVIF achieve even better compression ratios while maintaining higher visual quality than JPEG.
Lossless Compression
This technique reduces file size without discarding any image data. PNG is the standard lossless format, using algorithms such as DEFLATE to detect patterns and redundancies in the image data.
Every pixel in the decompressed image is identical to the original, making lossless compression essential for logos, icons, screenshots with text, images requiring transparency, and any content where exact color accuracy matters. The trade-off is larger file sizes compared to lossy compression, typically 2-5× larger for photographic content.
Choosing the Right Format
- Use lossy compression for photographs, background images, user-generated content, and hero sections where minor quality reduction is imperceptible.
- Use lossless compression for logos and branding, UI icons and graphics, images with transparency, screenshots and diagrams, and text-heavy images. PNG-8 works well for simple graphics, while PNG-24 handles complex images with millions of colors.
- Use modern formats like WebP or AVIF when browser support allows. WebP offers 25-35% better compression than JPEG with equivalent quality, while AVIF provides an additional 20% improvement over WebP. Both support both lossy and lossless modes.
Compress Images with the Canvas API
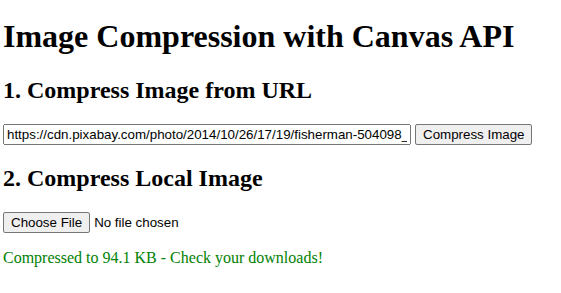
The Canvas API lets you compress images directly in the browser before uploading them to a server. The basic workflow is simple: load an image, draw it on a canvas element, and export it as a compressed JPEG or PNG. This happens entirely on the client side, reducing upload times and server load.
This example uses the Canvas API, which compresses the image by re-encoding it at a lower quality. After the image is loaded, it is drawn onto a canvas using drawImage, which converts the image into raw pixel data managed by the Canvas API. The compression happens when canvas.toBlob() is called with the output format set to image/jpeg and a quality value of 0.7.
Here, the Canvas API applies JPEG’s lossy compression algorithm, reducing file size by discarding less noticeable visual information. The resulting Blob is a compressed version of the original image with significantly smaller size and acceptable visual quality.
<!DOCTYPE html>
<html lang="en">

<head>
    <meta charset="UTF-8">
    <title>Image Compression Demo</title>
</head>

<body>
    <h1>Image Compression with Canvas API</h1>

    <h2>1. Compress Image from URL</h2>
    <input type="text" id="imageUrl" placeholder="Enter image URL (e.g., from Pixabay)" style="width: 400px;">
    <button onclick="compressRemoteImage()">Compress Image</button>

    <h2>2. Compress Local Image</h2>
    <input type="file" onchange="compressLocalImage(event)" accept="image/*">

    <div id="status"></div>

    <script>
        // Compress a remote image from user-provided URL
        function compressRemoteImage() {
            const url = document.getElementById('imageUrl').value;
            if (!url) {
                alert('Please enter an image URL');
                return;
            }

            const img = new Image();
            img.crossOrigin = 'anonymous';  // Allow cross-origin image loading

            img.onload = function () {
                compressAndDownload(img, 'compressed-remote.jpg');
            };

            img.onerror = function () {
                document.getElementById('status').innerHTML =
                    '<p style="color: red;">Failed to load image. Check the URL or CORS settings.</p>';
            };

            img.src = url;
        }

        // Compress a local image file
        function compressLocalImage(event) {
            const file = event.target.files[0];
            if (!file) return;

            const reader = new FileReader();
            reader.onload = function (e) {
                const img = new Image();
                img.onload = function () {
                    compressAndDownload(img, 'compressed-local.jpg');
                };
                img.src = e.target.result;
            };
            reader.readAsDataURL(file);
        }

        // Main compression function
        function compressAndDownload(img, filename) {
            // Create canvas and set size
            const canvas = document.createElement('canvas');
            canvas.width = img.width;
            canvas.height = img.height;

            // Draw image on canvas
            const ctx = canvas.getContext('2d');
            ctx.drawImage(img, 0, 0);

            // Convert to compressed JPEG (70% quality)
            canvas.toBlob(function (blob) {
                // Display size
                document.getElementById('status').innerHTML =
                    `<p style="color: green;">Compressed to ${(blob.size / 1024).toFixed(1)} KB - Check your downloads!</p>`;

                // Download
                const url = URL.createObjectURL(blob);
                const a = document.createElement('a');
                a.href = url;
                a.download = filename;
                a.click();
                URL.revokeObjectURL(url);
            }, 'image/jpeg', 0.7);
        }
    </script>
</body>

</html>
Output:
Use Cloudinary for Automatic Compression
While client-side compression gives us control over the upload process, Cloudinary provides automatic, intelligent compression during image delivery. This approach eliminates manual quality tuning and ensures every user receives the most optimized version of our images, regardless of their device or browser.
We can use direct URL transformations to apply powerful automatic optimization features that adapt to each user’s context. Later in this guide, we’ll explore the JavaScript SDK for programmatic URL generation in complex scenarios.
Use q_auto for Optimal Quality and Small File Size
The q_auto parameter enables Cloudinary’s automatic quality selection algorithm. Instead of manually choosing a quality level, Cloudinary analyzes each image and determines the optimal compression level that maintains visual quality while minimizing file size. This analysis happens once per image and accounts for image content, complexity, and format.
URL Structure:
# Original image (no optimization)
https://res.cloudinary.com/YOUR_CLOUD_NAME/image/upload/sample.jpg
# With automatic quality optimization
https://res.cloudinary.com/YOUR_CLOUD_NAME/image/upload/q_auto/sample.jpg
# A Cloudinary URL follows this structure:
https://res.cloudinary.com/[CLOUD_NAME]/[RESOURCE_TYPE]/[DELIVERY_TYPE]/[TRANSFORMATIONS]/[PUBLIC_ID]
YOUR_CLOUD_NAMEis our Cloudinary account identifierimagespecifies the resource typeuploadindicates this is a file we uploaded to Cloudinary (as opposed tofetchfor remote URLs)- Transformation parameters like
q_autogo in the middle sample.jpgis the public ID (filename) of our image. Cloudinary provides a demo cloud with sample images we can use for testing without creating an account.
The q_auto parameter typically reduces JPEG file sizes by 40-60% and PNG files by 20-40% without visible quality loss. For images with large solid-color areas or simple gradients, savings can exceed 70%. The algorithm adjusts compression based on the specific characteristics of each image, meaning complex photographs receive less aggressive compression than simple graphics.
Deliver WebP/AVIF Automatically Via f_auto
Modern image formats like WebP and AVIF offer significantly better compression than JPEG and PNG. The challenge is browser support; not all browsers support these formats, so fallbacks are required for older browser versions.
Cloudinary’s f_auto parameter solves this by automatically detecting the user’s browser capabilities and delivering the best supported format. Users on Chrome, Firefox, and Edge receive WebP or AVIF, while older Safari versions and IE get JPEG or PNG. This happens transparently without client-side detection code or CDN configuration.
# Automatic format selection
https://res.cloudinary.com/YOUR_CLOUD_NAME/image/upload/f_auto/sample.jpg
When a Chrome user requests this URL, Cloudinary serves WebP. When a Safari user requests the same URL, Cloudinary serves JPEG. The URL remains identical, but the delivered file changes based on the Accept header sent by the browser.
Combining q_auto and f_auto
For maximum optimization, we combine both parameters:
# Combined URL transformation
https://res.cloudinary.com/YOUR_CLOUD_NAME/image/upload/f_auto,q_auto/sample.jpg
This combination typically reduces bandwidth by 50-80% compared to unoptimized images. A 500 KB JPEG might become a 120 KB AVIF for modern browsers or a 200 KB WebP for slightly older ones, all from a single URL.
Using the Cloudinary JavaScript SDK
While the URL approach works well for simple cases, the Cloudinary JavaScript SDK provides a cleaner way to generate URLs with complex transformations. The SDK handles URL encoding, parameter ordering, and provides a type-safe API for building transformation chains. This is particularly valuable when we need to programmatically generate many different image variants with different sizes, crops, or effects.
Multiple transformations can be combined in a single configuration without worrying about parameter ordering or encoding. When the browser requests the generated URL, Cloudinary applies compression, format selection, and resizing server-side at delivery time, ensuring consistent, optimized images while keeping client-side code lightweight and easy to maintain.
Wrapping Up
Image compression is essential for building fast, efficient web applications. In this guide, we covered two complementary strategies: client-side compression with the Canvas API to reduce upload size and server load, and cloud-based automatic compression with Cloudinary to optimize images at delivery for every device and browser.
Cloudinary takes optimization further by handling compression during delivery. The q_auto parameter intelligently selects the best image quality, while f_auto uses modern formats like WebP or AVIF when supported. Together, they typically cut bandwidth usage by 50–80% without manual tuning and scale effortlessly with traffic.
In practice, the strongest setup combines both approaches: compress images client-side before upload, then let Cloudinary handle format selection and delivery optimization. This layered strategy ensures faster uploads, lower costs, and consistently optimized images across devices.

