Image transformations
Last updated: May-25-2025
Cloudinary's dynamic URL transformations enable you to programmatically generate multiple variations of your high quality original images on the fly, without the need for graphic designers and fancy editing tools.
You can build these URLs manually in your code, or take advantage of Cloudinary's SDKs, which enable you to write your transformation code using intuitive syntax designed for your preferred programming language or framework and let the SDK automatically build these URLs for you.
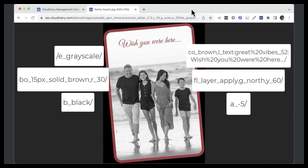
Here are just a few examples of some popular use cases that you can accomplish on the fly by combining Cloudinary transformations. Click each image to see the URL parameters applied in each case:
 Convert format, round,
change aspect ratio & crop to face,
add outlines & shadows
 Place, style, and format
image and text layers
 Apply special effects like
 cartoonify and brightness,
rotate to any angle
Overview
Cloudinary allows you to easily transform your images on the fly to any required format, style and dimension, and apply effects and other visual enhancements. You can also optimize your images to deliver them with minimal file size alongside high visual quality for an improved user experience and minimal bandwidth. You can do all of this by implementing dynamic image transformation and delivery URLs. Your transformed images are then delivered to your users through a fast CDN with optimized caching.
With image transformations, you can:
- Deliver images using the image format that fits your needs.
- Resize and crop your images to the required dimensions using different scaling and cropping techniques, or use our smart cropping techniques, including face-detection or auto-gravity for cropping to focus on the most relevant parts of a photo.
- Generate a new image by layering other images or text on your base image.
- Apply a variety of effects, filters, and other visual enhancements to help your image achieve the desired impact.
The other pages in this guide provide details and use-case examples on the various types of image transformations you can apply to your images.
The Transformation URL API Reference details every transformation parameter available for both images and videos.
- Usage limits for uploading, transforming and delivering files depend on your Cloudinary plan. For details, check the Account tab in your Cloudinary Console Settings.
- For additional information on how your overall account usage is calculated (including storage and bandwidth), see the Cloudinary Pricing page and this KB article.
- You can set your email preferences to receive notifications regarding your account usage.
Quick example
Below you can see the transformation URL and corresponding SDK code for generating an image with several transformation parameters applied:
- Scales and tightly crops the image to fit into a 200px x 200px square, centering on the auto-detected face:
/c_thumb,g_face,h_200,w_200/ - Rounds the corners to a circle:
/r_max/ - Converts and delivers the image in the best transparent format for the requesting browser. For example, webp or avif:
/f_auto/
Transformation URL syntax
Your Cloudinary media assets are accessed using simple delivery HTTP or HTTPS URLs, which are then delivered to users via a worldwide fast CDN. The URL contains the public ID of the requested asset plus any optional transformation parameters. The public ID is the unique identifier of the asset and is either defined when uploading the asset to Cloudinary, or automatically assigned by Cloudinary (see Uploading Assets for more details on the various options for specifying the public ID).
Generating transformation URLs with Cloudinary SDKs
Cloudinary's SDKs automatically build the transformation URL for you. They allow you to continue working in your preferred developer framework and also provide helper methods to simplify building image tags and image transformation URLs.
Transformation URL structure
The default Cloudinary asset delivery URL has the following structure:
| element | description |
|---|---|
| cloud_name | A unique public identifier for your product environment, used for URL building and API access. Note: Paid customers on the Advanced plan or higher can request to use a private CDN or custom delivery hostname (CNAME) to customize the domain name used for your delivery URLs. |
| asset_type | The type of asset to deliver. Valid values: image, video, or raw.
|
| delivery_type | The storage or delivery type. For details on all possible types, see Delivery types. |
| transformations | Optional. One or more comma-separated transformation parameters in a single URL component, or a set of chained transformations in multiple URL components (separated by slashes). When the transformation URL is first accessed, the derived media file is created on the fly and delivered to your user. The derived file is also cached on the CDN and is immediately available to all subsequent users requesting the same asset. |
| version | Optional. You can include the version in your delivery URL to bypass the cached version on the CDN and force delivery of the latest asset (in the case that an asset has been overwritten with a newer file). For simplicity, the version component is generally not included in the example URLs on this page. For details, see Asset versions. |
| public_id | The unique identifier of the asset, including the folder structure if relevant. |
| extension | Optional. The file extension of the requested delivery format for the asset. Default: The originally uploaded format or the format determined by f_auto, when used. |
In the most general case of simply delivering images that were uploaded to your Cloudinary product environment without any transformations, the delivery URL will be in the format:
https://res.cloudinary.com/<cloud_name>/image/upload/<public_id>.<extension>
For example, delivering the image with a public ID of: leather_bag_gray, from the demo product environment in jpg format:

The following shows an example of delivering the same image, this time with transformation parameters applied, so that the image is scaled down and then cropped to fill a 250px square (aspect ratio of 1:1 = 1.0) and then a light blue border is applied:

Transformation URL tips
- For customers with a Custom delivery hostname (CNAME) - available for Cloudinary's Advanced plan and above - the basic image delivery URL becomes:
https://<custom delivery hostname>/image/upload.... - You can convert and deliver your image in other supported image formats by simply changing the image format file extension. For details, see Delivering in a different format.
-
You can append an SEO-friendly suffix to your URL by replacing the
image/uploadelement of the URL withimagesand then appending the desired suffix with a slash (/) after the public ID and before the extension. For example, if you have a cooking image with a random public ID like:abc1def2, you can deliver your image as:https://res.cloudinary.com/<cloud_name>/images/upload/a12345/cooking.jpgFor more details, see Dynamic SEO suffixes.
-
You can also use shortcut URLs when specifically delivering image files using the default
uploadtype. With Cloudinary's Root Path URL feature, the<asset_type>and<delivery_type>elements can be omitted from the URL (they automatically default to the valuesimageanduploadrespectively). For example, the Root Path shortcut delivery URL for the cropped image above is:https://res.cloudinary.com/demo/c_crop,h_200,w_300/sample.jpg
Transformation URL video tutorial
The following video provides a quick demonstration of how dynamic transformation URLs work with both images and videos.
Tutorial contents
Delivery types
The delivery type element of the URL provides an indication about the way the asset will be delivered, although in most cases, the delivery type value is determined at the time that the asset is stored in Cloudinary.
The following delivery type values are supported:
| Delivery type | Description | Learn more |
|---|---|---|
| upload | The default delivery type for uploaded assets. In most cases, this delivery type indicates that the asset is publicly available. However, there are options you can use to restrict access to assets with an upload delivery type. This includes strict transformations and access mode settings) |
Upload API |
| private | The URL for the original asset can be accessed only with a signed URL. Transformed versions of the asset are publicly available (unless strict transformations are also defined). | Uploading private assets |
| authenticated | Both original and transformed versions of the asset can be accessed only with a signed URL or an authentication token. | Uploading authenticated assets Delivering authenticated assets |
| list | Generates a list of assets that have a specified tag. Note: This isn't a delivery type in the classic sense, in that it doesn't relate to an individual asset. However, to use this feature, you specify list in the delivery type element of the URL. |
Client-side asset lists |
| fetch | Enables transforming and delivering remote assets on the fly. | Fetch remote media files |
|
facebook twitter_name gravatar |
Fetches a profile picture from Facebook, Twitter, or other specified social delivery type based on a specified ID or name. | Social media profile pictures |
|
youtube hulu vimeo animoto worldstarhiphop dailymotion |
Delivers a thumbnail image generated from the specified video from a public video site. | Fetching thumbnails of public videos |
| multi | Enables you to deliver a single animated image (GIF, PNG or WebP) from all image assets that have been assigned a specified tag. | Multi method Create animated images Create PDF files |
| text | Enables you to generate an image in your product environment from a specified textual string along with style parameters for use as an image overlay. | Text method |
| url2png | Requires the URL2PNG Website Screenshots add-on. Enables you to generate a screenshot of a website. | URL2PNG Website Screenshots add-on |
| asset |
Relevant only for the Ruby on Rails SDK. Delivers files that were uploaded using the sync_static command. |
Static files |
Parameter types
There are two types of transformation parameters:
- Action parameters: Parameters that perform a specific transformation on the asset.
- Qualifier parameters: Parameters that do not perform an action on their own, but rather alter the default behavior or otherwise adjust the outcome of the corresponding action parameter.
It's best practice to include only one action parameter per URL component.
If you want to apply multiple actions in a single transformation URL, apply them in separate chained components, where each action is performed on the result of the previous one.
In contrast, qualifier parameters must be included in the component with the action parameter they qualify.
- Most qualifiers are optional, meaning the related action parameter can be used independently, but you can add optional qualifiers to modify the default behavior.
- In some cases, an action parameter requires one or more qualifiers to fully define the transformation behavior.
- There are a few parameters that can be used independently as action parameters, but can also be used in other scenarios as a qualifier for another action.
For example, the transformation below includes multiple transformation actions. The qualifier transformations included together with a particular action define additional adjustments on the transformation action's behavior:

In this transformation:
- The aspect ratio, gravity, and width qualifiers control the way the thumbnail crop action will be performed.
- The rounding action doesn't have any qualifiers.
- The color qualifier overrides the default color of the outline effect action.
- The color qualifier overrides the default shadow effect color, while the x and y qualifiers adjust its placement.
Transformation flags
Transformation flags alter default transformation behavior. In some cases, they alter the default behavior of the transformation URL as a whole. In other cases, they alter the behavior of one or more specific transformation parameters that must be used together in the same URL component.
In general, tens of flags are available that can alter delivery and format, cropping and positioning, overlays, metadata and color profiles, as well as PDF and text behaviors, just to name a few.
For example:
fl_attachment alters the normal behavior of the overall transformation. Instead of delivering an asset in a web page, it causes the transformed media file to be downloaded as an attachment. This flag can be used independently of other transformations.
fl_relative modifies the way overlay resize parameters are evaluated. This flag can only be used in conjunction with the overlay (
l_) parameter.fl_layer_apply tells Cloudinary to apply all chained transformations, until a transformation component that includes this flag, on the last added overlay or underlay asset instead of applying them on the base asset. This flag acts as an indicator to close the layer section of the transformation, similar to a closing bracket. Placement definitions for how the layer should be applied, such as gravity and offsets are also defined in the component with this flag.
For details on all available transformation flags, see the flag section of the Transformation Reference.
Generating secure HTTPS URLs using SDKs
For backward compatibility reasons, some of Cloudinary's earlier SDK major versions generate http URLs by default. When using one of these SDKs, you'll generally want to instruct the SDK to generate https URLs by setting the secure parameter to true globally as part of your SDK configuration. However, you can also pass the secure option locally in each transformation operation.
The following example shows only the SDKs and library versions that require passing secure = true to generate HTTPS:

- For SDK major versions first released in 2020 or later, the
secureparameter istrueby default. - For more details on configuring the SDK of your choice, see the relevant SDK guide
Verbose vs non-verbose syntax
Some transformation parameters with multiple options offer two alternative syntaxes for defining the option values:
-
Verbose, unordered: Each option of the transformation (whether required or optional) is specified in the verbose format
name_valueand each option is separated by a colon (:) or semicolon (;) depending on the transformation.The options can be specified in any order, and you only need to include those that you want (or are required) to define.
With this syntax, you can also choose to specify only the options for which you don't want to use default values and default values will be applied for the others.
- Non-verbose, ordered: Transformation options are specified only by values, and must be entered in the pre-defined option order for that transformation. All values from the syntax to the left of the value you want to supply must also be entered.
Transformations that support both verbose and non-verbose URL syntax are indicated as such in the Transformation Reference. When both are supported, SDKs always output the verbose syntax.
Verbose vs non-verbose example
The theme effect supports the color and photosensitivity options, but you can specify them in a different order using verbose syntax. For example:
e_theme:photosensitivity_110:color_black
However, when using non-verbose syntax, you must specify the parameters in order. Therefore, even if you only want to change the default behavior of the photosensitivity (last) option, you must still specify the value to use for the color (first) option:
e_theme:black:110
Asset versions
The version component is an optional part of Cloudinary delivery URLs that can be added to bypass the CDN cached version and force delivery of the newest asset. Cloudinary returns the value of the version parameter as part of every upload response, and the returned url and secure_url parameters also include the version component, which represents the timestamp of the upload.
- Delivering the URL without a version value will deliver the cached version on the CDN if available or will request the latest version from Cloudinary if not cached (or when the cached version expires).
- Delivering the URL with a version will deliver the cached CDN version only if the cached version matches the requested version number. Otherwise, it will bypass the cached CDN version and immediately request and deliver the latest version from Cloudinary.
Example image delivery URL without version:
Example image delivery URL with version:
invalidate parameter to true while uploading a new version of an asset. This invalidates the previous version of the media asset throughout the CDN. Note that it usually takes between a few seconds and a few minutes for the invalidation to fully propagate through the CDN. Using a new version value in a URL takes effect immediately, but requires updating your delivery URLs in your production code. For details on invalidating media assets, see Invalidating cached media assets on the CDN.
Chained Transformations
Cloudinary supports powerful transformations that are applied on the fly using dynamic URLs. You can combine multiple transformation actions together as part of a single delivery request, e.g., crop an image and then add a border to it.
In general, it's best practice to chain each transformation action in your URL as a separate component in the chain.
To support chained transformations, Cloudinary's transformation URLs allow you to include multiple transformation components, each separated by a slash (/), where each of the transformation components is executed on the result of the previous one. Cloudinary's SDKs can apply multiple transformation components by specifying the transformation parameter and setting it to an array of transformation maps.
Examples:
-
Three chained transformations: fill to a 250px square, then round to a circle, and deliver in the optimal transparent format:

-
Five chained transformations: Fill to a 250*400px portrait, then rotate the result by 20 degrees, then add a brown outline to the rotated image, and optimize the resulting image to deliver with the best compression that gives good visual quality and in the optimal transparent format:

Named Transformations
A named transformation is a pre-defined set of transformation parameters that has been given a custom name for easy reference. Instead of applying each of the required transformations separately to an asset, you can apply a single named transformation to apply all the transformations defined for it. This makes it easy to:
- Reuse transformations on multiple assets
- Shorten complex transformation URLs
- Hide the details of a transformation in your delivery URL.
- Simplify the enabling/disabling of transformations in Strict Transformations mode.
Named transformations can include other named transformations, which allows you to define a chain of transformations to run on multiple assets more easily.
Named transformations are required for baseline transformations, which save processing time and cost by avoiding regeneration of the baseline part of the transformation.
You can create and manage named transformations via the API or in the console UI using the Transformation Builder.
Once the named transformation has been defined, you can transform an asset with the transformation parameter (t for URLs) and the name of your named transformation. For example t_instagram-auto-crop.
You can include user-defined variables in your named transformations, and then pass the value for the user-defined variable into the transformation from an external source. This enables creating a named transformation 'template' with a lot of flexibility.
For example, you could define a complex named transformation that includes a text overlay as a named transformation, using a user-defined variable for the text string value.
You can also set named transformations as transformation templates, which you can apply as templates in the Media Library so that you can preview how assets will look with different named transformations applied.
For more details, see user-defined variables. For a use-case example demonstrating named transformations with user-defined variables, see Named transformation with a user-defined variable.
- Keep in mind that not all transformations support all asset types and formats. Applying a named transformation to an asset of an unsupported type or format will fail and return a 404 error. You can check whether you can use the parameters in your named transformation for both images and videos in the transformation reference. You can also check the supported formats for transformations.
- Before you update the transformation parameters of an existing named transformation that's already used in production, make sure you're aware of all existing instances. To mitigate risk, when you update the parameters of an existing named transformation (via the Console UI or API), existing derived assets using the named transformation are not automatically invalidated and regenerated.
If you're sure you want to apply the new definition to any already derived assets with that named transformation, you must specifically invalidate those transformations or otherwise modify the other parameters in that delivery URL, so that the asset will be re-derived using the new definition on next request.
Tip: You can use the regen_derived CLI command to invalidate and then regenerate derived assets after updating the definition for a named transformation. - Before you delete an existing named transformation, make sure you aren't using that transformation in production. When you delete an existing named transformation via the Console UI or API, and if there are fewer than 1000 existing derived assets using that named transformation, they're automatically invalidated (and will return a
404error on the next request).
If there are 1000 or more such derived assets, the delete request fails with a403error indicating that your named transformation hastoo many derived resourcesortoo many dependent transformations(when the derived assets use the named transformation in combination with other parameters).
Creating named transformations
You can create a named transformation programmatically or using the Transformations UI in your Cloudinary console:
To create a named transformation programmatically, use the Transformations Admin API method. The following example defines a named transformation called small_profile_thumbnail that uses automatic cropping to resize assets to the required size for a particular application's thumbnail display:
curl \
  -d 'transformation=w_100,h_150,c_fill,g_auto' \
  -X POST \
  https://<API_KEY>:<API_SECRET>@api.cloudinary.com/v1_1/<CLOUD_NAME>/transformations/small_profile_thumbnail
For more details and examples, see the Create Transformation method in the Admin API Reference.
To create a named transformation using the UI: Expand the Transform and Customize section, accessible from the Console Product Navigation menu.
From here, there are a few ways to create a named transformation:
- Start with a transformation from the Transformations Center as a template and experiment with it in the UI, click Use it to open the Transformation Builder and refine the transformation to your needs, and finally save it with your chosen name.
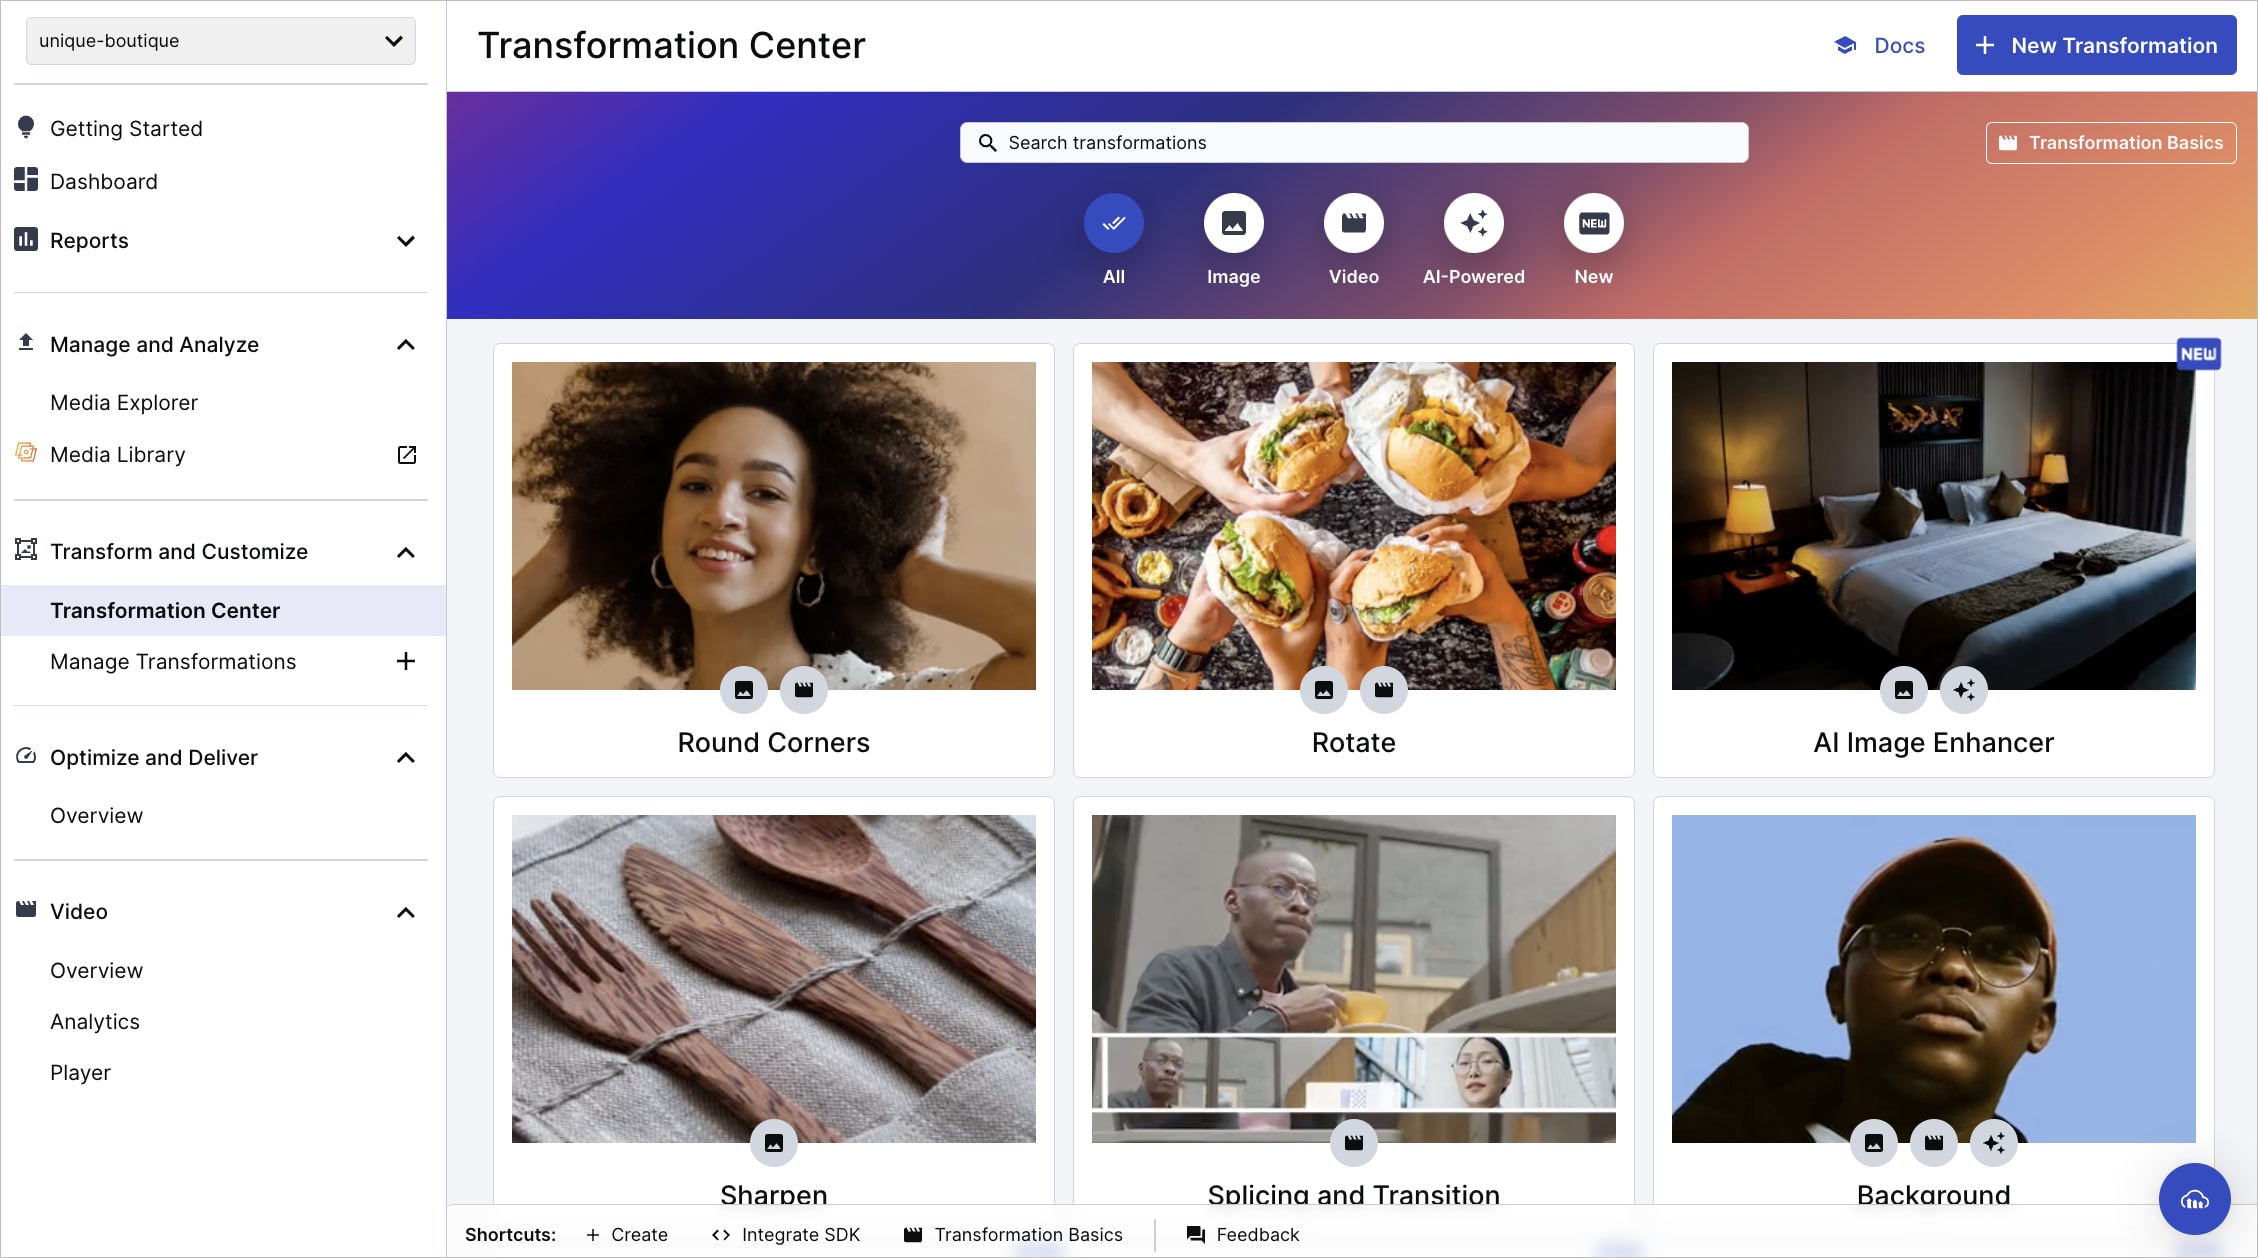
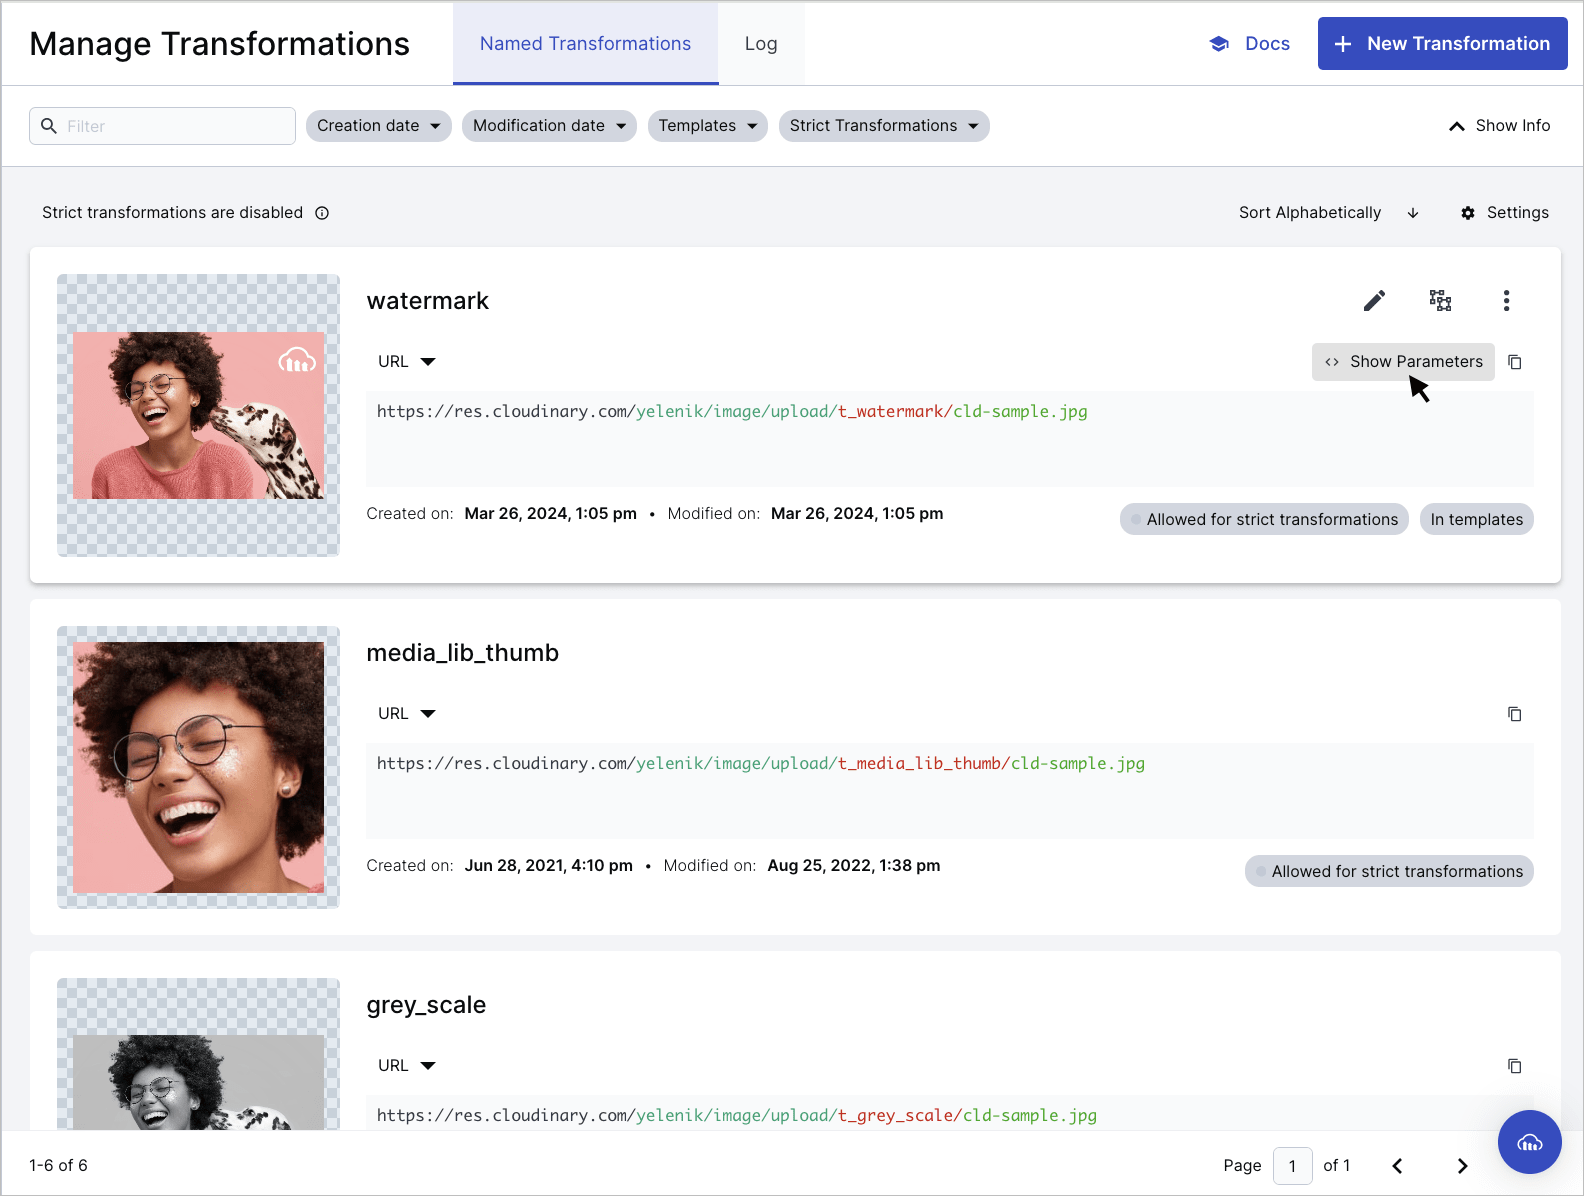
- View all your delivered dynamic transformations (those that were generated and delivered on the fly) in the Log tab of the Manage Transformations page and save one of those with your chosen name.
- Create a new transformation from scratch using the Transformation Builder (Beta) and save with your chosen name. Open the builder by clicking New Transformation from either of the Transform and Customize pages.
- Must contain valid UTF8 characters only
- Must not contain more than 1024 characters
- Must not contain any of these characters:
\,/,?,&,#,%,.,,,<,>
Once you've saved your named transformations, you can view a list of them on the Named Transformations tab of the Manage Transformations page of the Console. From here, you can edit, copy, or enable/disable Strict Transformations.
To access the page:
- If you have the new App Console, the page is part of the Image product: Image > Manage Transformations .
- If you have the Classic Console, go to Programmable Media > Manage Transformations.
You can also select to include a transformation as a preset so that it can be applied to an asset in the Download Options tab of the asset management drill-down page (available for Assets Enterprise plans).
Transformation Builder
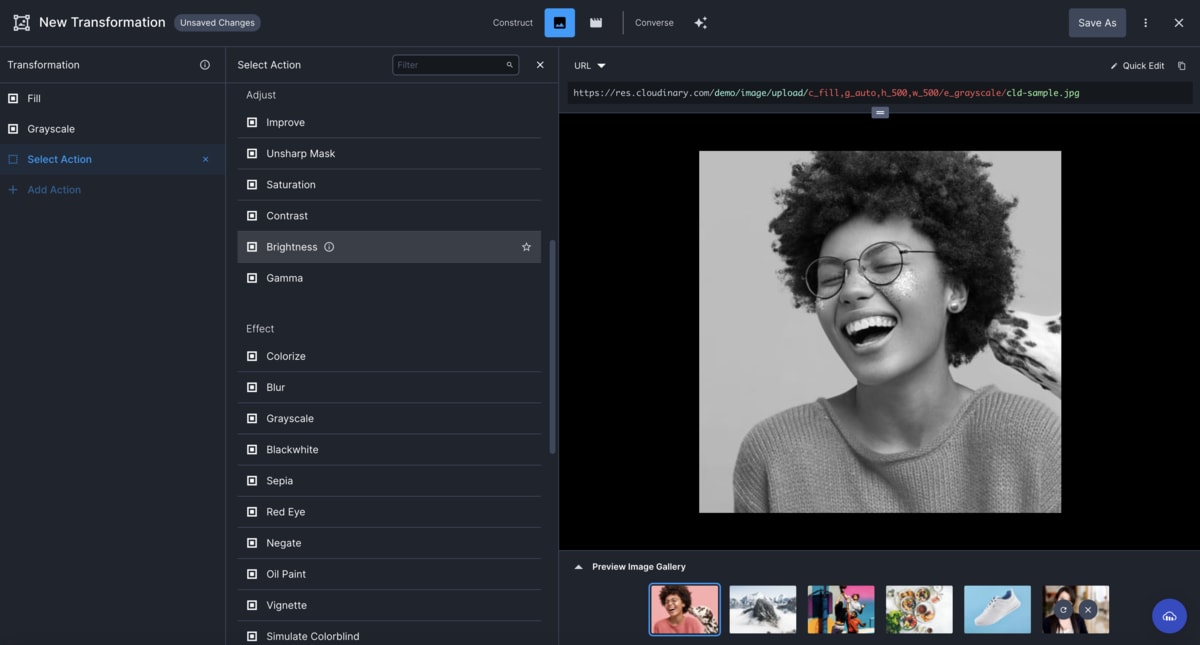
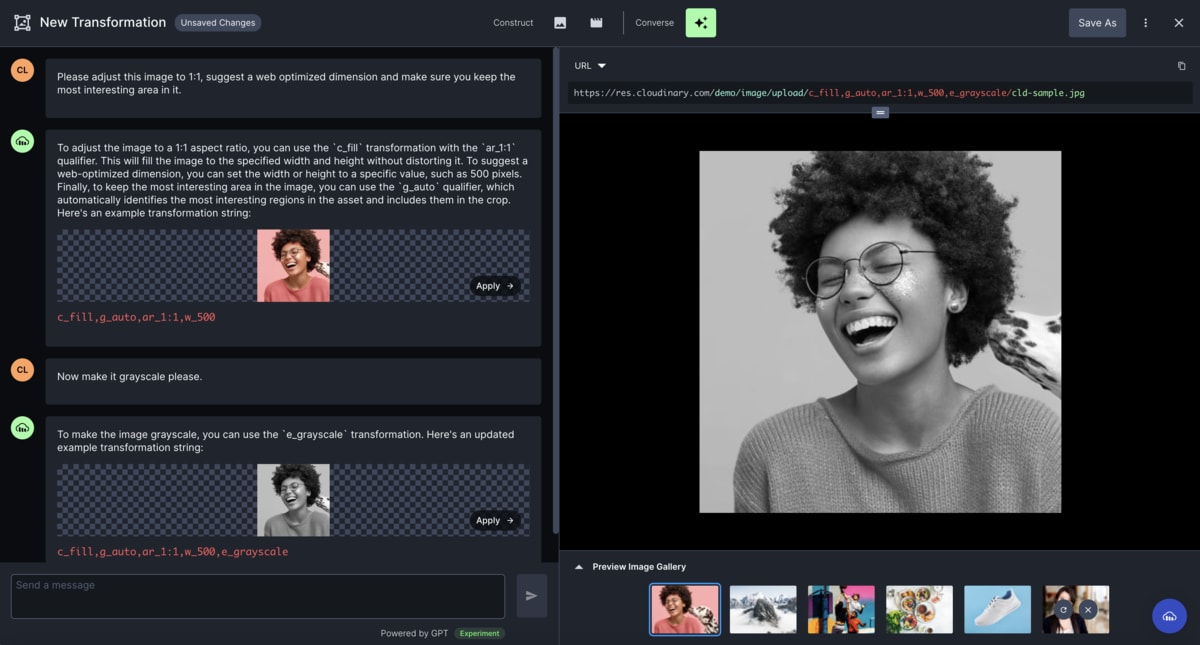
The Cloudinary Transformation Builder is the UI for creating and saving your transformations in a simple and easy to use way. The Transformation Builder has two modes of operation:
- Construct: Build transformations manually by selecting and configuring transformation actions.
- Converse: Build transformations using AI chat by describing the transformation with natural language.
Transformation Builder video tutorial
Watch this video for a quick introduction to the Transformation Builder:
Tutorial contents
Create a transformation using the Builder
To create a new transformation, open the Builder and select the mode to use.
Construct mode
The Transformation Builder in construct mode provides:
- A simple and intuitive UI for selecting and configuring transformation actions - easily discover actions and parameters as you build.
- Transformations built as a series of self-contained actions so you can see the results of each one as you apply it.
- URL and SDK code ready to copy and paste directly to your code.
- The ability to update the default preview image to something from your own product environment.
- Quick edit functionality, to easily add transformations using URL syntax.
The builder supports most common transformation actions. If the transformation action you are trying to apply is not listed, you can add an Additional Transformation action and use transformation URL syntax to specify your transformation. Alternatively, you can switch to the legacy editor to create your transformation.
Converse mode
The Transformation Builder in converse mode provides:
- An AI-powered conversational interface to describe the transformation you want to create with natural language.
- Iterative prompts to continue the conversation and perfect the transformation.
- URL and SDK code ready to copy and paste directly to your code.
- The ability to update the default preview image to something from your own product environment.
- The conversational interface is powered by GPT.
- It answers questions related to Cloudinary transformations only.
- The use of AI, including the GPT model, means that answers may not be 100% accurate.
- We have implemented mechanisms to improve the accuracy of results for transaction-related queries compared to using ChatGPT directly.
- We are continually learning and making improvements as this technology progresses.
Named transformation examples
Below are two quite different named transformations applied to the same lighthouse_reflection image:
-
fill_square_400 is defined as
ar_1:1,c_fill,g_auto,w_400, which fills (scales and crops) the image into a 400*400 square, automatically focussing on the most interesting area of the image:
-
rounded_cartoonified_frame is defined as
e_cartoonify/r_max/co_rgb:add8e6,e_outline:30/b_rgb:add8e6, which applies a cartoonify effect, rounds it to a circle or oval shape, adds a light blue outline around the oval so that the image won't be touching the edges of the frame, and then fills the transparent background with the same color as the outline:
Chaining named transformations
You can chain named transformations before or after other transformations. For example, here the oval_cartoonified_frame named transformation is applied after a grayscale effect:

You can also chain multiple named transformations. For example, to chain the named transformations defined in the previous section:

Chaining transformations can create long URLs, so instead you could define a named transformation that includes a chain of other transformations, including other named transformations. For example, we can create a named transformation that is a composite of the named transformations from the section above.
It is now simple to specify a single named transformation and apply it to any asset:

Where the fill_circle_cartoon named transformation is defined as: t_fill_square_400/t_rounded_cartoonified_frame.
Limitations of named transformations
Automatic format
The automatic format transformation parameter (f_auto) is not effective if used in named transformations.
When f_auto is used in a delivery URL, the CDN layer determines the best format to deliver. If this parameter is hidden in a named transformation then it is not visible to the CDN.
You can use f_auto together with a named transformation by chaining the components, for example, t_square/f_auto.
Automatic quality
The automatic quality transformation parameter (q_auto) is effective in named transformations, except in one situation.
When q_auto is used in a delivery URL and the browser sets the Save-Data HTTP header to on in the request, q_auto is translated to q_auto:eco at the CDN level. If this parameter is hidden in a named transformation then it is not visible to the CDN, so the default level is applied, q_auto:good.
To accommodate this situation, you may prefer to use q_auto together with a named transformation by chaining the components, for example, t_square/q_auto.
q_auto:best, then there are no concerns as there are no dependencies on the CDN level.Learn more: Save-Data support
Automatic width
The automatic width transformation parameter (w_auto) is not effective if used in named transformations.
For responsive image solutions, w_auto must appear directly in the delivery URL. If it's hidden within a named transformation, it won't be visible to the client or CDN (depending on the solution) and therefore won't take effect.
See Responsive images using the cloudinary-core JS library and Responsive images using client hints.
Automatic device pixel ratio
The automatic device pixel ratio transformation parameter (dpr_auto) is not effective if used in named transformations.
For responsive image solutions, dpr_auto must appear directly in the delivery URL. If it's hidden within a named transformation, it won't be visible to the client or CDN (depending on the solution) and therefore won't take effect.
See Responsive images using the cloudinary-core JS library and Responsive images using client hints.
Named transformation video tutorial
Watch this video tutorial to learn how to create re-usable named transformations with the Cloudinary Transformation Builder UI.
Tutorial contents
Embedding images in web pages using SDKs
You access uploaded images or their derived transformations with URLs. These URLs can be used as the <src> of the <img> tags in your HTML code or other frontend functions to deliver your media assets.
But the easiest way to deliver them is using Cloudinary's framework SDKs to automatically generate transformation URLs and embed them using HTML image tags. The SDKs offer two main helper methods: the URL helper and the image tag helper.
Cloudinary URL helper method
The Cloudinary URL helper method (e.g., cloudinary_url in the Ruby/Rails SDK) automatically generates the image source URL itself. For example, using the URL helper method to return the URL of the leather_bag_gray image, padded to a scaled width and height of 300 pixels with a blue background for the padding:
This SDK code outputs the URL:
Cloudinary image tag helper method
By default, the Cloudinary image tag helper method (e.g., cl_image_tag in Ruby on Rails) automatically generates an HTML image tag including the image source URL.
The following shows the same transformations as above, but this time using the image tag to generate a complete HTML image tag.
This SDK code will output the following HTML code:
<img
  src="https://res.cloudinary.com/demo/image/upload/c_scale,h_100,w_300/sample.jpg"
>
The Cloudinary Image Tag helper method allows you to not only specify any Cloudinary transformations parameters, but also to specify regular HTML image tag attributes (e.g., alt, title, width, height). For example, using the Image Tag helper method to create an HTML image tag for the sample image, with the 'alt' attribute set to "A sample photo" and the 'className' attribute set to "Samples":
cloudinary.image("sample.jpg", {alt: "A sample photo", className: "Samples"})For more information on these SDK helper methods, see the transformation documentation in the relevant SDK guide.
For example:
cloudinary.image("sample.jpg", { transformation: { raw_transformation: "w_400,c_pad" }})Image format support
Images can be uploaded to Cloudinary in various formats (input formats), and you can easily convert these images to other formats for displaying in your web site or application (output formats). Examples of situations where you might want to change the delivered image format:
- Delivering JPEG images for photos that you want to load quickly (or AVIF or WebP if your users are on a browser that supports these).
- Delivering a PNG (24 bit) for high quality illustrations with a transparent background.
- Delivering an image where the original format is not supported for delivery by the browser. For example, you could deliver a Photoshop (.psd) image as a JPEG.
Delivering in a different format
You can convert and deliver images in any supported image format by specifying the required format as the file extension of the delivery URL. When using an SDK to build the URL, you can either append the extension of the new format to the asset's public ID or use the format parameter.
For example, to display the uploaded woman-business-suit JPEG image as a PNG:

You can combine other image transformations with format conversion. For example, to deliver the same image as a PNG, but this time removing the background and converting the image to grayscale:

Another option for changing the format is to explicitly call the fetch_format transformation parameter (f in URLs). This can be useful in situations where you cannot change the file extension, for example, when fetching remote assets that already have a different file extension (format) as part of their URLs.
For example, to fetch a remote image from Wikimedia in PNG format, and deliver the image in JPEG format (also scaled down to a width of 400 pixels):

- If the file extension is omitted in a delivery URL, the file is delivered in the originally uploaded format unless a specific format (or the auto format is requested using the
fetch_format(f_) transformation parameter). - When converting from one multi-page or multi-layer image format (PDF, GIF, WebP, TIFF, PSD) to another, only the first 100 pages are included in the new file.
- SDK major versions with initial release later than January 2020 have a
formattransformation parameter, instead of thefetch_formatparameter. See f (format) in the transformation reference.
f_auto
You can take advantage of Cloudinary's automatic format selection (f_auto) transformation to automatically deliver images in the most optimized format that's supported by the requesting browser.
For example, if you deliver a JPEG image with f_auto, Cloudinary might generate and deliver the image as a WebP, AVIF or JPEG XL file, depending on the requesting browser and your account setup. The f_auto algorithm will similarly deliver the best format when the original asset is a PNG (with or without transparency), an animated GIF, etc.
For details, see Automatic format selection (f_auto) and Tips and considerations for using f_auto.
Supported image formats
The table below summarizes the supported image formats.
| Format | Extensions | Supported for Upload 1 | Supported for Transformations 2 |
|---|---|---|---|
| 3DS | .3ds | Yes | Yes |
| AI (Adobe Illustrator) | .ai | Yes | Yes |
| animated AVIF | .avif | No | Yes 6 |
| animated GIF | .gif | Yes | Yes |
| animated PNG | .png | Yes | Yes |
| animated WebP | .webp | Yes | Yes |
| AVIF | .avif | Yes | Yes 6 |
| BMP | .bmp | Yes | Yes |
| BW (Browzwear file) | .bw | Yes | Yes |
| DjVu | .djvu | Yes | No |
| DNG (Digital Negative) | .dng | Yes | No |
| EPS (Encapsulated PostScript) | .ps, .ept, .eps, .eps3 | Yes | Yes |
| FBX (Filmbox) | .fbx 7 | Yes 5 | Yes |
| FLIF (Free Lossless Image Format) | .flif | Yes | Yes |
| GIF | .gif | Yes | Yes |
| GLB (Binary glTF) | .glb | Yes | Yes |
| glTF (GL Transmission Format) | .gltf | Yes 5 | Yes |
| HEIF | .heif, .heic | Yes | Yes |
| ICO | .ico | Yes | Yes |
| InDesign | .indd | Yes | Yes 3 |
| JPEG | .jpg, .jpe, .jpeg | Yes | Yes |
| JPEG 2000 | .jp2 | Yes | Yes |
| JPEG XR (JPEG eXtended Range) | .wdp, .jxr, .hdp | Yes | Yes |
| JXL (JPEG XL) | .jxl | Yes | Yes |
| OBJ | .obj 7 | Yes | Yes |
| Yes | Yes | ||
| PLY | .ply | Yes | Yes |
| PNG | .png | Yes | Yes |
| PSD (Photoshop Document) | .psd | Yes | Yes 4 |
| Raw image files | .arw, .cr2, .cr3 | Yes | No |
| SVG | .svg | Yes | Yes |
| TARGA (Truevision TGA) | .tga | Yes | Yes |
| TIFF | .tif, .tiff | Yes | Yes |
| U3MA (Fabric file) | .u3ma | Yes 5 | Yes |
| USDZ | .usdz | Yes | Yes |
| WebP | .webp | Yes | Yes |
- If a format is supported only for upload, then the delivery URL enables a user to download the original file in its original format, but you cannot apply transformation parameters.
-
If a format is supported for transformations, but the browser doesn't support displaying that format, you can either provide the transformation URL with the original format to enable users to download the file, or you can provide the URL with a different delivery format specified. In that case, Cloudinary applies the transformation to the original format and then converts the image to the requested format for delivery. For example, you could provide a transformation URL for a Photoshop (.psd) image and specify
jpgas the delivery format to display the resulting transformation in the browser. -
You can transform an InDesign file if you deliver it as an image format, such as
jpgorpng, but you cannot deliver aninddfile with transformations. -
All layers are flattened into a single image if no
pageparameter is specified. - Certain 3D file formats are supported for upload within a zip file containing other required files for the model, such as textures etc. Some transformations, such as converting to a video or image, are supported on the bundle as a whole. No transformations are currently supported on its contained assets. For further information see Transformations on 3D models.
-
Images converted to AVIF and animated AVIF from other formats use additional quota. Images exceeding 30 megapixels cannot be encoded to AVIF - ensure you scale them down first. You can request to enable AVIF and animated AVIF as possible formats to be delivered when automatic format selection (
f_auto) is used. - You cannot convert a 3D model of a different format to FBX or OBJ.
Image transformation types
This page walked you through the basics of how image transformations work. The rest of the pages in this guide provide details, use cases and examples of the many different types of transformations you can apply to the images you deliver:
| Transformation type | Description |
|---|---|
| Resizing and cropping | Resize (crop and/or scale) images server-side before delivering them. |
| Placing layers on images | Place image, text, or other layers on (or under) existing assets to generate new and customized creations on the fly. |
| Effects and enhancements | Apply a huge variety of effects, filters, and other artistic enhancements to any image. |
| Background removal | Use AI to remove image backgrounds. |
| Generative AI transformations | Use generative AI to transform your images, naturally extending dimensions, removing and replacing objects, generating new backgrounds and more. |
| Face-detection based transformations | Transform an image based on detected faces. |
| Animated image transformations | Create animated images from multiple images in your product environment, convert them to video, convert between animated formats, and apply animation-specific transformations. |
| 3D models | Learn how to perform transformations on 3D models. |
| Conditional transformations | Apply a transformation only if a specified condition is met. |
| User-defined variables and arithmetic transformations | Use arithmetic expressions and variables to add additional sophistication and flexibility to your transformations. |
| Custom functions | Inject a remote, lambda or WebAssembly function and apply the result as a transformation. |
Delivering optimized and responsive media
In addition to changing the appearance of your media assets by transforming them, you can also use Cloudinary URLs and a variety of parameters to control how they are delivered:
| Topic | Description |
|---|---|
| Optimizations | Deliver your media assets with the smallest possible file size while maintaining visual quality, saving bandwidth and improving performance for your website. This includes automatic quality and format selection optimizations (q_auto and f_auto). |
| Responsive images | Deliver your images to perfectly fit any device, viewport size, orientation, or resolution at any pixel density (DPR). Upload a single high resolution image and let Cloudinary automatically transform it. |
|
Deliver remote media files and Social media profile pictures |
Grab media assets from anywhere on the web or pull social media profile pictures from a variety of popular social media networks, including support for on-the-fly transformation and optimized delivery via a CDN. |
| PDF and Photoshop files | Deliver content from assets with multiple pages or layers such as PDFs or Photoshop files, including options for delivering or transforming only selected pages or layers. |
| Access control | Control who can access your media, both the originals and transformed assets, including enabling strict transformations, using signed delivery URLs, uploading images as private or authenticated, and using access_control or access_mode to control who can access an asset without adjusting the URL. |
| Advanced URL delivery options | Take advantage of advanced options that make your URLs more SEO-friendly, deliver assets using private CDNs or multi-CDN solutions, use custom delivery hostnames (CNAMEs) for your URLs, define custom favicons, work with asset versions, and more. |
Create new images
Cloudinary provides a variety of methods to create new assets in your product environment.
| Topic | Description |
|---|---|
| Animated images | Create a single animated image from multiple image assets, where each asset is used as a single frame of the resulting animated image. |
| PDF files from images | Create a PDF from multiple image assets, where each asset is used as a single frame of the resulting PDF file. |
| Sprites | Create and deliver sprite images with their corresponding CSS based on all images with a specified tag. |
| Image collages | Create image collages from multiple image assets, combined together in a specific layout, with spacing and colors defined in a template. |
| Images from text | Create an image of a given textual string and customize the look & feel of the resulting image with various font, color and style parameters. |
- Transformation URL API Reference: Details all available transformation parameters. Icons indicate which parameters are supported for each asset type.
- Video transformations guide: Provides details and examples of the transformations you can apply to video assets.
- Transformation basics video tutorial: Watch a quick video on how these dynamic transformation URLs work.
- How are transformations counted?: Details how various transformations are counted for monthly billing.


