 Ask AI
How do I offset the crop position when cropping around a face?
Last updated: Nov-09-2026
x_ and y_ don't offset the crop when you use c_crop with g_face. To adjust the position or tightness of a crop around a face, use one of these approaches:
-
Zoom in or out:
ar_1.0,c_crop,g_face,z_0.5 -
Shift the face within the crop:
c_thumb,g_face,h_600,w_600/c_crop,h_400,w_400,x_150,y_0
The question
"I'm cropping around a face with c_crop,g_face and adding x and y to offset the crop, but the face stays in the center. How do I move the crop position relative to the face?"
You want a crop that's based on the detected face, but with the face placed off-center, or with more or less of the surrounding area visible.
The original asset
The examples use this photo of a woman:

Why x and y don't offset the crop
With c_crop, the x and y parameters set fixed coordinates for the top-left corner of the crop rectangle. When you also set g_face, the gravity and the explicit coordinates conflict, and the x and y values don't offset the crop relative to the detected face. The face stays centered regardless of the values you specify.
For example, this transformation crops around the detected face:

Adding x_50,y_50 or x_200,y_200 doesn't shift the crop from the face:

For details on how x and y work with c_crop, see fixed coordinates cropping.
The solution
There are two ways to get the result you want. Choose one, depending on what you need to adjust:
- Option 1: Adjust the crop tightness with zoom: for simple adjustments to how much of the surrounding area is visible. The face stays centered.
- Option 2: Shift the face with a two-step crop: for precise directional control over where the face appears in the image.
Option 1: Adjust the crop tightness with zoom
To control how tightly the crop frames the face without shifting its position, combine z (zoom) with c_crop,g_face. Values less than 1.0 zoom out, showing more context around the face. Values greater than 1.0 zoom in for a tighter crop.
c_crop, z has no effect if you set both w and h. Either omit w and h, or use an aspect ratio with ar, for the zoom to take effect. c_thumb accepts z even when w and h are both set.With c_crop and an aspect ratio
Using ar_1.0 keeps a square crop while z adjusts how much surrounding area the crop includes:
Default zoom (ar_1.0,c_crop,g_face):
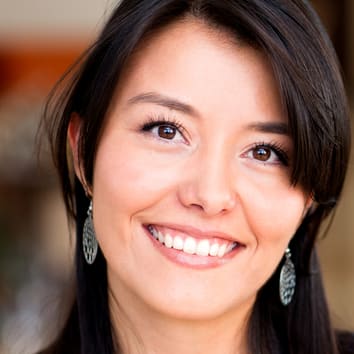
Zoomed out (ar_1.0,c_crop,g_face,z_0.5):

Zoomed in (ar_1.0,c_crop,g_face,z_1.5):

With c_thumb for resolution-independent sizing
When you need a specific output size that's the same across source images of different resolutions, use c_thumb. The z parameter keeps working even with w and h set:
Default zoom (c_thumb,g_face,h_300,w_300):

Zoomed in (c_thumb,g_face,h_300,w_300,z_2.0):

For more details, see c_crop, c_thumb, and z (zoom) in the Transformation Reference.
Option 2: Shift the face with a two-step crop
If you need precise directional control over where the face appears in the final image, use a two-step crop:
-
First step: Use
c_thumbwithg_faceand dimensions larger than your target size. Thec_thumbcrop mode scales the cropped region proportionally to the detected face, so the technique gives consistent results across source images of different resolutions. -
Second step: Apply
c_cropwithxandyto shift the crop window within the region from step 1.
Because the second c_crop operates on the already-cropped intermediate image, x and y work as expected, since there's no gravity to conflict with.
In the second step, x and y set the top-left corner of the final crop rectangle within the intermediate image:
-
Increasing
x: Moves the crop window to the right, which shifts the face to the left in the output. -
Increasing
y: Moves the crop window down, which shifts the face up in the output.
This example first extracts a 600x600 region proportional to the detected face, and then crops a 400x400 region with different offsets.
x=0, y=0 (top-left of the face region):

x=150, y=0 (face shifted left):

x=0, y=150 (face shifted up):

- Make the first crop dimensions large enough to give the second step room to adjust. If the first crop is too tight, there's no space to nudge.
- The difference between the first and second crop dimensions determines how far you can shift. For example, a 600x600 first crop with a 400x400 second crop allows up to 200 pixels of adjustment in each direction.
- Experiment with the
xandyvalues to find the right positioning for your image.
Focus on objects other than faces
If your images feature subjects other than people (products, animals, or specific objects), replace g_face with object-detection gravity from the Cloudinary AI Content Analysis add-on. Use g_auto:<object> (for example, g_auto:cat), or g_<object> (for example, g_cat), with any of the techniques on this page to center and nudge the crop around that subject.
Related topics
Error
Rate this page:
